- Posts: 1242
- Thank you received: 125

ACMOC Membership Benefits
- FREE quarterly magazine filled with content about antique Caterpillar machines
- FREE classified listings
- ACMOC store discounts and specials
- Full Bulletin Board Access
- Marketplace (For Sale/Wanted)
- Technical Library
- Post attachments
$44 /year ELECTRONIC
$60 /year USA
$77 /year International
- Forum
- Antique Caterpillar Machinery Owners Club
- DISCUSSION
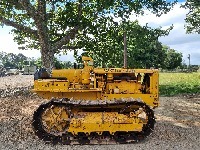
- Found a one owner 1950 D2 5U with 3940 original hours
Found a one owner 1950 D2 5U with 3940 original hours
Please Log in or Create an account to join the conversation.
Toby, thank you so much for taking some of your precious time to look at the pics and to reply, you are an inspiration to me (and to many others on this site I'm sure). I'm never going to have the time or resource to complete a machine to your standard so I'm very very excited to get one in such awesome condition to start with! I'll certainly be cleaning and polishing when it arrives (along with replacing all oils, fluids, and filters) and will post some more pics once I have. I will need to dismantle the back end to tighten up the pinion bearings (as you have explained in detail in your videos) but that's a small job compared to tackling frozen blocks, rusty main and steering clutches!Nice D2! You don't find them in any better condition than that, I bet with just a bit of cleaning that original paint would be shining almost like new again. Sheet metal all there, undercarriage with tons of life left, drawbar looks good, brake pedals like cheese graters - looks like a very well cared for machine. Some guys put tons of money and even more time into getting them back to this condition...lol
Please Log in or Create an account to join the conversation.
Please Log in or Create an account to join the conversation.
Cheers,
Neil
Pittsford, NY
Please Log in or Create an account to join the conversation.
Please Log in or Create an account to join the conversation.
BTW.. That's a nice tractor!
Please Log in or Create an account to join the conversation.
Neil, as usual, you are dead right, in this case, I knew exactly what I wanted to say but didn't have the right terminology in my head. Thanks for correcting me. It is the bevel gear shaft (you might say the rear 'axle') that is loose as it is moving laterally when pressure is put on it by the steering clutch lever (exactly like Toby's 5J1113). I remember reading a CAT service bulletin posted on here recently (I can't seem to find it now) that it was a known problem with the D2's mainly used for Ag work with a lot of straight line pulling and they instructed to remove enough shims behind the bearing caps to adjust the pre-load back to what it should be, being sure to check in the backlash and mesh of the teeth with the pinion at the same time. I'm sort of hoping that if the bevel gear bearings are Timkens and in still good condition that readjusting the pre-load will be sufficient as I understand you need to press off the bevel gear to replace them. Someone might re-post the bulletin if they have it to hand, if so, it would be hugely appreciated.Mark, is it the pinion bearing or the bevel gear bearings that are loose? I think you said the "other" steering lever moves. If so, then the bevel gear bearings are loose. I did mine a couple of years ago. It's a bit newer than yours but I think you have the same arrangement, which is that there are shims behind the bearing cages that you can use to adjust preload. Regardless of the condition of the bearings, I would replace them because they're relatively inexpensive, particularly compared to the time it would take you to go back in there to swap them out later. The pinion bearing design was upgraded in a later series run than mine, which means your pinion is the same as mine, which is a regular roller bearing. Later models in the 5U series had conical bearings which are better suited to the load imposed by the pinion/bevel gear arrangement. So, if you have to pull the pinion out (you don't if you're just replacing the bevel gear bearings), then replace that bearing too. You'll want to go through the appropriate preload, contact point, and backlash adjustment procedure for that gear set
Please Log in or Create an account to join the conversation.
Thanks Delta! The 5U series (up until somewhere in 1953) had exactly the same track frame and track length as the 5J series and the top roller was an optional extra. After Serial #5U13237 when Cat extended the chassis to make the main clutch fully serviceable I think the top roller became standard with the longer track frames. This is a 1950 model (Serial #5U5373) so before that change.I thought that only the J series D2s did not have top rollers; Didn't all the D2 U series tractors have top rollers?
BTW.. That's a nice tractor!
Please Log in or Create an account to join the conversation.
Bearings were Bower. They were good ones that's for sure, but I replaced them anyway because they were stained, and I replace all bearings if I don't know the history (which means every single bearing on my 5U has been replaced except a little tiny one on the end of the governor shaft). You'll need a pair of new seals too. Mine were Chicago Rawhide (CR) and super solid construction.
Nut locks 2B1738 qty 8, seals 4B3675 qty 2, cup 1B3978 qty 2, cone 1B3890 qty 2 - I picked up the cones from Florin. I had to put Speedisleeves on the seal surfaces 99175 SKF Speedi-Sleeve 1.75, in case you need to replace any of that stuff, although do check your parts catalog in case you have different numbers
Cheers,
Neil
Pittsford, NY
Please Log in or Create an account to join the conversation.
Thanks SO much for your detailed help Neil, it is truly appreciated. I don't have a parts book for the tractor as of yet, so I would have been scratching around for those part numbers! I presume you are meaning there is no way of forcing the bearing shells out of the covers? If I'm going to replace the bearings I probably would shrink them out using a bead of weld (like Toby shows in his videos), but I can't see why I would need to put a hole through the shims (if I was to make a forcing screw hole) aren't the shells separate from the bearing cone, rollers, and inner race? I thought they simply could be withdrawn from the shaft including the seal once the 4 bolts are removed, at least that's the way Toby does it in the video below (unless the 5U series is different of course)Other thing to know about the bearing cages is that they do not come with a forcing screw thread, which is a big miss on Cat's part. You could try drilling the flange and threading it. Might have to mess with it a bit to get the tap started. The flange is only maybe 5/16 thick so you wouldn't have to drill much. I tapped mine out from the inside of the bevel shaft compartment because I wanted to see what it looked like apart before drilling any holes. In any case, whatever way you get it out, you can certainly drill forcing screw holes afterwards, and add some oversize holes in the shims where the forcing screw would go. One hole on each side diametrically opposite.
Bearings were Bower. They were good ones that's for sure, but I replaced them anyway because they were stained, and I replace all bearings if I don't know the history (which means every single bearing on my 5U has been replaced except a little tiny one on the end of the governor shaft). You'll need a pair of new seals too. Mine were Chicago Rawhide (CR) and super solid construction.
Nut locks 2B1738 qty 8, seals 4B3675 qty 2, cup 1B3978 qty 2, cone 1B3890 qty 2 - I picked up the cones from Florin. I had to put Speedisleeves on the seal surfaces 99175 SKF Speedi-Sleeve 1.75, in case you need to replace any of that stuff, although do check your parts catalog in case you have different numbers
Caterpillar D2 #5J1113 Chassis Rebuild Ep.9: Pulling The Bevel Gear Off The Shaft - Ring The Bell!!!
Please Log in or Create an account to join the conversation.
- Forum
- Antique Caterpillar Machinery Owners Club
- DISCUSSION
- Found a one owner 1950 D2 5U with 3940 original hours
ACMOC
Antique Caterpillar Machinery Owners Club
1115 Madison St NE # 1117
Salem, OR 97301
support@acmoc.org
"I became a member recently because the wealth of knowledge here is priceless."
- Chris R
"I also joined a year ago. had been on here a couple of times as a non-member and found the info very helpful so I got a one year subscription (not very expensive at all) to try it out. I really like all the resources on here so I just got a three year. I think its a very small price for what you can get out of this site."
- Jason N


