
- Posts: 83
- Thank you received: 0

ACMOC Membership Benefits
- FREE quarterly magazine filled with content about antique Caterpillar machines
- FREE classified listings
- ACMOC store discounts and specials
- Full Bulletin Board Access
- Marketplace (For Sale/Wanted)
- Technical Library
- Post attachments
$44 /year ELECTRONIC
$60 /year USA
$77 /year International
- Forum
- Antique Caterpillar Machinery Owners Club
- DISCUSSION
- New Caterpillar Twenty Logging Special Model Project
New Caterpillar Twenty Logging Special Model Project
10 years 11 months ago #101407
by cbensch
www.bufordsbarncars.com
This email address is being protected from spambots. You need JavaScript enabled to view it.
Replied by cbensch on topic New Caterpillar Twenty Logging Special Model Project
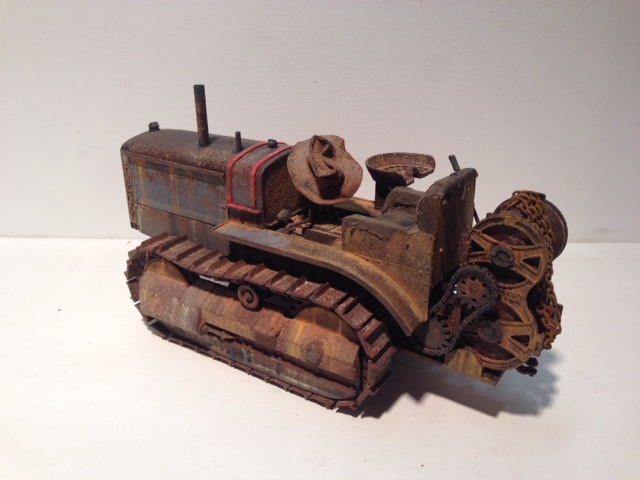
I figured I may as well throw this in too. I replaced the plastic smoke stack and what I would imagine is the air intake tube with brass tubing. The brass has a thinner wall and is more realistic than the plastic. I also designed, printed and installed the winch lever bracket and lever (made from brass). I have some light wet sanding to do but overall not much at all...
Another teaser: Primed and ready for weathering!
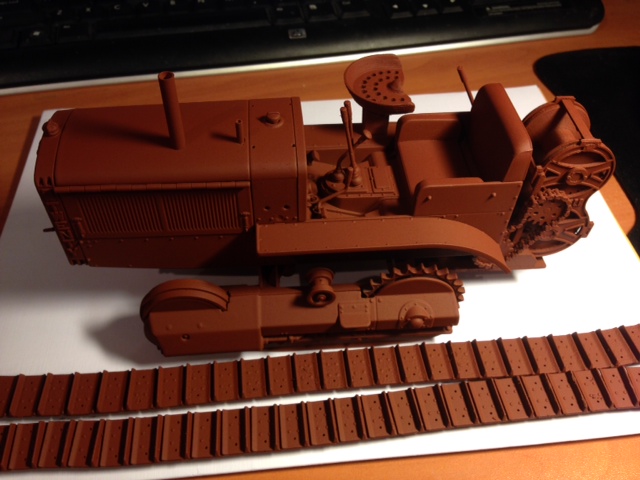
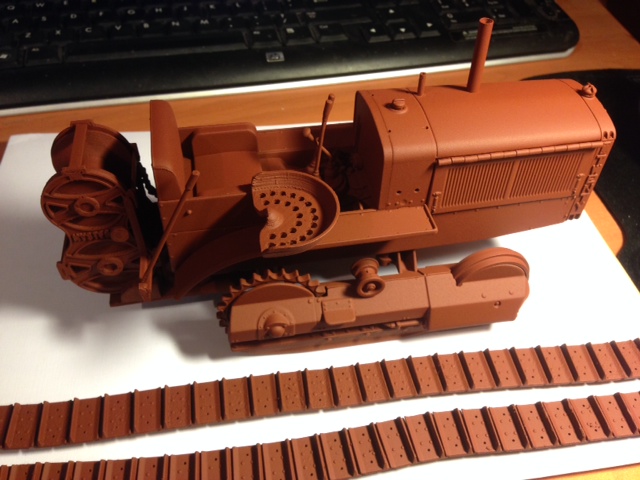
Another teaser: Primed and ready for weathering!
www.bufordsbarncars.com
This email address is being protected from spambots. You need JavaScript enabled to view it.
Please Log in or Create an account to join the conversation.
10 years 11 months ago #101408
by MARCOTEN
Replied by MARCOTEN on topic New Caterpillar Twenty Logging Special Model Project
wow !!the model is "coming to live"
i just edit my last other post here with a few more pictures of the double drum winch.
i will go tru my photo archives to see a nice extra for the cat 22 model.
i am in for the solo winch if possible! it would make an outstanding model of it !!
you can contact me for details and price please on :
<a href="This email address is being protected from spambots. You need JavaScript enabled to view it." target="_blank">This email address is being protected from spambots. You need JavaScript enabled to view it.
thanks
Please Log in or Create an account to join the conversation.
10 years 11 months ago #101421
by edb
Replied by edb on topic Implement Seat
Hi Calvin,
seat is a winner Mate.
Top job on it and the detail of weathering you are going to is beyond any I have seen before--love the rusty surface finish--had a 2 Ton with one half of each track like that--sat in sand for years.
Cheers,
Eddie B.
seat is a winner Mate.
Top job on it and the detail of weathering you are going to is beyond any I have seen before--love the rusty surface finish--had a 2 Ton with one half of each track like that--sat in sand for years.
Cheers,
Eddie B.
Please Log in or Create an account to join the conversation.
10 years 10 months ago #101435
by cbensch
www.bufordsbarncars.com
This email address is being protected from spambots. You need JavaScript enabled to view it.
Replied by cbensch on topic New Caterpillar Twenty Logging Special Model Project
I'm humbled fellas. Thank you. ")
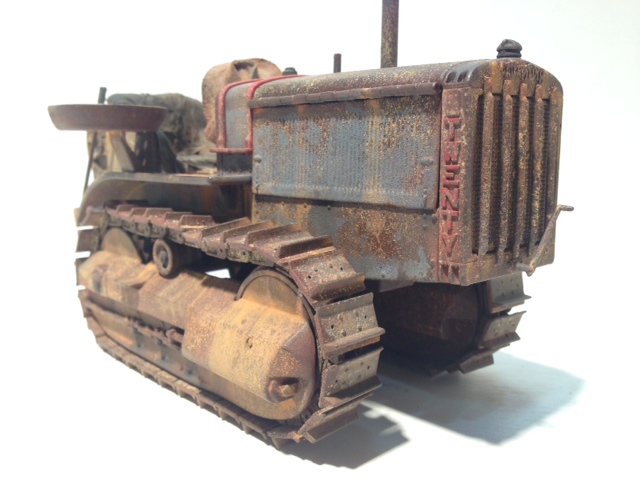
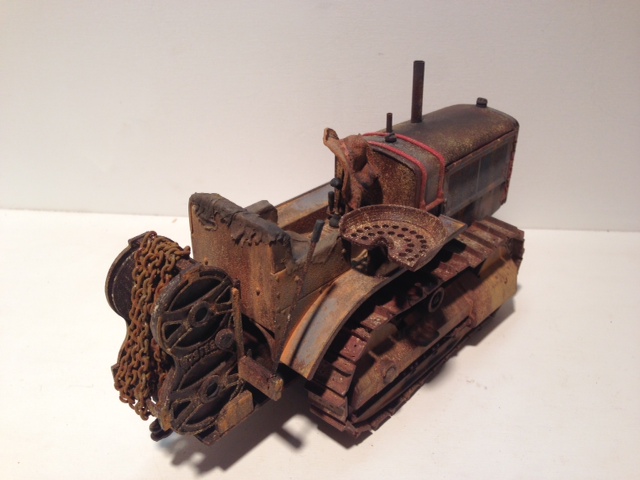
The tracks have always been a primary focus on my models and I wanted to really make the Twenty's tracks pop. Recall earlier that I am going for a look similar to those Cats sitting at Oregon's Camp 18. Using an image I found on Flickr of a Thirty at the Camp as a prototype ( www.flickr.com/photos/thumpr455/8146507944/ ) I adjusted my typical weathering process to reflect the rust expected from Oregon's humid environment. Therefore you'll find the general deep rust with a slight layering of mineral deposits and minute organic growth. I'm actually quite pleased with the outcome; they're no longer dull and gray.
I hope you also enjoy them.
Weathered tracks:
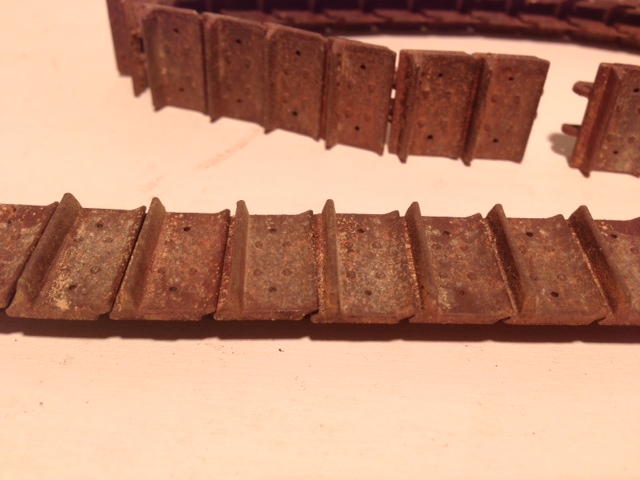
www.bufordsbarncars.com
This email address is being protected from spambots. You need JavaScript enabled to view it.
Please Log in or Create an account to join the conversation.
10 years 10 months ago #101437
by MARCOTEN
Replied by MARCOTEN on topic New Caterpillar Twenty Logging Special Model Project
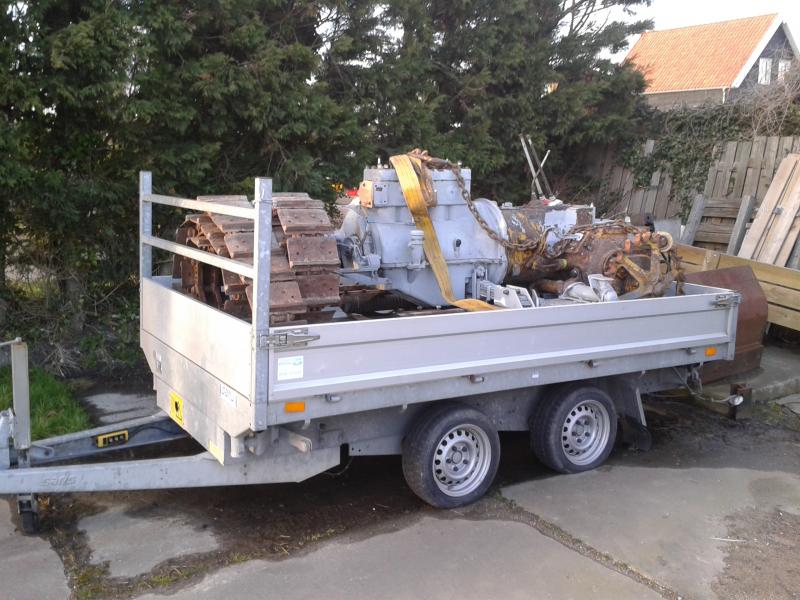
yes look perfectly "bad" like my track from my fifteen, those 2 tracks are now on the trailer to bring them to the sandblaster on monday haha!! i will post a picture later .
whats the technique behind this using sand or clay in your paint mixture and spray it on??
whats the technique behind this using sand or clay in your paint mixture and spray it on??
Please Log in or Create an account to join the conversation.
10 years 10 months ago #101438
by cbensch
Yes I'd love to see a picture!
The tracks are a composition of auto primer, enamel model paints and a careful selection of organic compounds I specially order from Croatia. There are 23 steps required to get the tracks like this. I know because I had to write them down.
www.bufordsbarncars.com
This email address is being protected from spambots. You need JavaScript enabled to view it.
Replied by cbensch on topic New Caterpillar Twenty Logging Special Model Project
yes look perfectly "bad" like my track from my fifteen, those 2 tracks are now on the trailer to bring them to the sandblaster on monday haha!! i will post a picture later .
whats the technique behind this using sand or clay in your paint mixture and spray it on??
Yes I'd love to see a picture!
The tracks are a composition of auto primer, enamel model paints and a careful selection of organic compounds I specially order from Croatia. There are 23 steps required to get the tracks like this. I know because I had to write them down.
www.bufordsbarncars.com
This email address is being protected from spambots. You need JavaScript enabled to view it.
Please Log in or Create an account to join the conversation.
10 years 10 months ago #101442
by MARCOTEN
Replied by MARCOTEN on topic New Caterpillar Twenty Logging Special Model Project
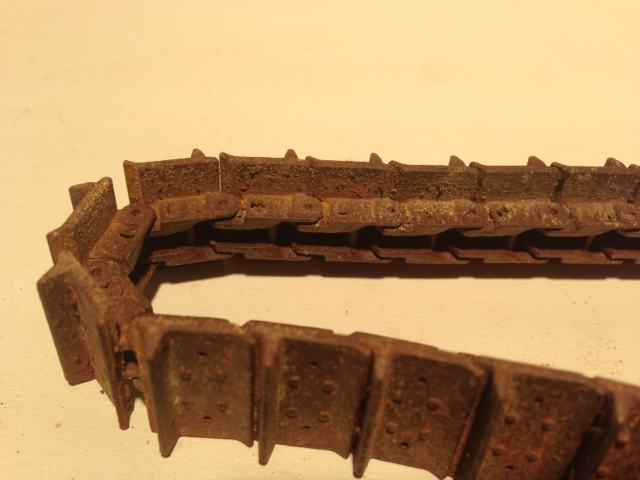
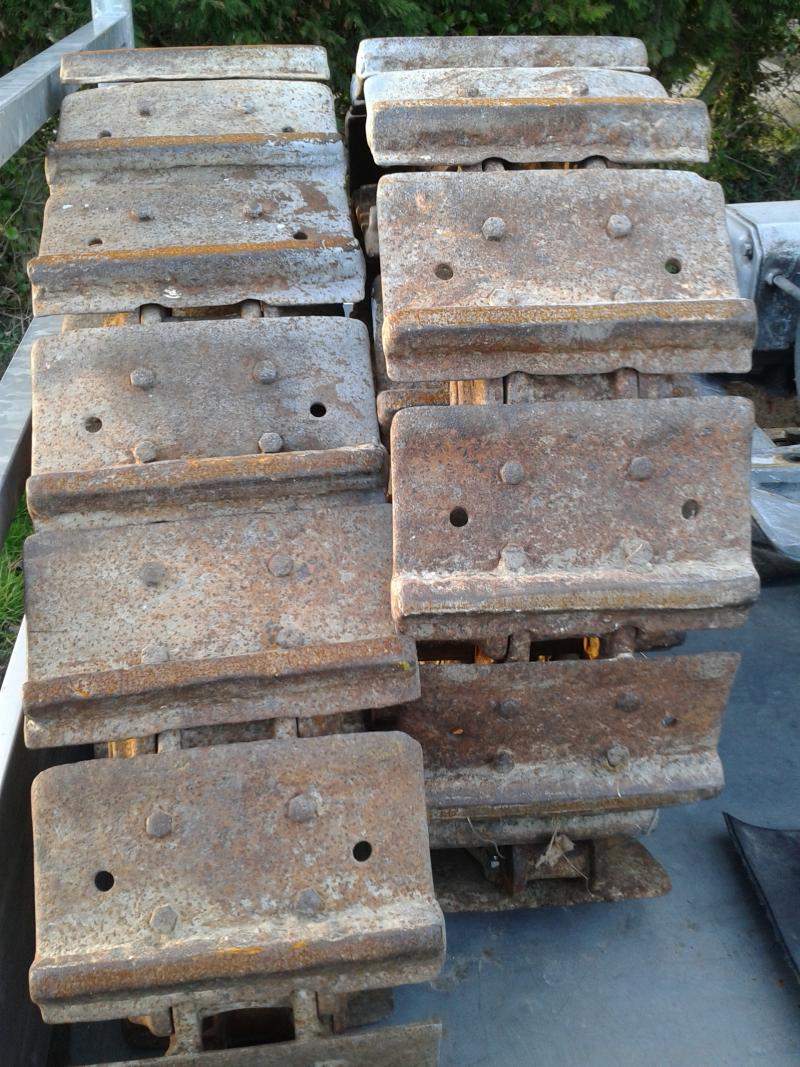
here 2 pictures of the old tracks ready to go on monday for sandblasting!
as you see the grousers were worn out and have been welded up, and by using it they are worn again.
as you see the grousers were worn out and have been welded up, and by using it they are worn again.
Please Log in or Create an account to join the conversation.
10 years 10 months ago #101493
by cbensch
www.bufordsbarncars.com
This email address is being protected from spambots. You need JavaScript enabled to view it.
Replied by cbensch on topic New Caterpillar Twenty Logging Special Model Project
Hey those tracks look like....this!
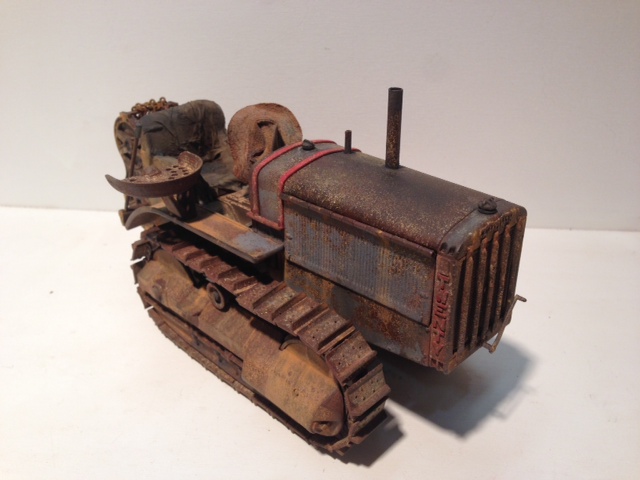
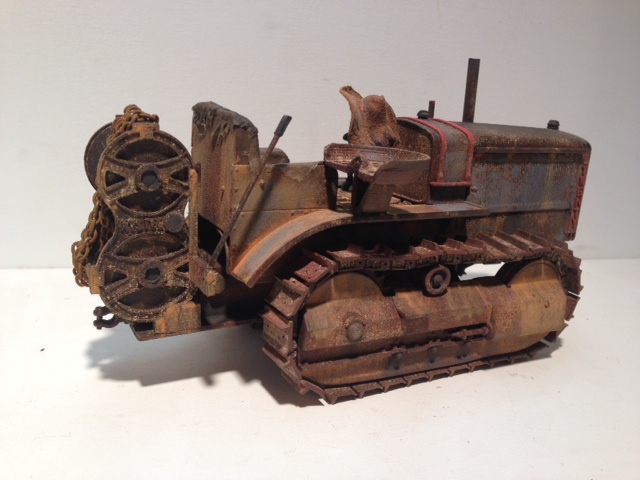
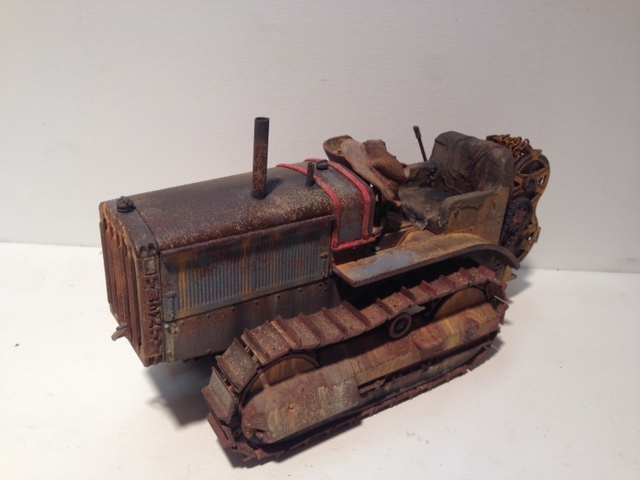
I haven't even touched the engine yet. The top of the model is only fastened with a single screw. And out of all of those little "extras" I had mentioned earlier the only single item you'll notice is the dirty cowboy hat hung over the handles after a full day on the farm. I know you may think it's done, and that I'm nuts (haven't you already figured out that I am.. ) but I have lots and lots left to do. But We're in the home stretch. Thank you again every one for following along, and I hope you are enjoying the thread.
Late addition: I forgot to mention that I had thought I was going to make the seat rotten, with springs sticking out as if the crawler had been sitting in a field for some years. But I've now turned towards a piece of equipment that is in super poor condition cosmetically but still used. So the seat has some "burlap" to cover up the rips, springs etc. that you'd find from an over abundance of usage. This is also a hint-hint for those extras I mentioned.
I haven't even touched the engine yet. The top of the model is only fastened with a single screw. And out of all of those little "extras" I had mentioned earlier the only single item you'll notice is the dirty cowboy hat hung over the handles after a full day on the farm. I know you may think it's done, and that I'm nuts (haven't you already figured out that I am..
) but I have lots and lots left to do. But We're in the home stretch. Thank you again every one for following along, and I hope you are enjoying the thread.Late addition: I forgot to mention that I had thought I was going to make the seat rotten, with springs sticking out as if the crawler had been sitting in a field for some years. But I've now turned towards a piece of equipment that is in super poor condition cosmetically but still used. So the seat has some "burlap" to cover up the rips, springs etc. that you'd find from an over abundance of usage. This is also a hint-hint for those extras I mentioned.
www.bufordsbarncars.com
This email address is being protected from spambots. You need JavaScript enabled to view it.
Please Log in or Create an account to join the conversation.
10 years 10 months ago #101498
by MARCOTEN
Replied by MARCOTEN on topic New Caterpillar Twenty Logging Special Model Project
wow!! looks amazingly real!!
absolute not pikking on your work because its again amazing job you are doing but if i may give a few advices: put back the leather crank strap on the front ( which hold the hand crank in this position ( in real if the hand crank is not in the lether strap, it turn down verticaly by gravity.)
and nr.2 advice is add one more handle for operating the winch as it is a 2 drum winch it has 2 handles , and 2 footbrakes aswell wich you could add.
istead of chains on the winch mabe steel cables on the drum ?
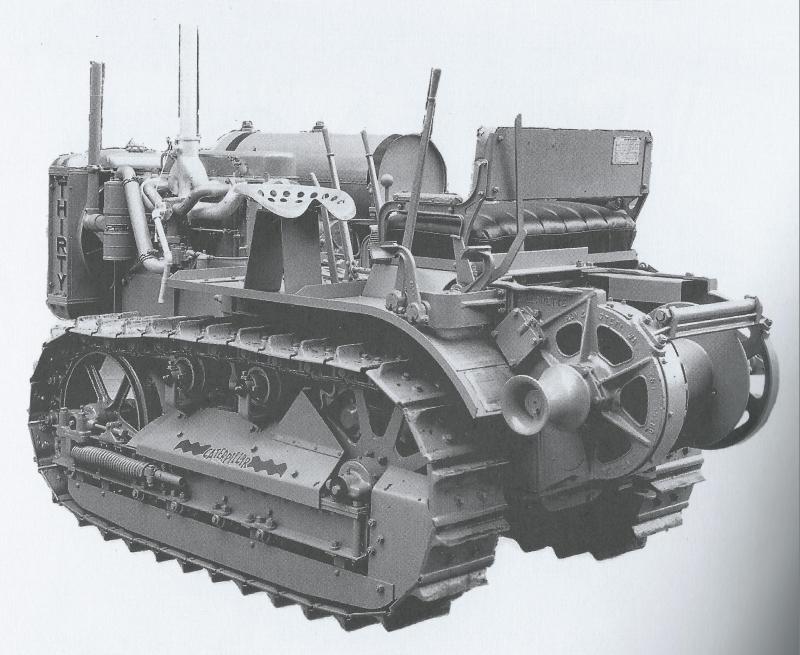
i found one more picture, as you can see a 1 drum winch has 2 handles and 2 footpedals, so a 2 drum winch like your beautyfull model has 3 handles and 3 footpedals:
-per drum (2 in your model) one handle (2 ) and footpedal (2) and
- 1 clutch pedal and 1 handle to put in or out gear.
absolute not pikking on your work because its again amazing job you are doing but if i may give a few advices: put back the leather crank strap on the front ( which hold the hand crank in this position ( in real if the hand crank is not in the lether strap, it turn down verticaly by gravity.)
and nr.2 advice is add one more handle for operating the winch as it is a 2 drum winch it has 2 handles , and 2 footbrakes aswell wich you could add.
istead of chains on the winch mabe steel cables on the drum ?
Attachment WINCH%209224%20CAT%20D8K-01S.jpg not found
i found one more picture, as you can see a 1 drum winch has 2 handles and 2 footpedals, so a 2 drum winch like your beautyfull model has 3 handles and 3 footpedals:
-per drum (2 in your model) one handle (2 ) and footpedal (2) and
- 1 clutch pedal and 1 handle to put in or out gear.
Please Log in or Create an account to join the conversation.
10 years 10 months ago #101500
by cbensch
www.bufordsbarncars.com
This email address is being protected from spambots. You need JavaScript enabled to view it.
Replied by cbensch on topic New Caterpillar Twenty Logging Special Model Project
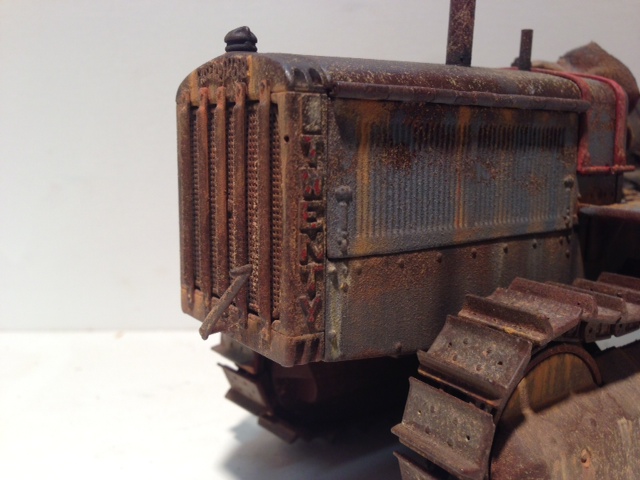
Thanks! I was hoping someone responded to say it was OK. I was getting worried. 
1) The leather strap is sitting next to the yet-to-be-weathered engine. I just haven't gotten there yet.
2) One more handle is doable...and certainly necessary! I could only see a single handle in the original Twenty photo I provided from Classic Dozers so it was one I went with. I have to very carefully remove the other and reprint a few parts. I can add the foot brakes as well. But seriously, who needs a foot brake when you'd be driving backwards anyway?! No wonder these machines are dangerous!
3) The chains will be attached to the end of the steel cabling. I just put them there because the drums looked empty without anything.
I've got time tonight so I'll get on it!
www.bufordsbarncars.com
This email address is being protected from spambots. You need JavaScript enabled to view it.
Please Log in or Create an account to join the conversation.
- Forum
- Antique Caterpillar Machinery Owners Club
- DISCUSSION
- New Caterpillar Twenty Logging Special Model Project
Time to create page: 0.223 seconds
ACMOC
Antique Caterpillar Machinery Owners Club
1115 Madison St NE # 1117
Salem, OR 97301
support@acmoc.org
Become a Member!
"I became a member recently because the wealth of knowledge here is priceless."
- Chris R
"I also joined a year ago. had been on here a couple of times as a non-member and found the info very helpful so I got a one year subscription (not very expensive at all) to try it out. I really like all the resources on here so I just got a three year. I think its a very small price for what you can get out of this site."
- Jason N