- Posts: 1175
- Thank you received: 1

ACMOC Membership Benefits
- FREE quarterly magazine filled with content about antique Caterpillar machines
- FREE classified listings
- ACMOC store discounts and specials
- Full Bulletin Board Access
- Marketplace (For Sale/Wanted)
- Technical Library
- Post attachments
$44 /year ELECTRONIC
$60 /year USA
$77 /year International
Hello Guys!
13 years 2 months ago #63378
by ronm
Replied by ronm on topic Hello Guys!
PO was a real artist, that rebar work there is somethin special...
Please Log in or Create an account to join the conversation.
- Deas Plant.
-

- Offline
- Platinum Boarder
- User
Less
More
- Posts: 6637
- Thank you received: 928
13 years 2 months ago #63388
by Deas Plant.
You have a wonderful day. Best wishes. Deas Plant.
Replied by Deas Plant. on topic There's no need . . . . . . . . . . .
Hi, Ronm.
Now, now, M8. There's no need for sarcasm here. I believe the 'kee-rect' term is 'doing what you can with what you have'. LOL.
Hi, Grader Dude.
I'd suggest starting by checking the ends of the lean wheel bar for slack then go to the ends of the main axle beam and check for slack there. If my memory serves me right, there is a sliding collar connecting the lean wheel drive shaft from the control box the the input shaft on the angle drive box. You can remove the pins and slide that collar back to allow you to check for slack in the angle drive box and the lean wheel drive box without interference from the control box. If the front wheel are vertical when you dis-connect the sliding collar, they should had oughta stay pretty much that way while you test. Mind you, it might be a nuther story if you try to drive it down the road like that.
Let us know what you find. Your answers and any fixes that might be posted may help others with similar problems in the future.
You have a wonderful day. Best wishes. Deas Plant.
Please Log in or Create an account to join the conversation.
- Grader Dude
-
Topic Author
- Offline
- Junior Boarder
- User
Less
More
- Posts: 33
- Thank you received: 0
13 years 1 month ago #63436
by Grader Dude
Replied by Grader Dude on topic Hello Guys!
Thanks as always Deas, I think this thread just might turn into a 12E anthology, allthough I hope I dont have much more work to do on it I have been slowly working on it. I have had the throttle off while working on getting the battery tray situated for my new battery's (enough to jump start a power grid) I outta have some new fan belts to drop in tomorrow and hopefully I can crank her up, the front end doesn't seem too wobbly, though the steering could certainly use some tightening up. I am thinking of removing the anti lean garbage, lift the front axle off the ground and see what happens, if all is well add weight and go from there. I have been slowly but surely going through gear boxes and dropping some oil to check for condition/water. The two gear boxes for the Scarafier seem to have a consistency of pudding w/ extra lumps! I do not have a scarafier on there right now so I am fine with it in there, now knowing at least there is not any water making rust. One of the blade raise/lower boxes did not drain at first, so I wiggled my finger around in it and go some chunks to come out, then some flow, I later found an odd chunk of steel in my drain pan that had once been threaded and defiantly had gotten in a fight with some gears wherever it came from. Okay here are some pictures of things I am currently up against. First, the square tubing used to control the circle rotation and wheel lean boxes are really sloppy and look like they are going to bust at any time, I was thinking weld the cracks on the corners then shim them so they are tight, whadda think?? The other 2 are my rear motor mounts, it looks like someone pulled the engine at some point (The "I" bolts are still in the head) and after that the thing was just welded to the frame, the side that looks like hammered dog shit has not cracked, the other (Right side) has a crack in one of the welds, I am guessing that the way the engine torques is lifting that side and pressing down on the other. As you can see there are holes there already, I was thinking of drilling a hole through the frame and running a bolt, I know not the best, but better then what I have, If you have suggestions on an easy way to integrate some rubber let me know.
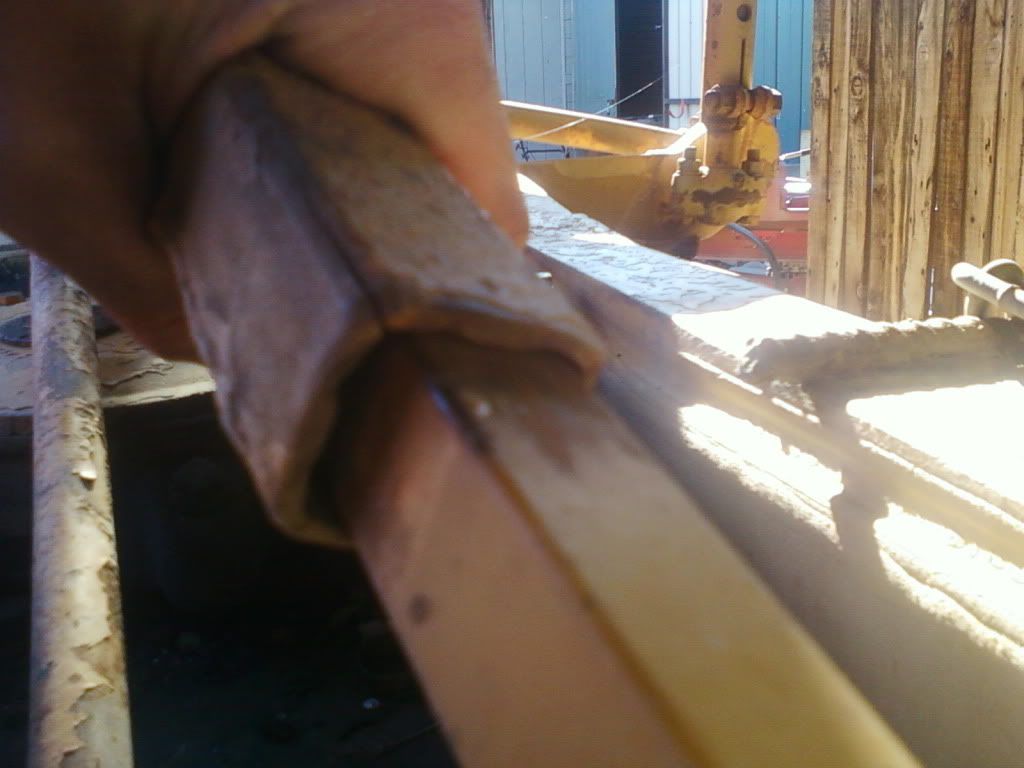
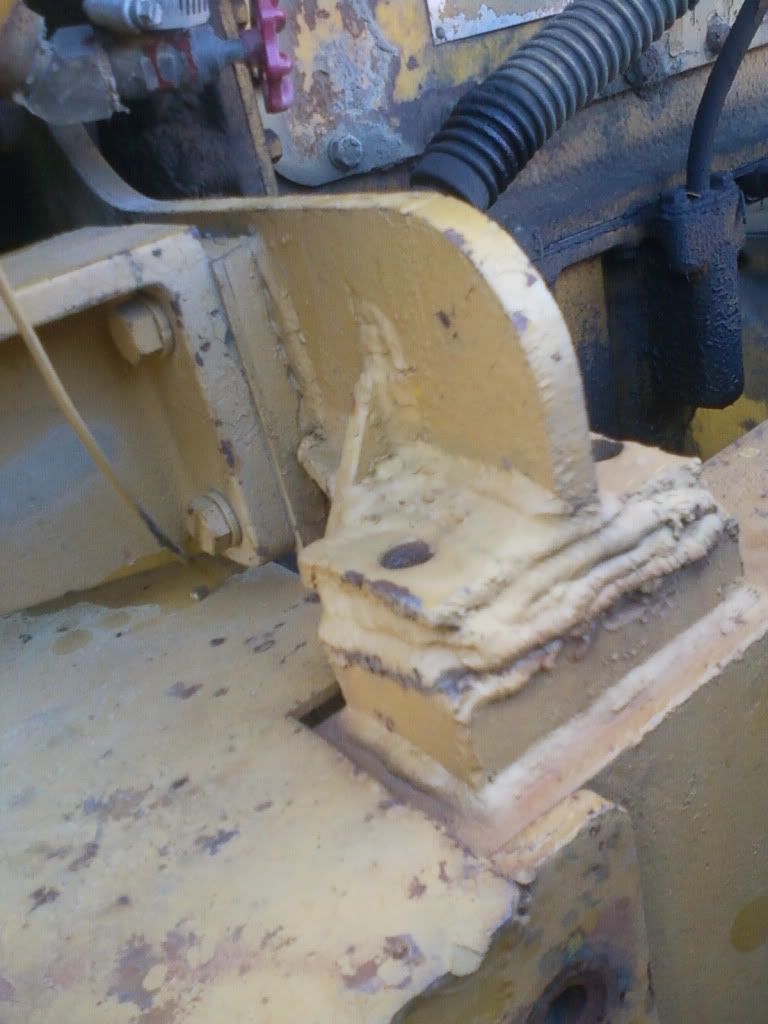
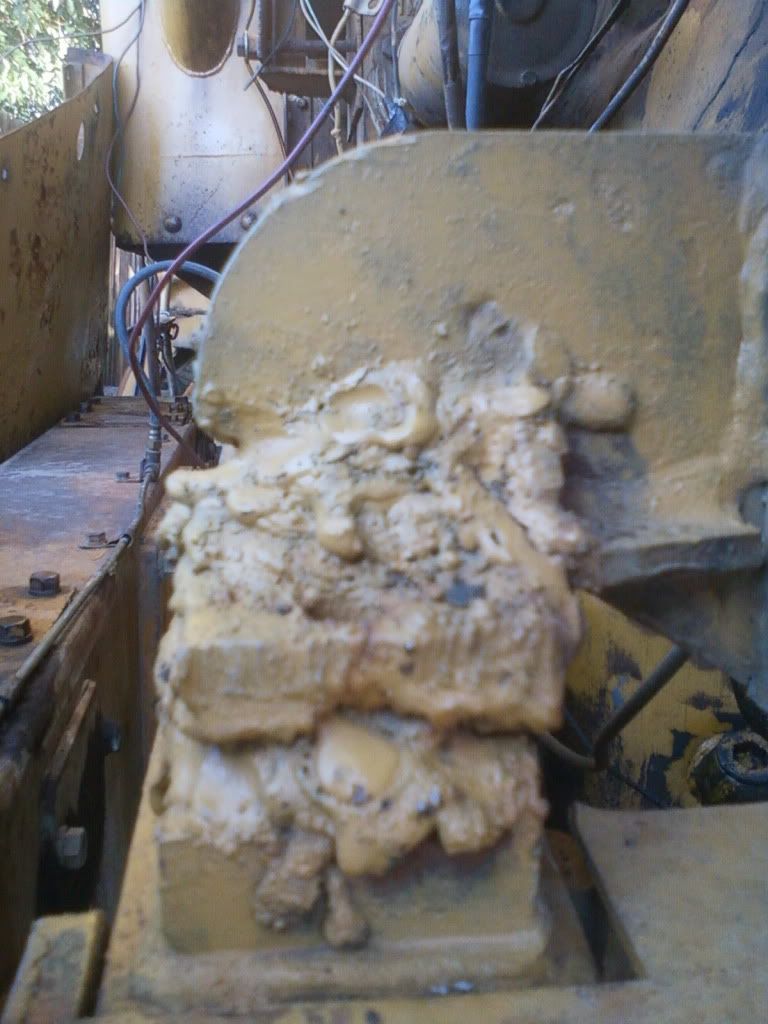
I have been slowly working on it. I have had the throttle off while working on getting the battery tray situated for my new battery's (enough to jump start a power grid) I outta have some new fan belts to drop in tomorrow and hopefully I can crank her up, the front end doesn't seem too wobbly, though the steering could certainly use some tightening up. I am thinking of removing the anti lean garbage, lift the front axle off the ground and see what happens, if all is well add weight and go from there. I have been slowly but surely going through gear boxes and dropping some oil to check for condition/water. The two gear boxes for the Scarafier seem to have a consistency of pudding w/ extra lumps! I do not have a scarafier on there right now so I am fine with it in there, now knowing at least there is not any water making rust. One of the blade raise/lower boxes did not drain at first, so I wiggled my finger around in it and go some chunks to come out, then some flow, I later found an odd chunk of steel in my drain pan that had once been threaded and defiantly had gotten in a fight with some gears wherever it came from. Okay here are some pictures of things I am currently up against. First, the square tubing used to control the circle rotation and wheel lean boxes are really sloppy and look like they are going to bust at any time, I was thinking weld the cracks on the corners then shim them so they are tight, whadda think?? The other 2 are my rear motor mounts, it looks like someone pulled the engine at some point (The "I" bolts are still in the head) and after that the thing was just welded to the frame, the side that looks like hammered dog shit has not cracked, the other (Right side) has a crack in one of the welds, I am guessing that the way the engine torques is lifting that side and pressing down on the other. As you can see there are holes there already, I was thinking of drilling a hole through the frame and running a bolt, I know not the best, but better then what I have, If you have suggestions on an easy way to integrate some rubber let me know.
Please Log in or Create an account to join the conversation.
- Deas Plant.
-
- Offline
- Platinum Boarder
- User
Less
More
- Posts: 6637
- Thank you received: 928
13 years 1 month ago #63439
by Deas Plant.
You have a wonderful day. Best wishes. Deas Plant.
Replied by Deas Plant. on topic Woo Hoo. You Gotta Project.
Hi, Grader Dude.
Firstly, there never wuz any rubber in those engine mounts and it would be a mistake to try to add some. They wuz always solid bolted to the frame. I gotta say that that those 'sparrer-crap' 'bolts' are not original equipment either. Possibly drilling and tapping to original or a slightly larger size might be an option. The existing holes should give you a clue as to the size. They won't drill easy as the original bolts would have been hi-tensile so you will need a GOOD drill bit. A pretty steady hand and a good eye will also be useful, as will some patience.
I think I would be vee-ing the cracks in the drive shaft squares, clamping them with a G-clamp and welding them. You could then take some short lengths of about 1/4" to 3/8" flat bar around 3" long and the same width as the solid square and weld them to the sides of the square tube down near the end, paying particular attention to the corners and filling the gaps between the flat bars at said corners with weld metal. This should have the effect of shrinking the square tube a bit, helping to take up the slack while also strengthening the tube.
Re-building and grinding down the solid square is also an option and may be more effective than shimming. You would need to take into account the distance that the shafts lengthen and shorten during working to make sure that you re-build the necessary areas.
The broken/battered piece of threaded material from the blade lift gear case may be one of the bolts holding the blade lift gear to the shaft. I seem to remember that there are about 8 x 1/2" bolts on each side. You can remove the key from the blade lift arm and the inspection plug from the top of the gear case and rotate those gears to inspect for damage or for the least worn section of the gear. (As per the adjustment instructions in an earlier post.)
Hope this helps.
You have a wonderful day. Best wishes. Deas Plant.
Please Log in or Create an account to join the conversation.
13 years 1 month ago #63440
by ronm
Replied by ronm on topic Hello Guys!
Now now Deas, no sarcasm, remember...
I repeat, that guy was an artist-the first mount looks like a s'more, second looks like under a turkey roost...
That grader is one of those machines that would give somebody a good cussin' out, if it could talk...
Dude, got your PM, not my grader...
I repeat, that guy was an artist-the first mount looks like a s'more, second looks like under a turkey roost...
That grader is one of those machines that would give somebody a good cussin' out, if it could talk...
Dude, got your PM, not my grader...
Please Log in or Create an account to join the conversation.
- Deas Plant.
-
- Offline
- Platinum Boarder
- User
Less
More
- Posts: 6637
- Thank you received: 928
13 years 1 month ago #63472
by Deas Plant.
You have a wonderful day. Best wishes. Deas Plant.
Replied by Deas Plant. on topic 'Different'.
Hi, Ronm.
I would describe some of the things that have been done to that grader as 'DIFFERENT', not necessarily better, just 'DIFFERENT'.
Further, I would use ONE word to describe what has been done to those engine mounts, "FUBB".
Just my 0.02. And not being 'sarky', just factual and honest like always - - - - - - - with maybe a touch of humor and/or irony thrown in for good measure.
How far do you live from Denver?
You have a wonderful day. Best wishes. Deas Plant.
Please Log in or Create an account to join the conversation.
13 years 1 month ago #63479
by ronm
Not far enough, Deas... no really, Denver's a fun place to visit, but you couldn't make me live there. It's about 250 mi. on I-70, actually, I live only 17 miles from the Utah border, in the far West part of the state...Grader Dude is in Durango, about 200 mi. south of me. (mention him so it's not a total hijack...)
Keep up the sense of humor, no problem there...always look forward to your posts.
Replied by ronm on topic Hello Guys!
Hi, Ronm.
How far do you live from Denver?
Not far enough, Deas...
no really, Denver's a fun place to visit, but you couldn't make me live there. It's about 250 mi. on I-70, actually, I live only 17 miles from the Utah border, in the far West part of the state...Grader Dude is in Durango, about 200 mi. south of me. (mention him so it's not a total hijack...)Keep up the sense of humor, no problem there...always look forward to your posts.
Please Log in or Create an account to join the conversation.
13 years 1 month ago #63481
by ol Grump
Replied by ol Grump on topic Hello Guys!
I went out and checked my 12E yesterday. The square bar shaft measures 7/8" square and rather than rebuild that part, I'd go ahead and carefully grind out the weld at the lower coupling and replace with a new piece. The tube portion measures 1 1/4" square on the outside so while the size isn't an oddball size, it has the weld flash removed from the inside so it might be harder to replace.
Please Log in or Create an account to join the conversation.
- Grader Dude
-
Topic Author
- Offline
- Junior Boarder
- User
Less
More
- Posts: 33
- Thank you received: 0
13 years 1 month ago #63538
by Grader Dude
Replied by Grader Dude on topic Hello Guys!
I am working on belts/wiring the wiring is every bit as bad as those engine mounts.  I am replacing the original gauges as most of them dont seem to work. The fuel gauge has a 1/4" line running to it and nothing else,does anyone have an idea how that would work?
EDIT, it is a fuel pressure gauge In my defense it was pretty hard to read, all I saw was the little fuel symbol
I am replacing the original gauges as most of them dont seem to work. The fuel gauge has a 1/4" line running to it and nothing else,does anyone have an idea how that would work?EDIT, it is a fuel pressure gauge In my defense it was pretty hard to read, all I saw was the little fuel symbol
Please Log in or Create an account to join the conversation.
- Grader Dude
-
Topic Author
- Offline
- Junior Boarder
- User
Less
More
- Posts: 33
- Thank you received: 0
13 years 1 month ago #63642
by Grader Dude
Replied by Grader Dude on topic Hello Guys!
As an update, ended up tearing out almost every single wire in the thing as most of them had been spliced togeather w/ electrical tape and run in incorrect places. While under the cab I found two terminals on the master cylinder, I am guessing for brake lights, does anyone know the story on those? Also a local body guy told me I can get some industrial enamel to paint the thing and all I would need to do for prep is pressure wash it good. I know it wont be a perfect paint job but it outta make it easter on the eyes. I would like to do the orginal color instead of the 'dirty' yellow cat uses these days, do any of you guys have a paint code or some other way to get a close match for my paint?
Please Log in or Create an account to join the conversation.
Time to create page: 0.183 seconds
ACMOC
Antique Caterpillar Machinery Owners Club
1115 Madison St NE # 1117
Salem, OR 97301
support@acmoc.org
Become a Member!
"I became a member recently because the wealth of knowledge here is priceless."
- Chris R
"I also joined a year ago. had been on here a couple of times as a non-member and found the info very helpful so I got a one year subscription (not very expensive at all) to try it out. I really like all the resources on here so I just got a three year. I think its a very small price for what you can get out of this site."
- Jason N