- Posts: 87
- Thank you received: 66

ACMOC Membership Benefits
- FREE quarterly magazine filled with content about antique Caterpillar machines
- FREE classified listings
- ACMOC store discounts and specials
- Full Bulletin Board Access
- Marketplace (For Sale/Wanted)
- Technical Library
- Post attachments
$44 /year ELECTRONIC
$60 /year USA
$77 /year International
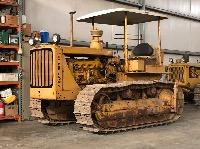
D6 8U-2517 Engine Overhaul
- NickyWalnuts
-
 Topic Author
- Offline
- Premium Boarder
- Member
Attachments:
Please Log in or Create an account to join the conversation.
Please Log in or Create an account to join the conversation.
It is unimaginable how many dollars and time spent to do a proper overhaul on this unit. You might have been customer of the month at Piggy Smiths!
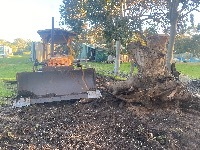
As a side note, a local tree nursery used to own a D2 tree digger; after being cast off in their bone pile, I am told it was exported to England or Australia. It would be nice to know if it had been restored or laid to rest.
Sitting back and biting our nails to see the action videos. JM
Please Log in or Create an account to join the conversation.
- NickyWalnuts
-
 Topic Author
- Offline
- Premium Boarder
- Member
- Posts: 87
- Thank you received: 66
The correct glow plug wiring harness for a D318 is unobtainium. I ended up buying an aftermarket harness (CTP), however it’s actually meant for a D6C (part# 5S8479). This left two challenges: mounting the harness, and changing out the terminals that slip onto the glow plugs because the ones that come on the D6C harness are too small for the 3H2033 glow plugs, and the CAT terminals for the D318 harness are also discontinued.
The mounting tabs on the D6C harness don’t line up with the studs that hold down the valve covers, and if they did, the holes in the tabs are too small to slip onto the studs. We egged out the hole on the tab on one end and got it directly onto a valve cover stud. The other two tabs on the harness required a bracket to be fabricated to hold them, as can be seen in the pics down below.
To address the terminals on the harness, I took a trip to the local automotive hardware store in my small town. I found the best fit were terminals meant for a distributor/coil wire just like the ones pictured here:
brillman.com/product/straight-high-tensi...ibutorcoil-terminal/
The length of wires coming out of the D6C harness are just long enough to reach all of the glow plugs. If you cut the terminals off of the wires, the wires will likely be too short to reach the glow plugs. To preserve the wire length, we were able to decrimp the old terminals by applying crimping pressure to the old terminals 90 degrees opposite from where they were factory crimped. I’m very happy with how it turned out.
I ordered the two replacement pushrods from a vendor in Washington state because they were the closest option to me that had them. Only to discover when they arrived on Tuesday that I screwed up and ordered the wrong part number and the pushrods were 14-1/4” long instead of the proper 17-1/4”. I still don’t know where I got that part number from, but it was from a Cat parts book. When I looked up the part number once again, fortunately for me, Smith’s did have the correct ones, and I made the 3 hour round trip yesterday to go get them. We popped them in as soon as I got back, set the valves again to .012 and turned the engine by hand and checked the valve clearance about 3 more times, prelubed the engine and put the automatic charger on the batteries to let it go overnight and went home.
This morning was the big day:
I need to remember my youtube password so I can upload the video and then I have to remember how to embed it on here…. Bear with me and I’ll get the video of the first start on the stand posted up!
Attachments:
Please Log in or Create an account to join the conversation.
Do you have any attachments for your 8U tree digger? I have seen some neat set ups here; spray booms, toppers and single row chopper heads to trim them down.
Some old school machines using remote cameras too, instead of an old truck mirror...
Let's see some videos of it slogging away in the muck too please. JM
Please Log in or Create an account to join the conversation.
- NickyWalnuts
-
 Topic Author
- Offline
- Premium Boarder
- Member
- Posts: 87
- Thank you received: 66
Please Log in or Create an account to join the conversation.
Please Log in or Create an account to join the conversation.
- ctsnowfighter
-

- Offline
- Platinum Boarder
- User
- Posts: 1002
- Thank you received: 502
Those were the sweetest sounding engines at work.
CTS
Please Log in or Create an account to join the conversation.
- NickyWalnuts
-
 Topic Author
- Offline
- Premium Boarder
- Member
- Posts: 87
- Thank you received: 66
Please Log in or Create an account to join the conversation.
Later serial 16,537 above is 1725 rpms if this helps. JM
Please Log in or Create an account to join the conversation.
ACMOC
Antique Caterpillar Machinery Owners Club
1115 Madison St NE # 1117
Salem, OR 97301
support@acmoc.org
"I became a member recently because the wealth of knowledge here is priceless."
- Chris R
"I also joined a year ago. had been on here a couple of times as a non-member and found the info very helpful so I got a one year subscription (not very expensive at all) to try it out. I really like all the resources on here so I just got a three year. I think its a very small price for what you can get out of this site."
- Jason N


