- Posts: 1281
- Thank you received: 236

ACMOC Membership Benefits
- FREE quarterly magazine filled with content about antique Caterpillar machines
- FREE classified listings
- ACMOC store discounts and specials
- Full Bulletin Board Access
- Marketplace (For Sale/Wanted)
- Technical Library
- Post attachments
$44 /year ELECTRONIC
$60 /year USA
$77 /year International
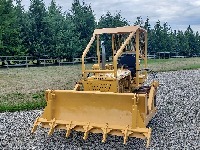
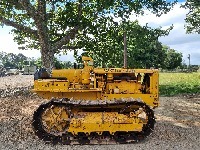
D2 going in the shop
I got the crankcase guard beat back into shape, welded and painted. Just waiting for the paint to harden to install it.
Going to try and get to town today or tomorrow and get all the fluids to fill everything so I can try to make some black smoke!
Attachments:
Please Log in or Create an account to join the conversation.
Cheers,
Neil
Pittsford, NY
Please Log in or Create an account to join the conversation.
Attachments:
Please Log in or Create an account to join the conversation.
Please Log in or Create an account to join the conversation.
Please Log in or Create an account to join the conversation.
Cheers,
Neil
Pittsford, NY
Please Log in or Create an account to join the conversation.
I used a floor jack and snowmobile roller to put my crankcase guard on. Rolled it right under there and lifted in time place. The guard is a must as far as I'm concerned, careful is good when it works but accidents do happen.
Please Log in or Create an account to join the conversation.
- replace brake linings just by removing a couple of covers
- remove pony pinion without disturbing the pony
- adjust bevel gear by removing a cover or two
- adjust pony carb easily from the side
- main engine oil drain from side
Cheers,
Neil
Pittsford, NY
Please Log in or Create an account to join the conversation.
- trainzkid88
-

- Offline
- Platinum Boarder
- Member
- Posts: 2120
- Thank you received: 788
Please Log in or Create an account to join the conversation.
I thought I would see if the pony motor would sputter or pop just a little before I got real serious about getting it started. Nope. After taking the carb apart, checking the mag and all the other stuff that you would check I figured out that compression was coming through the carb. Well it has to be a stuck intake valve. Nope. I took the top cover off and rolled the engine over and what do you know the intake valve is opening when the piston is going up. Oops, I had my neighbor come and verify the backwards looking valve movement. Yup, it's out of time. We'll there's only one place it can be out of time so out comes the motor. The c stamped on the gears is lined up but the one on the crank isn't lined up with the gear. I haven't really thought of a good excuse for how this happened yet as the book clearly states to line up the marks. You just can't get good help these days.
Anyway it was a fairly easy fix and the motor is sitting back in place. Maybe I can get everything bolted back together and try for a start up.
Attachments:
Please Log in or Create an account to join the conversation.
ACMOC
Antique Caterpillar Machinery Owners Club
1115 Madison St NE # 1117
Salem, OR 97301
support@acmoc.org
"I became a member recently because the wealth of knowledge here is priceless."
- Chris R
"I also joined a year ago. had been on here a couple of times as a non-member and found the info very helpful so I got a one year subscription (not very expensive at all) to try it out. I really like all the resources on here so I just got a three year. I think its a very small price for what you can get out of this site."
- Jason N


