- Posts: 30
- Thank you received: 0

ACMOC Membership Benefits
- FREE quarterly magazine filled with content about antique Caterpillar machines
- FREE classified listings
- ACMOC store discounts and specials
- Full Bulletin Board Access
- Marketplace (For Sale/Wanted)
- Technical Library
- Post attachments
$44 /year ELECTRONIC
$60 /year USA
$77 /year International
My D2 Project
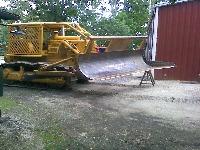
I'm new to the forum and have been using some of these threads as invaluable resources so I figure I would post a few photos of what I am working on. I have a D2 5U, not sure of the year but I can get the serial number off it if I can remember tonight while I am over there. I have already done the main clutch and clutch collar in it. I bought it as a non steering unit and the clutchs are locked right up so that's what sparked this whole gig.
I know one of the things I'm going to be looking for is the drain plug for the bellhousing which is missing as shown in one of the pictures. This allowed mice into the case to build a nest and destroy my main clutch colar prior to me buying the machine.
Let me know what you think!
Please Log in or Create an account to join the conversation.
Please Log in or Create an account to join the conversation.
Cheers,
Neil
Pittsford, NY
Please Log in or Create an account to join the conversation.
The two chunks out of the case was me prying against the case to free the final drive from the steering clutch. The drum was hopelessly stuck so I used an impact chisel to break the outer drum so I could get the final drive off.
Gotta keep motivated! Did this work over the past 10 nights and weekends. I have to get the water pump off, generator, and the left side final drive off. I think thats as far apart as I will need to take it. If I can find some exhaust manifold gaskets I'll pull those off and repaint them.
Please Log in or Create an account to join the conversation.
- Garlic Pete
-

- Offline
- User is blocked
- User
- Posts: 2533
- Thank you received: 1
What happened with the master link? It looks like you cut or chiseled the end off, if I'm interpreting that picture correctly. I don't think I've seen master pins with those sideways pins or plugs in them, or maybe those are something you put in in the removal?
Unfortunately, your experience with the broken brake drums, and attendant risk of breaking the final drive case, is a common one with the D2s. It looks like you did good with getting the one apart. Good luck with the other.
When I'm planning to work on D2 clutches, I try to work them back and forth to break the clutches free as much as I can stand it before I try to take them apart. Often they won't break loose, but I think the work helps to get the teeth on the disks working within the drums, breaks up some of the accumulated crud and lessens the likelihood of a broken drum when disassembling the final drive.
You'll notice that there is a lot of crud and scale accumulated in the grooves inside the drum around the protruding teeth of the clutch disks. This is what locks the drum and disks together and leads to the broken drum. Most of the drums I've seen even have little hollows worn into the grooves where the teeth run, further complicating disassembly when the clutch disks can't float.
When you get the drain plug, make sure that you drill it about an 1/8" larger than a big cotter key, then insert the key and bend it so that it will rattle around loosely. This allows condensation and moisture which inevitably makes it in the top of the compartment out the bottom. A completely sealed compartment can cause almost as much destruction with rust, corrosion and moisture damage to linings as the mice did! You should do the same for each steering clutch compartment.
Keep the pictures coming and keep up the good work.
Pete.
Please Log in or Create an account to join the conversation.
Please Log in or Create an account to join the conversation.
Please Log in or Create an account to join the conversation.
Cheers,
Neil
Pittsford, NY
Please Log in or Create an account to join the conversation.
I will look into drilling for the starter. This pony engine setup is one of the reasons I love this machine though. So I doubt I would ever convert it but your right you never know.
Below are some photos of the little I did last night. Stripped off the water pump which has a bad bearing, the generator, fuel filters + fuel pressure gauge, and the oil filter assembly. The previous owners would always run this machine with hose water then drain it out after every use. Not sure what the best method to clean out the cooling system is but sure looks like it needs it.
Please Log in or Create an account to join the conversation.
Please Log in or Create an account to join the conversation.
ACMOC
Antique Caterpillar Machinery Owners Club
1115 Madison St NE # 1117
Salem, OR 97301
support@acmoc.org
"I became a member recently because the wealth of knowledge here is priceless."
- Chris R
"I also joined a year ago. had been on here a couple of times as a non-member and found the info very helpful so I got a one year subscription (not very expensive at all) to try it out. I really like all the resources on here so I just got a three year. I think its a very small price for what you can get out of this site."
- Jason N


