OKAY! Man this bulletin board is great!... I guess I'll have to gear-up and fix it.
From what ccjersey tells me it is the same as the book explains. But...
Does the plunger run horizontally or is it vertical, and where do I 'mark it'; is the gear on the plunger, and the 'rack' on the pump? Do I just line-up the dots? (I guess basically, I'm putting the thing back in the same way it came out. Right?) Also, is the seal a 'rubber-like' material? (Of course it is - Probably) 😮
Any other tips or explanation is very helpful.
I'll order the parts and... let you know how it turns out.
Thanks.
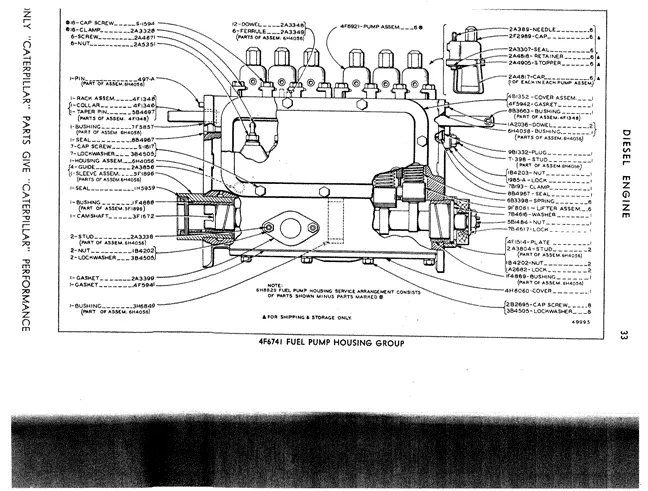
I,ll jump in & answer, the plungers move up & down vertically & the wheel (gear) on the bottom of the plunger has teeth machined in it & they are turned by the rack bar which is a bar of steel with teeth on it that moves horizonally and controlled by the governer.These gears on the bottom of the plunger has a mark or dot on the one gear tooth and the rack bar has a mark in between two teeth and you line these marks up, the one on the plunger gear to the one on the rack bar.To see it easier it,s best to take the side cover off the area below the pumps on the side of the housing.It will be clear what I,m saying when you get into it.If more than one pump & plunger is removed you always keep them paired up so never mix one plunger with another pump body asthey are fit to each other at the factory. Another thing if the pump gear is not timed to the rack bar correctly you will have a miss or erratic running engine on that cylinder.
Not to circumvent the valued professionals here, but mine was leaking, too. I took the pump off, cleaned the seal and surfaces, put a VERY light coat of silicone on the seal and reassembled. Not a drop since.
Don't worry about the rack/gear it's very obvious how it goes, and you have the other 5 to set an example. Just use the throttle to center the rack on the gears before disassembly. I dunno how close you are, but I have the bleeder tool if you need to borrow it, those things can be a bear to get a wrench on! I also lubed the rack/guides/gears/ with some light grease while I was in there.
CS
I think I'm getti'n the picture now; with the assistance of you guys and the manual, I just gotta get in there and do it! I am much more confident than before. Although I'm relatively 'mechanical' I like to know what I'm getting into before I jump in.
As far as the bleeding ritual; I've done it before. My technique is probably primitive as I just set some buckets under the engine, pump like crazy as I turn each bleeder valve. I took a small wrench and bent it at a 90 degrees to allow accesss. I didn't know there was a bleeder tool. Hopefully I won't need to bleed it; it costs me about 4-5 gallons of diesel. Maybe I should connect tubes to each bleeder valve and let them run into a clean bucket? By the way, Carlsharp, thankks for the offer. I'm in Southern Ca. outside of the Palm Springs area if your close enough to loan me the bleeder tool. If not, I think I'll be alright.
At any rate, I think I'm ready.... Thanks again to all and we'll see how it goes. Yea, I'll let ya know.
You can just pull the throttle part way on and just open each fuel line on top the pumps and you can bleed it that way.Later pumps did away with the bleeder screws behind the lines on the pumps.
Thanks SJ but I'm not sure what you mean. This grader has a small valve just behind the cap/fuel line of the pump. I think it might be easier for me to open this valve as I pump (like crazy) the plunger located near the filter housing. It takes awhile but I can tell when all of the air is out. Then all I gotta' do is start er' up... as long as I haven't drained my batteries from trying to start it with air in the lines. I feel comfortable doing it this way and the manuel explains it that way as well. Not sure but is sounds like the way you describe, the engine needs to be running.


Our channel highlights machines from the earliest Holt and Best track-type tractors, equipment from the start of Caterpillar in 1925, up to units built in the mid-1960s.
Antique Caterpillar
Machinery Owners Club
1115 Madison St NE # 1117
Salem, OR 97301
Terms & Privacy
Website developed by
AdCo
"I became a member recently because the wealth of knowledge here is priceless."
-Chris R