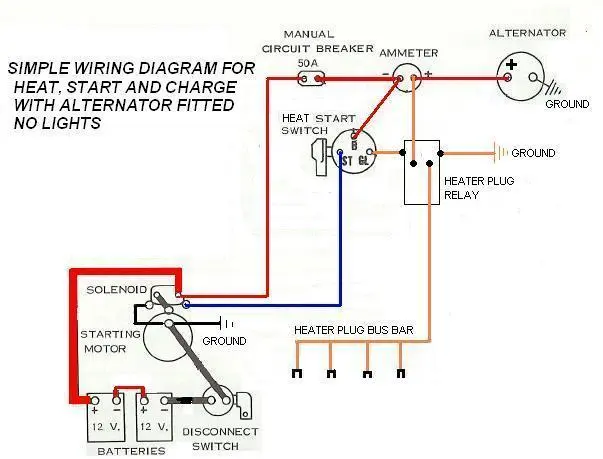
that diagram seems to show a pusbutton that activates a solenoid that will send power and activate the starter solenoid---however it shows a disconnect on the + wire instead of on the - wire that most Cats have
that diagram seems to show a pusbutton that activates a solenoid that will send power and activate the starter solenoid---however it shows a disconnect on the + wire instead of on the - wire that most Cats have
Dependzic you are correct, disconnects should be on the ground side because there may be other draws that do not path through the main cable. An example is the fusible link on some vehicles. If the disconnect is on the ground side it includes all circuits.
I converted a lot of Cats to direct start nearly sixty years ago and we did not use a solenoid [relay] on the exciting wire for the starter,there was a solenoid used for the glow plugs,put the cables and the wires back to where they were on the old starter,leave the solenoid he gave you off,did you get the old starter repaired or is this a replacement if so check that is the dog is the same,is the machine fitted with glow plugs,the standard fitting for the disconnect switch is usually on the ground cable,but that is not an issue one or the other and it is probably on right.
Good luck
AJ
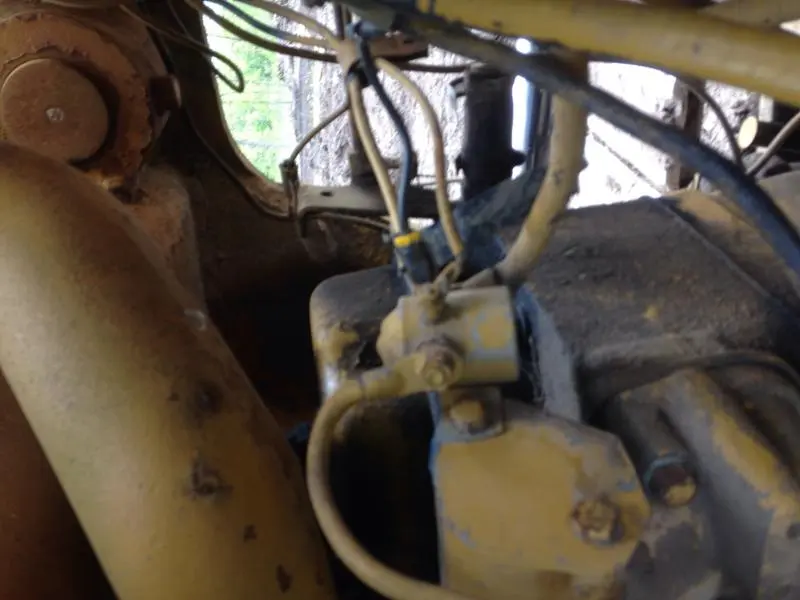
The new starter has a solenoid mounted on the top and this machine is fitted with glow plugs. The dark picture is a picture of the back of the new solenoid and the other picture is the old one. The guy at the shop who sold me the new starter seem to think that I should hook up both
I think it would depend on the amp draw of the solenoid on the starter and if the pushbutton is rated for that amp load--otherwise the secondary solenoid would have to handle that amp draw.
When I first bought this cat, they had both the positive and negative wires running into a disconnect. Before I put this new starter in, that set up worked just fine. Is there any reason that I would need to run both solenoids to crank over this new starter? Or could I just wire the starter as my old one was and hook it up to my own Old solenoid?
Shawn you have received a complete replacement Delco 42MT Starter to replace your older Delco Inershia Drive Style Starter. Completely remove your original Soleniod Switch that is in pic #1. Did the Rebuilder supply you with the new 24 Volt Magnetic Relay Switch. If not I recommend to purchase a Cole Herse Part #24063 Soleniod/Relay Switch & mounted where or as close to the old Starter Soleniod that is disguarded. Use the machines exsisting trigger wire from instrument panel Start Switch to activate the new Cole Herse 24063 Soleniod Relay Switch. This new relay acts like a Clutch Slave Cylinder to the Starter Soleniod Switch to take the load of the amperage draw of the Starter Soleniod which on this 24 Volt 42 MT Starter Soleniod Switch is about 30 to 35 Amps. The Cole Herse Starter Soleniod Relay Switch only requires about 2 Amps. You now will need to make up new Battery Cables as you know are eliminating the old style Starter Soleniod Switch. I would suggest running 10 gauge wire from new Cole Herse Starter Soleniod Relay Switch to 42 MT Starter Soleniod Switch. As I stated in prevoice post get your Battery Cables maded up with good Thomas & Betts or Quick Cable Battery Cable Terminals that are either properly crimped or soldiered. If you need further assistance give me a call at tel. 860-528-8174. Good Luck Ken Plourde
Well a picture is worth a thousand words,when I seen the picture of the old solenoid I realize you had the old style inertia starter and you are replacing it with a pre engaged one,the last time I seen an inertia starter on a Cat was back in the fifties on a grader,we never used them on any of the conversions we done as they not that long lived and the pre engaged was available from a home source.the little sketch I posted before is the way to hook it up.
Good luck
AJ


Our channel highlights machines from the earliest Holt and Best track-type tractors, equipment from the start of Caterpillar in 1925, up to units built in the mid-1960s.
Antique Caterpillar
Machinery Owners Club
1115 Madison St NE # 1117
Salem, OR 97301
Terms & Privacy
Website developed by
AdCo
"I became a member recently because the wealth of knowledge here is priceless."
-Chris R