1. Yes, wrap it up tight, then hit it with a bfh. Wrap it up tight, then hit it again. A little "loose juice" and heat always helps unstick and expand things.
2. You'll want to take your brake drum off to clean the grooves and outer surface. It will come off easier than the clutch pack.
3. My observation is that they tend to be worn fairly even.
4. Estimate #500????
5. I left one track on the ground, then raised up high enough to drag the track out of the sprocket. This was high enough to uncouple the spring from the track frame.
6. Somewhere I posted it before? The first side takes the longest (40hrs?). The second side was half the time because you have all the tools and procedures figured out.
7. Obviously you have turned the track adjuster tension nut backwards to loosen, then you need to turn it back out until the track has a 1.5 inch to 2 inch sag in the middle.
Its not hard to do, just tedious. Most guys break the brake drums because they are rusted on from being full of water which is why I insist on filling them with loose juice for as long as I can wait before I start the project. Let it soften the rust so as to minimize breakage of components.
👍
Nothing like the voice of experience to make the job go smoother. Thank you. I will get the clutches ordered and wait for the mud to dry up some before starting the job. Snowing again here in sunny California.
Paul
The D2 brake drum comes off with the final reduction assembly. If it is stuck it may break when you use some type of wedges or pry bars to seperate the assembly some may just come appart.
I just did both sides on my D25J. For the small amount of effort to pull the drums its worth it to check out the seals. I thought mine were fine until I pulled it apart and ended up using a couple of speedy sleeves and new seals. Then you have a drum for clutch set-up as well. Just my 2cts, Good luck!
I'm about to embark on this journey as well. I have a D2 5U with a tool bar blade on it. (frozen steering clutches) I'm wondering if anyone has step by step instructions on the removal of the clutches. Does a removal manual exist? 😊 If not, 5-10 main bullet points would be a great start. Maybe a list of common "gotchas" would be helpful too.
The first question I have based on reading this is: Does the entire track assembly need to be removed to get them out? I was hoping that I only needed to remove the tracks.
As always, thank you guys for your valuable insight.
a step by step the way I did it
1 block up front of tractor at front of oil pan and each side on draw bar, so there is a 3 points of suport
2 split both tracks with master pin at back and lay out extra track in front of machine.
3 remove leaf springs togather
4 remove pivot shaft mounting block bolts and roll both track frames forward on tracks to block under oil pan
5 I removed sprockets to make finals easier to handle
6 remove bolts to seperate finals, dont forget the ones on the bottom that tap into the finals, seperate final drives from machine, they need to slide stright out , be cautious, this is where brake drums break if stuck.
7 after clutch is exposed disconect the funky connectors (2) that connect to the thrust bearing cage
8 back out the large nut holding the stearing clutch about 4 turns, you can push on this with the puller and it will stop clutch from flying off.
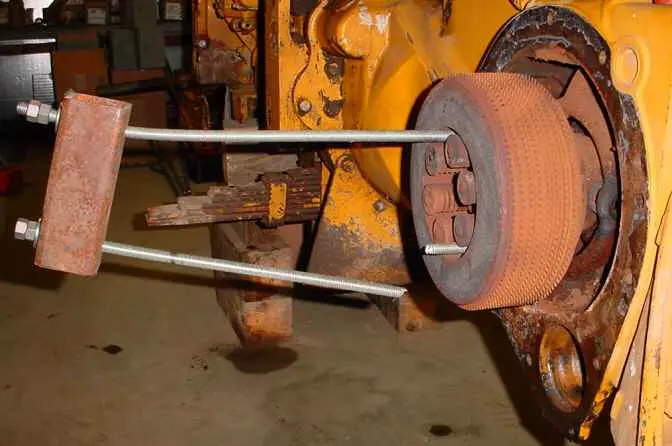
9 this is where a strong puller is needed, I used a heavy piece of 2 1/2 inch tubing for the cross bar, grade 8 all thread rod and a hydraulic jack or porta power to apply the pressure. Heat helps but will destroy the clutch springs, they are available aftermarket
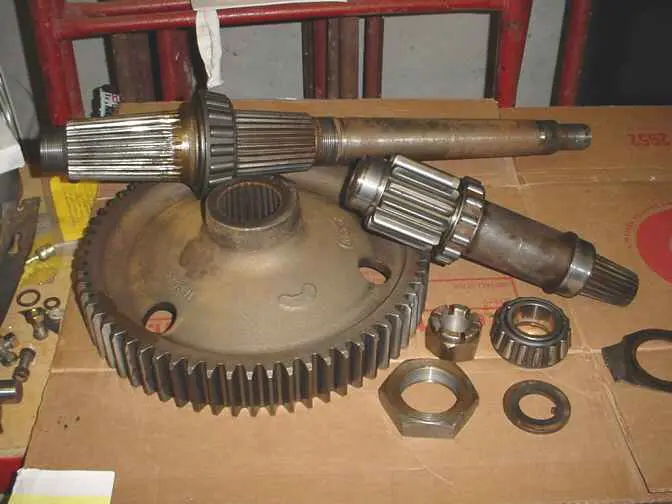
10 Sometimes the clutch problem is the thrust bearing, if this is bad the clutch will not work I reinstalled mine packed in synthetic grease, will try to dig out some old pictuers and post later
THANK YOU. I also found these manual images on the below link.
http://neil.forbes.net.nz/my_caterpillar_d2-5u/my_caterpillar_d2-5u.html
Any images would be useful.
Thanks again.
I did mine one side at a time but I like Steve's idea of rolling the frames together. I slid mine off with the help of an engine hoist. I left the sprocket on because it gave me another sling point for keeping the final level. I think there are still photo's of my project in various threads.
[quote="drujinin"]I did mine one side at a time but I like Steve's idea of rolling the frames together.
.[/quote]
I thought about that, but the dozer blade assembly would make it hard to move.😆
It's going to be a couple of weeks before I get started, snow melted and left me a bunch of yard work.

.webp)


Our channel highlights machines from the earliest Holt and Best track-type tractors, equipment from the start of Caterpillar in 1925, up to units built in the mid-1960s.
Antique Caterpillar
Machinery Owners Club
1115 Madison St NE # 1117
Salem, OR 97301
Terms & Privacy
Website developed by
AdCo
"I also joined a year ago. had been on here a couple of times as a non-member and found the info very helpful so I got a one year subscription (not very expensive at all) to try it out. I really like all the resources on here so I just got a three year. I think its a very small price for what you can get out of this site."
-Jason N