Good video Sasquatch. By being able to carry a bit od dirt along it is amazing how much work them little tumble bugs can do cleaning up a road and fixing erosion ruts and water holes.
great little unit it is amazing what can be done with these little scoops
good video and thanks for sharing
Paul
Very Nice Video!
While only having seen one in operation from a distance, it never looked practical.
Watching this video with the explanation of how it works and how to adjust it to operate properly makes it a very practical and useful tool!
Almost makes a guy want to put it on his list of accessories to buy!
Thanks for the Great video!
Sas,
Great explanation and demo on how they work. Like Jeff, I have never seen one working to the extent that I know how they work. You should have fired up and got into the sandbox at the show. Maybe you did and I just did not see you out there.
Keep your camera bracket handy so when OIH gets his DW 21 going, we can watch his bowl load and dump too.
Jan
Great Video and Presentation!:clap2:
[quote="Garlic Pete"]I never really understood what the "extra" lever did. I could see that on all the tumblebugs I've seen it changes the geometry of the tongue and pivot stops, but I didn't understand the relationship to the cutting edge and making it ride over the material or dig into the material.
Your video makes it all clear now. I have Tom Madden's 10' tumblebug at my house, with the assignment to figure out how to make it work behind a Sixty. With this video, I think I can finally get things adjusted and the darn thing working. The previous owners must have been using it as a grader, so all the stops are set in odd places, making trying to logic out operation that much more difficult.
I enjoyed talking to you at the show and look forward to seeing you again soon.
Pete.[/quote]
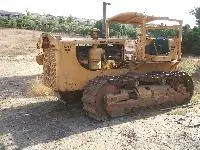
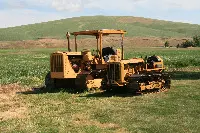
Thanks Pete, each tumblebug I have is slightly different in adjustment but the basic principal is the same - transport, cut, carry, dump (all at once with a complete revolution or spread with just half a revolution) then back to transport to start the process over again. The quickest way I've found to adjust them to a machine's drawbar is to hook up and pull tension on the hitch. With the slack tightened up get the transport stop adjustment set for it to ride squarely on the wear shoes, then trip it to rotate the bowl forward and again with the hitch tensioned set your cut/carry stops for the best range you can get for the cutting edge both into the dirt and out of the dirt when manipulating the loading lever. Sometimes for a more aggressive cut you might have to compromise on the distance the cutting edge will raise from the ground when carrying, but like I said all models differ in range of adjustability. With that said, I've never played with one that had wheels on it, I don't have any that big but I imagine the principal is still the same. But the thing to remember is that whenever you hook to a machine with a different drawbar height, re-adjustment of the stops is necessary.
*Edit* Forgot to mention, the cheaper scrapers that were sold back in the day did not have a variable pitch loading lever like the nicer ones did. Their loading lever just actuated an over-center mechanism that pitched the bowl forward to cut at a pre-determined amount every time. To stop the cut you usually had to stop the machine and slack the hitch to re-set the mechanism and re-enter carry mode (I've got a small Montgomery-Wards one like that). The fancier models were a lot easier to use because like the one in the video, the farther you pulled the load lever the deeper it would cut - made it a lot easier to feather into a grade.


Our channel highlights machines from the earliest Holt and Best track-type tractors, equipment from the start of Caterpillar in 1925, up to units built in the mid-1960s.
Chapter Two
| Folds Farm, Godshillwood, Fordingbridge, Hampshire, SP6 2LU, UKChapter Twenty Nine
| Hawkesbury Showground, Racecourse Rd, Clarendin, NSW, AustraliaChapter Nineteen
| Victoria Park, Urana NSW
Antique Caterpillar
Machinery Owners Club
1115 Madison St NE # 1117
Salem, OR 97301
Terms & Privacy
Website developed by
AdCo
"I also joined a year ago. had been on here a couple of times as a non-member and found the info very helpful so I got a one year subscription (not very expensive at all) to try it out. I really like all the resources on here so I just got a three year. I think its a very small price for what you can get out of this site."
-Jason N