You have a wonderful day. Best wishes. Deas Plant.
Hi, Mike Hudson.
If my (limited) memory serves me rightly, the pony exhaust should unbolt from the Diesel air intake as well as at the pony motor so that you can get it right out of the way.
Just my 0.02.
"i reject your reality and substitute my own" - adam savage. i suspect my final words maybe "well shit, that didnt work"
instead of perfection some times we just have to accept practicality
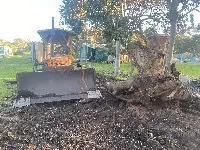
the main air cleaner, air pipe, bonnet and dash, pilot fuel tank and controls have to be removed first. then you unbolt the pilot exhaust from the intake manifold and the upper coolant pipe before you can then unbolt the pilot engine itself. you should drain the coolant before starting the removal so you don't get coolant where it shouldn't be.
there is 4 nuts under the cylinders 2 each side that are 'fun' to get to, you need a open ender or ratchet wrench(have a spare spanner trust me. crack em with a ring spanner first).
then you can evenly pry it up free of the dowel pins.
these are heavy little bastards so have suitable lifting gear ready.
the output gear protrudes below the block so you need suitable timbers to sit it on. 3x2 is suitable.
a diagram of the bolt placement is in the parts book and service reference book.
From memory TK 88 there is 1 or 2 bolts around the front side between the pony and the main engine (yes in that tiny gap) blow the junk away with compressed air to find them, make sure these are out or you are in for a fight until the casting lets go, I used a few long socket extension bars to reach down from the top.
Thank you Mann I can imagine how difficult it will go back. But I’ve got quite a bit to do before I put it back. But it ain’t nothing but time
"i reject your reality and substitute my own" - adam savage. i suspect my final words maybe "well shit, that didnt work"
instead of perfection some times we just have to accept practicality
yes there is 2 bolts inbetween the main and the pilot engine need long 3/8 or 1/4 drive sockets and extensions to get to them. also need to hold you mouth the right way to get the tool onto them. installation would be a real pain in the arse.
I stick a little bit of painter's tape into the socket so the nut stays in the socket
She's not pushing up daisies!
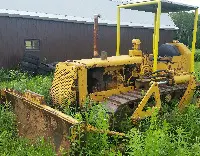
Hi all, new member here working on the same Pony...only this 7U has a (front) cover casting that impinges on that center bolt....so much so that the last mechanic didn't or couldn't tighten it all the way...can't figure out why Cat would allow an employee to spend an hour on placing ONE bolt !!
I have used 1/4" drive ratchets with lengthy extensions to get at the bolts, not too difficult. Just a few curse words about engineers. If you don't have a hoist to lift out, a 2x10 board is handy to lay it and slide off to the side without breaking your back. Best of luck. JM


Our channel highlights machines from the earliest Holt and Best track-type tractors, equipment from the start of Caterpillar in 1925, up to units built in the mid-1960s.
Antique Caterpillar
Machinery Owners Club
1115 Madison St NE # 1117
Salem, OR 97301
Terms & Privacy
Website developed by
AdCo
"I also joined a year ago. had been on here a couple of times as a non-member and found the info very helpful so I got a one year subscription (not very expensive at all) to try it out. I really like all the resources on here so I just got a three year. I think its a very small price for what you can get out of this site."
-Jason N