Hello Dave , you will need to drain the coolant and lift the pony engine to get the pininon assembly out unfortunately!! is the issue that its engaged in the flywheel ??
hope this helps...
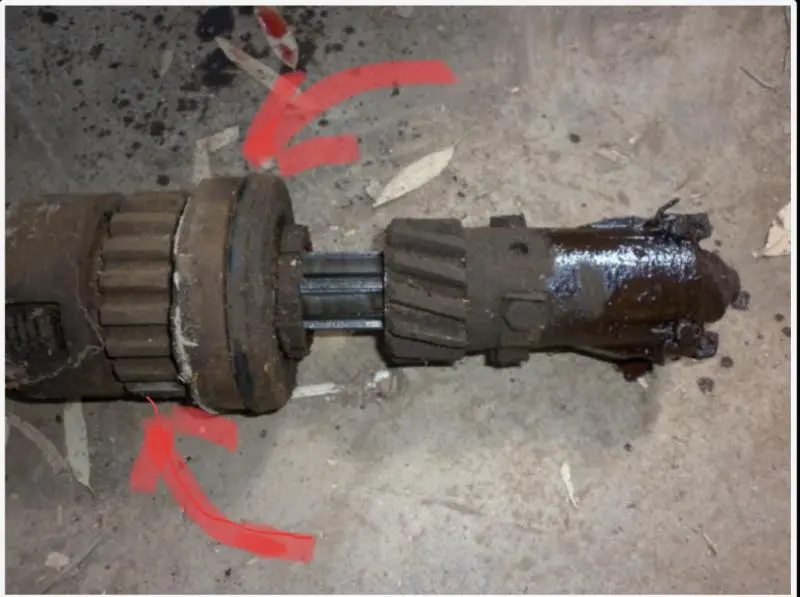
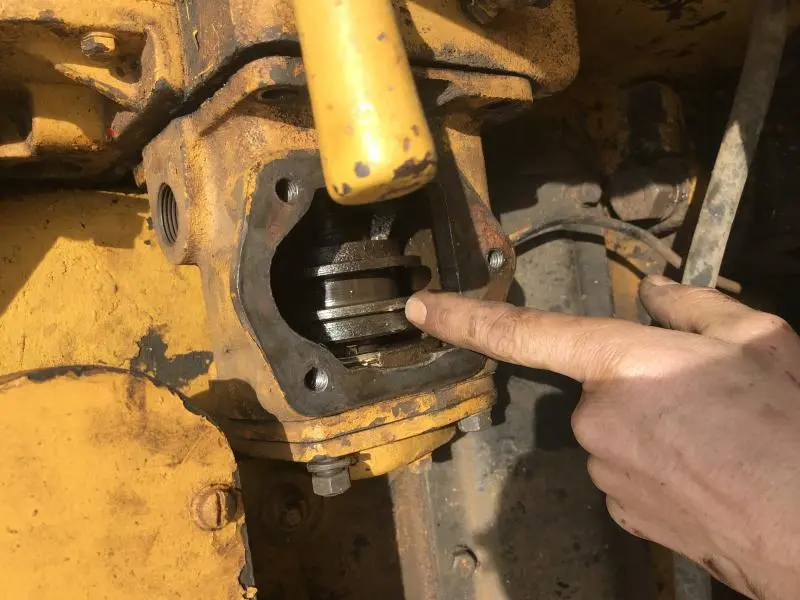
Yes it was engaged in I believe lever was stuck in the back position I stole this pic off another thread I imagine that gear (my red arrow) rides on the pony and the part behind it (the other red arrow) is why it won’t come forward? Gathering lift the pony just a bit it comes out? I believe my best bet is to pull it out clean it all and free it up. Reinstall bench adjust or?This area Is also dry or low on oil? [attachment=47729]CAC45573-4812-4FB7-A9A3-464008850837.jpg[/attachment]
You got it.
The service books say just lift the pony a little and then bolt it back down when you are finished, but the success of that is dependent on the last guy having greased the top surface of the gasket so it will release without tearing. Usually best to completely remove pony and replace the base gasket. I have even made them out of sheet material in a pinch.
Sasquatch, a member here has posted a good Youtube video showing the workings and adjustment of the pinion latches and clutch if you want to look that up. I would carefully note how the pinion latch spring is adjusted so you can get it right the first time. You might want to measure for the access hole while the pinion is out in case you have to cut it to fine tune the release rpm!
[quote="ccjersey"]You got it.
The service books say just lift the pony a little and then bolt it back down when you are finished, but the success of that is dependent on the last guy having greased the top surface of the gasket so it will release without tearing. Usually best to completely remove pony and replace the base gasket. I have even made them out of sheet material in a pinch.
Sasquatch, a member here has posted a good Youtube video showing the workings and adjustment of the pinion latches and clutch if you want to look that up. I would carefully note how the pinion latch spring is adjusted so you can get it right the first time. You might want to measure for the access hole while the pinion is out in case you have to cut it to fine tune the release rpm![/quote]
Thanks this helps at least I didn’t yank on it my guess I’ll hauling it out and clean it all up probably be fine this machine is low hrs by the look of other stuff so hope to get lucky
Hi Team,
link is to one of Toby's tutorials on above subject.--Look on Youtube for more of his tutorials on how to's on the pinion assemblies and starting procedures.
This should help explain how the pinion levers work and what they do.
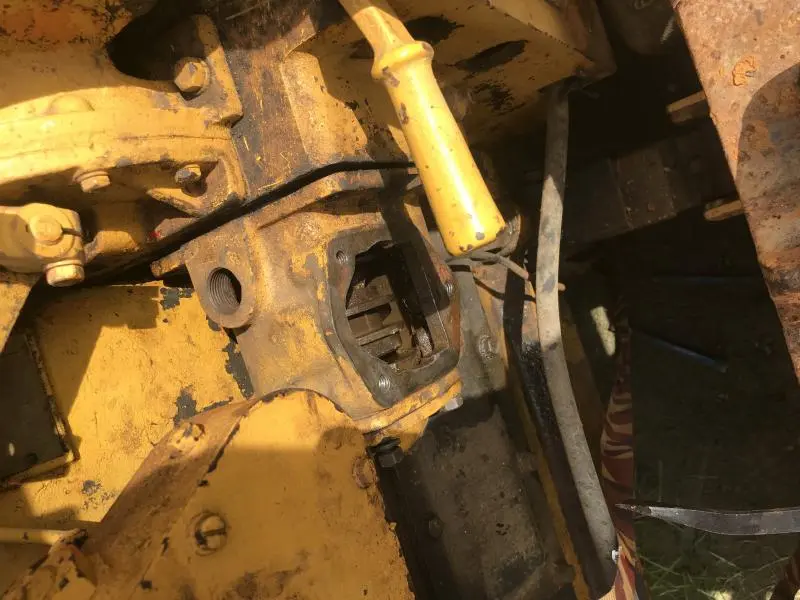
As said above if you need to remove the pinion assembly you need to lift the pony motor about 2 inches for its drive gear to clear the pinion gear.
The pinion assembly needs to be in the engaged position so it is at its shortest length. There is a big "O" Ring seal on the pinion assembly housing that makes sliding it back difficult--BE VERY CAREFUL levering on the housing as it is easy to break off an ear of the flange.
Also to help remove the pinion assembly the end cover of the pinion assembly, I am not sure if just the rear cover on the Injection pump Governor or maybe the entire Governor assembly on these engines needs to be removed to get the closed up pinion assembly out, and may be a bolt or two on the Diesel engine side cover need to be removed.
https://www.youtube.com/watch?v=vo0m1XBqdBY
https://www.youtube.com/watch?v=Jcz7qPz8QTE
Hope this helps.
Cheers,
Eddie B.
[quote="edb"]Hi Team,
link is to one of Toby's tutorials on above subject.--Look on Youtube for more of his tutorials on how to's on the pinion assemblies and starting procedures.
This should help explain how the pinion levers work and what they do.
As said above if you need to remove the pinion assembly you need to lift the pony motor about 2 inches for its drive gear to clear the pinion gear.
The pinion assembly needs to be in the engaged position so it is at its shortest length. There is a big "O" Ring seal on the pinion assembly housing that makes sliding it back difficult--BE VERY CAREFUL levering on the housing as it is easy to break off an ear of the flange.
Also to help remove the pinion assembly the end cover of the pinion assembly, I am not sure if just the rear cover on the Injection pump Governor or maybe the entire Governor assembly on these engines needs to be removed to get the closed up pinion assembly out, and may be a bolt or two on the Diesel engine side cover need to be removed.
https://www.youtube.com/watch?v=vo0m1XBqdBY
https://www.youtube.com/watch?v=Jcz7qPz8QTE
Hope this helps.
Cheers,
Eddie B.[/quote]
Thanks saw those in my search so I had the jist of it just wasn’t sure I had to lift the pony up guess there’s no way around that one
Just ordered the seal 8H2046 off Amazon thinking that slightly undersized seal is the way to go. Got 4 days of rain coming in so probably going to wait and tackle it next weekend at least I’ll have the seal
When I bought this the pony was full of fuel and I was forgetting the petcock would not shut off on the tank so gunna search out a new one of those as I just took it apart and the seat portion of the needle area is corroded away no chance of fixing that one
I already cleaned and got the mag working last year so that’s in order I hope this thing will start after all this
When You have the pony off, check the underside of the cylinders for cracks. Repair those with JB weld or ?
While you have it upside down. Also, consider removing the plug on the bottom of the pony and try to flush out the garbage from the coolant cavity.
Pulling the pinion : I have been successful with using a come along attaché to the front of the tractor. Attach a small chain to the pinion and slowly pull it out straight.


Our channel highlights machines from the earliest Holt and Best track-type tractors, equipment from the start of Caterpillar in 1925, up to units built in the mid-1960s.
Chapter Nineteen
| Cnr Hiller Lane and Ballarat Road, Hamilton, Vic, 3300Chapter Two
| Pitt Farm, Little Paxton, St Neots, Cambridgeshire, PE19 6HD, UKChapter Fifteen
| Historic Santa Margarita Ranch, 20000 El Camino Real, Santa Margarita, CA 93453, USAChapter Thirty
| Hartley - South Australia
Antique Caterpillar
Machinery Owners Club
1115 Madison St NE # 1117
Salem, OR 97301
Terms & Privacy
Website developed by
AdCo
"I became a member recently because the wealth of knowledge here is priceless."
-Chris R