Hi Rick,
There is an early seal (rubber bellows) #1H8868 and a late #5H426 used up into the D6B. Can't tell much about pins but I'd guess you are right on the later 6-pin.
The parts are interchangeable but usually done in matched pairs. The rubber does deteriorate over time. Are there any part numbers on them?
Also attached are some instructions for replacing the wear washer seal. They are not just glued flat on the face.
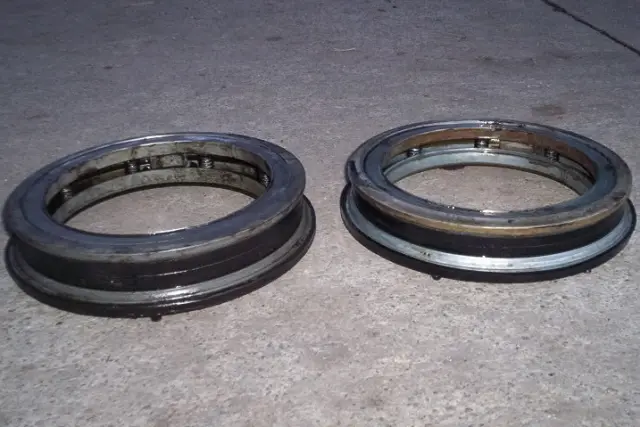
Thanks Old Magnet for the info and pictures. I didn't know about the taper face and gluing on the new seals that way. That will be fun! I found a number on the thinner seal: A-18705-1 The "0" was kinda hard to read and might be a "C" or a "6". I'm also wandering about the little seals or O-rings that go in the groove on the pins. I don't find a part number in my book so I was going to find some small O-rings and see if they fit and maybe use a little silicone on the pin too. I'm curious if anyone else has done that. Thanks.
Thanks Old Magnet for the info and pictures. I didn't know about the taper face and gluing on the new seals that way. That will be fun! I found a number on the thinner seal: A-18705-1 The "0" was kinda hard to read and might be a "C" or a "6". I'm also wandering about the little seals or O-rings that go in the groove on the pins. I don't find a part number in my book so I was going to find some small O-rings and see if they fit and maybe use a little silicone on the pin too. I'm curious if anyone else has done that. Thanks.
Hi Rick,
the little seals on the pins I am sure are just to hold the bellows in place during assembly of the F/Drive and sprocket etc.
From memory they are made from flat rubber sheet and could be punched out using wad punches, they do not seal any thing, just hold, if I recall correctly the rings are only on 3 of the 6 pins.
The numbers you cited in your last post would just be die numbers from the maker.
My D8 Serv. Man. tells me that the later seals have 6 pins, older ones had 3, and to drill 3 extra holes to accomadate the extra pins. I seem to recall this as in cold weather with thick oil the 3 pins could shear off. I would suggest putting the 3 pin units in the outer hubs where they are easy to get at if problems occur later--don't have to pull sprocket. At the Dealer we normally used to put all new seal units behind the sprockets for this reason. Good Insurance.
When fitting the sprocket or outer bearing housing coat the cork seal faces with moly grease to prevent the facing adhering to the metal facing plate--if the cork is dry it can adhere to the face and tear, this also can occur when the tractors have not moved for some time.
As for the taper on the seal face just glue the cork seal on with the special Cat Contact Cement (5H2471) for the job, have done many this way without the tapered former, the taper is built into the face of the bellows. Carefully align the seal and press firmly into place with the fingers going round and around several times checking to ensure full glued contact.
When glued and dry rotate the new seal face on a large sheet of sand paper or such to get a full witness mark of the seal face around the outer edge of the facing to about 1/16" width minimum for the thinnest witness width.
Hope you can follow this ramble.
Cheers,
Eddie B.
Thanks OM and Eddie B. for all the information and part numbers. I'm going to start cementing the seals, gaskets, and washers tomorrow. I have enough bellows assys so I won't have to use the one that is the odd ball. After I get this final drive back together and bolted on the machine I'll be working on the rollers and roller frame so I'm sure I'll have a few more questions. Thanks again.


Our channel highlights machines from the earliest Holt and Best track-type tractors, equipment from the start of Caterpillar in 1925, up to units built in the mid-1960s.
Antique Caterpillar
Machinery Owners Club
1115 Madison St NE # 1117
Salem, OR 97301
Terms & Privacy
Website developed by
AdCo
"I also joined a year ago. had been on here a couple of times as a non-member and found the info very helpful so I got a one year subscription (not very expensive at all) to try it out. I really like all the resources on here so I just got a three year. I think its a very small price for what you can get out of this site."
-Jason N