Neil--I don't think much of wd40 as a rust buster--I prefer Kroil oil or PB blaster
Hi Neil,
with a suitable shaped punch and some moderate hammering straight down on the nut has worked for me in the past.
Cannot add much more than some judicious heat and melting candle wax into the threads might help--do not get too carried away with the heat as you said. Allow to cool a bit and retry.
As Dan said, WD40 is a Water Dispersant and not a good penetrating fluid.
Any engine bearing should have crush applied when its cap is tightened to keep the bearing shells in place or else fretting and misalignment from wear occurs, as well, the crank is not being held in true alignment with its loadings equally supported by the next door journals--this can lead to a broken crank due to abnormal flexing of the crank between neighbouring mains--fatigue failures are likely at the radii and/or oil drillings.
Cheers,
Eddie B.
Thanks Eddie and Dan, much appreciated. I only used the WD40 because it's all that I had on hand - my aerosol of Kroil ran out of oomph. I'll head back on Monday with my punches and gas set and see if I can convince them to come. If I can't, would you say yea or nay to a 3/4 air rattler (as used on loosening truck lug nuts). My welder is fixing up the custom socket with some extra gusseting so between all these things, I'm fairly confident I'll get it. I can see that #2 leaked water but I'm planning on pulling the head so I'll see if it's a precombustion chamber or the o-rings on the bottom of the liner. I hope it's not a cracked head......
Cheers,
Neil.
Repair or make another socket and use a impact gun on it . If you use loaclized heat use a small gas tip to help keep it concentrated.
Neil;
If you need those injectors rebuilt and tested , give me a call; Bill Walter 816 891 8654
Hi Bill,
thanks! When/if I get them out : ), I'll send them over. I have a set in the 5U that I'm sure need looking at too.
Cheers,
Neil
Neil; If you wish to E-mail me; [email protected] Bill Walter
Neil, one thing you can do with the injectors still in is to presssurize the cooling system and see if the drip comes down below #2. If the cooling system holds, then almost certainly you're dealing with rainwater intrusion. Have you taken the exhaust and intake off it yet? Lots of times you can look at the ports and tell a lot. I am of the camp that wants to know where the leak is before the tear down. Would hate to miss something and end up doing the job twice before correcting it.
If you do not confirm a coolant leak, I would be inclined to just pull the #2 piston out the bottom (has to come out that way anyway, or at least the rod does. With that piston out, then rotate the engine and see if anything else binds up. Then feel and inspect the bore with a bright light and mirror. Might even be able to do some honing with a bead hone or even a 3 stone spring loaded hone if you can figure out a drill to drive it. Then reinstall the cleaned up piston with new rings and run it enough to diagnose the condition of the rest of the engine.
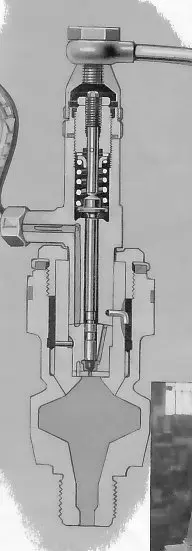
I always assumed the inlet nipple on the injectors was brazed into the the body of the injector????? Maybe not.
Coat both sides of the head gasket in all areas other than the fire ring around each cylinder. My understanding is that this procedure was adopted for the long 6 cylinder heads, but I cannot see any reason it would hurt to do it on the others.
Haven't had the head off my 5J yet (that day is coming, it was still stuck the last time I checked), but parts book shows no ferrules and grommets as used on the U series and some later engines. These are not actually water directors, Those are similar brass inserts, but are actually pressed into theport in the head to direct coolant flow toward specific areas. The grommets and ferrules are a non-directional assembly, they simply seal the head to the block with a rubber seal. Not sure why a simple o-ring was not used, but I guess that surfacing a head would change the clamping of an o-ring so much that the o-ring recesses would have to be recut each time. Seems like the grommet recesses are deep enough that, within the limits of "normal" work, surfacing the head does not change the clamping enough to matter.
On the main bearing.......How loose is it? How did you notice it? While it is certainly possible to roll the upper half of the bearing out and roll a new one in, I am wondering whether this would last long if the main bearing cap needs resizing/line boring. Guess it's certainly possible that the bearing is the problem and a new one will correct it. Note that the bearing half in the cap is doweled in place which makes me doubt that one that was loose could be salvaged with any hope of lasting long.
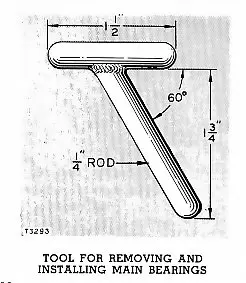
The serviceman's reference book shows a small tool used to insert in the crankshaft oil port and push the bearing shell out by rotating the crankshaft. It is fabricated from 1/4" rod and is fashoned as a bent T with the angle between the top and the leg at a 60* angle. Total height is 2" and total width is 1-1/2". Have also seen a large cotter pin used for the same job. Book also shows using a piece of some sort of flexible material to drive the bearing out with a hammer. Maybe a piece of stiff plastic?
I expect it would be a good plan to plasti-gauge the bearings before deciding whether to attempt replacement of bearings only or whether the crankshaft needs grinding. I believe to plastigauge a main bearing properly, you must jack up the crankshaft so all the clearance is at the bottom where the strip of plastigauge goes.


Our channel highlights machines from the earliest Holt and Best track-type tractors, equipment from the start of Caterpillar in 1925, up to units built in the mid-1960s.
Chapter Nineteen
| Cnr Hiller Lane and Ballarat Road, Hamilton, Vic, 3300Chapter Two
| Pitt Farm, Little Paxton, St Neots, Cambridgeshire, PE19 6HD, UKChapter Fifteen
| Historic Santa Margarita Ranch, 20000 El Camino Real, Santa Margarita, CA 93453, USAChapter Thirty
| Hartley - South Australia
Antique Caterpillar
Machinery Owners Club
1115 Madison St NE # 1117
Salem, OR 97301
Terms & Privacy
Website developed by
AdCo
"I became a member recently because the wealth of knowledge here is priceless."
-Chris R