I don't remember a locknut on the brake adjustment but they have detents that will hold the nut at every 1/6 turn. If you can't turn the nuts, they may be frozen with rust. ."loose juice" and maybe a bit of heat on 'em should loosen 'em up.
Then there's the brake band support bolts . . with the brake pedals depressed, tighten 'em and then back off a turn and a half and tighten the lock nuts.
Thanks ol Grump I will try to some heat if I can figure out where to heat. I cant see any threads that go into a nut but I will look harder. Is the nut on the end of the furthest band looking down the adjustment bolt?
Skip in CT
As you look down the adjustment rod with the hex on the top, you'll see the fork attached to the brake band. .the actual threaded nut is below that, it's several inches long. With just the clutch/brake access covers off, it may be rather hard to reach. If you can't reach it to heat it, you might try tapping on the end of the adjuster. If your critter has a seat tank it may be even harder to reach as you're working through the hole the tool box sits in.
ol Grump I was able to get the adjustment to move with a 1/2" ratchet instead of 3/8 also a good soaking of loose juice over night helped. I did finally take the seat tank off to gain better access to everything. It's all adjusted up the peddles don't go o the floor but still not great breaking. If I pull the track levers back the mackine will stop so I know they are releasing but on a down hill sometimes tough to turn. Can the brake bands come out for relining after taking the top off the rear housing but without removing the drive line?
Thanks again your all so helpful with this old equipment.
Skip in CT
Skip,
There's no drive line in there as such, just the cross shaft the drums, clutches and crown gear mount on. The bands can come out w/o taking the cross shaft out by taking off the tranny cover. Also, the SRB says that the bands can be removed w/o taking the tranny cover off. Maybe is all I'll say about that if you have small paws 😆
Before you go any further, you might try washing the brakes first. Drain the brake/clutch compartments, replace the plugs and dump in enough kerosene or diesel to touch the lower part of the brake drums, then drive the critter back and forth a few minutes w/o releasing the clutches, then drain and let dry.
If that doesn't help the problem, then it's time to pull the bands.
After adjusting the brake a few times I finally decided to reline the brake bands, so I took the top plate of the machine off to remove the bands. I don't have any books on the machine so I am relying on just mechanical skills (a explode view would be great). Anyway I removed the adjustment nut and jacked out a pin anchoring the band but still can't remove the band. There is another smaller pin in the casting pocket with cotter pins holding it in place that seams to be frozen, does this have to be removed in order to remove the band? I'll bet this was real easy when the parts were new.
Skip in CT.
My SRB says there are 3 sections to the brake band, top,center,and lower.
There is also an inspection cover to the rear of the steering clutch case that needs to be removed to gain access to the center and lower sections of the brake band
You need to loosed the support bolt under the stering cluch housing for turning the brake band.
Skip,
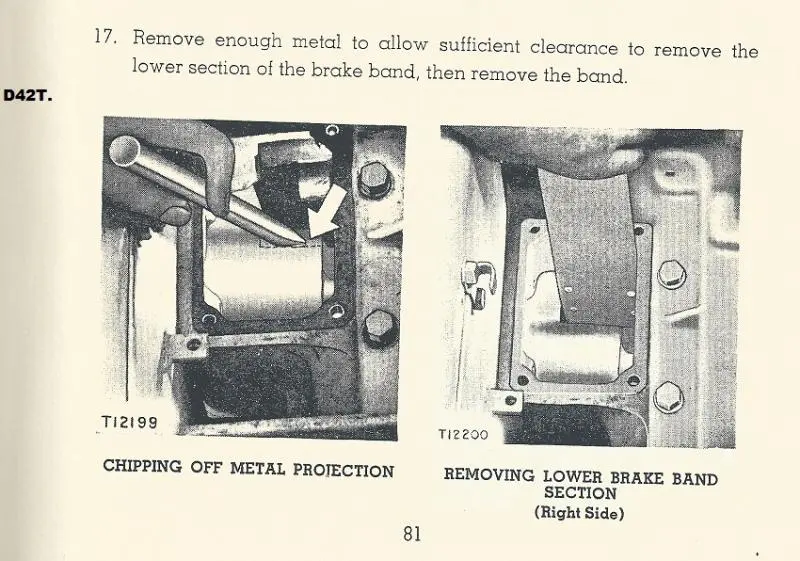
On some tractors the lowers section of the brake band cannot be removed without first removing a portion of metal located adjacent to the reverse idler gear bracket bore. Just remove enough metal to allow sufficient clearance to remove the lower section of the brake band
Kelly
[attachment=17314]D42Tbrakebandremoveal_chipoffmetal..jpg[/attachment]


Our channel highlights machines from the earliest Holt and Best track-type tractors, equipment from the start of Caterpillar in 1925, up to units built in the mid-1960s.
Antique Caterpillar
Machinery Owners Club
1115 Madison St NE # 1117
Salem, OR 97301
Terms & Privacy
Website developed by
AdCo
"I became a member recently because the wealth of knowledge here is priceless."
-Chris R