Original 3-bar grouser height is 1". If you must I'd say build up the leading bar with gap as you mention. If your primarily using it as a dozer you might consider using dozer grousers. Those flat shoe grousers are absolutely useless when trying to get traction in mud, snow, ice, forest debris etc. especially if trying to climb a grade. On the other hand raised grousers will tear up anything when maneuvering as the loader was designed to do.
You have a wonderful day. Best wishes. Deas Plant.
Hi, Agman101.
As I understand it, what you are talking about are commonly called 'ice caulks' - or 'high heels' as one Northern Manitoba visitor to this 4um - King of Obsolete - calls them.
I have zero experience of working on ice but I suspect that I would be doing pretty much what you describe, two short pieces of 're-bar' on the outer ends of the front grouser of those triple grouser plates and one in the middle on the back grouser. It'z possibly a moot point but I did wonder about alternating the pattern between grouser plates.
Just my 0.02. Happy skating.
Hi Team,
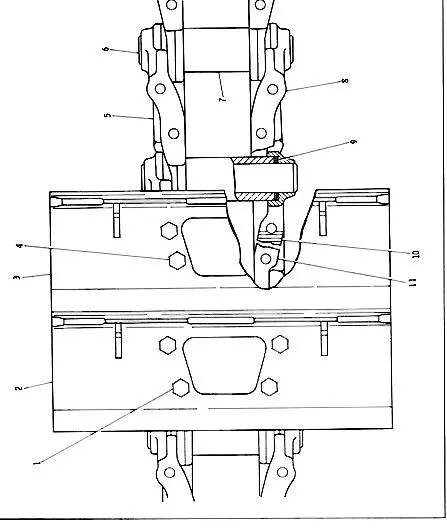
scan from a D6C Parts Book shows the grouser bar placement in relation the the track chain and the position of the bar higher sections on the bar section as well as the for and aft side slip spags.
The trapezoidal cut outs help stop snow/ice build up that usually results in "track popping"--jumping a tooth on the sprocket.
I feel you can adapt your current 3 bar grouser shoes to this style and add a short section of bar the the centre of the other outside (trailing) bar--as you originally said.
Hope this helps.
Cheers,
Eddie B.


Our channel highlights machines from the earliest Holt and Best track-type tractors, equipment from the start of Caterpillar in 1925, up to units built in the mid-1960s.
Antique Caterpillar
Machinery Owners Club
1115 Madison St NE # 1117
Salem, OR 97301
Terms & Privacy
Website developed by
AdCo
"I became a member recently because the wealth of knowledge here is priceless."
-Chris R