ACMOC
Login
ACMOC
Final Drive

Final Drive

Showing 1 to 10 of 19 results
1
gwoods
Topic Author
Offline
Send a private message to gwoods
Posts: 72
Thank you received: 0
I need help before making a mistake. If you are  working on left side ( sitting on seat, the   left side final drive). Got the cap, nut, shims other pieces and ready to turn large nut to remove the housing before the bearing and sprocket. If standing in front of final drive, which direction does spanner wrench handle point. I read the technical instructions, but did not get if I was looking from front or back. If anyone could help I would appreciate.     Counterclockwise on left side of the dozer would want to turn handle to left, but dozer guy said the opposite, but giving him the benefit of not working on one for long time     I wanted a second opinion or many opinions. I see all the dozers in the acmoc magazines and they are impressive. Lots of been there done that.     gnwoods
Please log in or create an account to join the conversation.
Fri, Jun 2, 2023 5:38 AM
trainzkid88
Offline
Member
Send a private message to trainzkid88
Location: b.berg qld
Posts: 2,249
Thank you received: 28
look at the end of the thread it will show you. if your talking about the nut thats behind the outer cover. it needs tightening to 1200 ft/lb when you reassemble the rough rule is 6 ft of pipe on your inch drive breaker bar and to average size blokes and swing on it.

from memory to undo you turn it to the blade if your on the left side according to the seat.

"i reject your reality and substitute my own" - adam savage. i suspect my final words maybe "well shit, that didnt work"

instead of perfection some times we just have to accept practicality

Please log in or create an account to join the conversation.
Fri, Jun 2, 2023 8:33 AM
PhilC
Offline
Member
Send a private message to PhilC
Posts: 665
Thank you received: 0
Reply to trainzkid88:
look at the end of the thread it will show you. if your talking about the nut thats behind the outer cover. it needs tightening to 1200 ft/lb when you reassemble the rough rule is 6 ft of pipe on your inch drive breaker bar and to average size blokes and swing on it.

from memory to undo you turn it to the blade if your on the left side according to the seat.
Both the hex nut on the very end of the dead axle and the large grooved bearing retaining nut are standard right hand threads on both sides of the machine. At least they are on my D6, D8 and 955K.

TK where do you get your information? 1200 ft/lbs on the bearing retaining nut? That sounds a little high and your method of tensioning it ain't gonna cut it.
Please log in or create an account to join the conversation.
Fri, Jun 2, 2023 5:24 PM
gwoods
Topic Author
Offline
Send a private message to gwoods
Posts: 72
Thank you received: 0
Reply to PhilC:
Both the hex nut on the very end of the dead axle and the large grooved bearing retaining nut are standard right hand threads on both sides of the machine. At least they are on my D6, D8 and 955K.

TK where do you get your information? 1200 ft/lbs on the bearing retaining nut? That sounds a little high and your method of tensioning it ain't gonna cut it.
Thanks, does the portion that holds bearing race come off in one piece or the large nut and bearing come off as one piece? I turned the large nut on left side of seat to the right and could see threads. Thought that would push the bearing and the race portion off. The rd 4 final drive ( Life after loss) on you tube all came off together when pressed off. Is there an exploded view of the d4 7u to be found? Is there a final drive being removed video of a d4 7u somewhere in the acmoc archives? I have read and tried to understand the d4 service manual and been confused. I want to take apart, but am now need some help from who has done it. gwoods
Please log in or create an account to join the conversation.
Sat, Jun 3, 2023 10:01 AM
trainzkid88
Offline
Member
Send a private message to trainzkid88
Location: b.berg qld
Posts: 2,249
Thank you received: 28
Reply to trainzkid88:
look at the end of the thread it will show you. if your talking about the nut thats behind the outer cover. it needs tightening to 1200 ft/lb when you reassemble the rough rule is 6 ft of pipe on your inch drive breaker bar and to average size blokes and swing on it.

from memory to undo you turn it to the blade if your on the left side according to the seat.
from my understanding you have unwind the bearing adjuster and that allows access to the bearing and sprocket. after removing the outer cover and the outer nut.
there is a clamp bolt in that adjuster nut that needs to be undone too.

"i reject your reality and substitute my own" - adam savage. i suspect my final words maybe "well shit, that didnt work"

instead of perfection some times we just have to accept practicality

Please log in or create an account to join the conversation.
Sat, Jun 3, 2023 3:18 PM
gwoods
Topic Author
Offline
Send a private message to gwoods
Posts: 72
Thank you received: 0
Reply to trainzkid88:
from my understanding you have unwind the bearing adjuster and that allows access to the bearing and sprocket. after removing the outer cover and the outer nut.
there is a clamp bolt in that adjuster nut that needs to be undone too.
Trainzkid88 could you shoot me a picture of where this clamp bolt. A picture would be most helpful to understand. Thank you gwoods
Please log in or create an account to join the conversation.
Sun, Jun 4, 2023 2:52 AM
ctsnowfighter
Offline
Send a private message to ctsnowfighter
Posts: 1,049
Thank you received: 17
Reply to gwoods:
Trainzkid88 could you shoot me a picture of where this clamp bolt. A picture would be most helpful to understand. Thank you gwoods
The avalable manuals and parts books are your best friends!
Get to know them before you do something you may regret.

Some service/repair operations demand special care and tooling. Pressures to remove bearings, sprockets, pins/bushings are extreme and may be life changing events!
Don't take shortcuts, improvise tooling, etc.

CTS
Please log in or create an account to join the conversation.
Sun, Jun 4, 2023 3:30 AM
Deas Plant.
Offline
Member
Send a private message to Deas Plant.
Location: Currently - DowNunda.
Posts: 6,654
Thank you received: 16
Reply to ctsnowfighter:
The avalable manuals and parts books are your best friends!
Get to know them before you do something you may regret.

Some service/repair operations demand special care and tooling. Pressures to remove bearings, sprockets, pins/bushings are extreme and may be life changing events!
Don't take shortcuts, improvise tooling, etc.

CTS
Hi, gwoods.
This may help.

https://ww2-secure.justanswer.com/uploads/DIRTWRENCH/2011-02-07_042944_d4d_sprocket.pdf

Or this:

https://www.youtube.com/watch?v=hBUMKNfRxe8

There were a couple of related videos on the same page as that link when I looked.

Just my 0.02.
You have a wonderful day. Best wishes. Deas Plant.

Please log in or create an account to join the conversation.
Sun, Jun 4, 2023 4:57 AM
ctsnowfighter
Offline
Send a private message to ctsnowfighter
Posts: 1,049
Thank you received: 17
Reply to Deas Plant.:
Hi, gwoods.
This may help.

https://ww2-secure.justanswer.com/uploads/DIRTWRENCH/2011-02-07_042944_d4d_sprocket.pdf

Or this:

https://www.youtube.com/watch?v=hBUMKNfRxe8

There were a couple of related videos on the same page as that link when I looked.

Just my 0.02.
Perspective - what is it worth to you?

Pictures on youtube - some showing use of a hydraulic bottle jack - YIKES -
When those sprockets let go, it is often with a "BANG", one that you will not soon forget.

NEVER try to pull a sprocket without the NUT in place - it is the only thing keeping that sprocket on the shaft when it lets go!

Same goes with those "cobbled up" track presses.

I operated a press with two opposing cylinders about 8" in Dia, walls were about 3/4" thick. I can tell you for a fact, you do not want to be the operator when a cylinder explodes! Been THERE - DONE THAT! No time to be scared until it is all over and you feel lucky to be alive!

The "books" all talk about "tons" of pressure. How do you relate TONS to something one works with on regular basis - PSI for example. Most of us have seen or know what happens when a split ring fails on a truck tire/wheel at 100 PSI or so.

I think you may find this information found in the link below "awakening".

https://www.unitconverters.net/pressure/ton-force-long-square-foot-to-psi.htm

cts
Please log in or create an account to join the conversation.
Sun, Jun 4, 2023 8:47 AM
trainzkid88
Offline
Member
Send a private message to trainzkid88
Location: b.berg qld
Posts: 2,249
Thank you received: 28
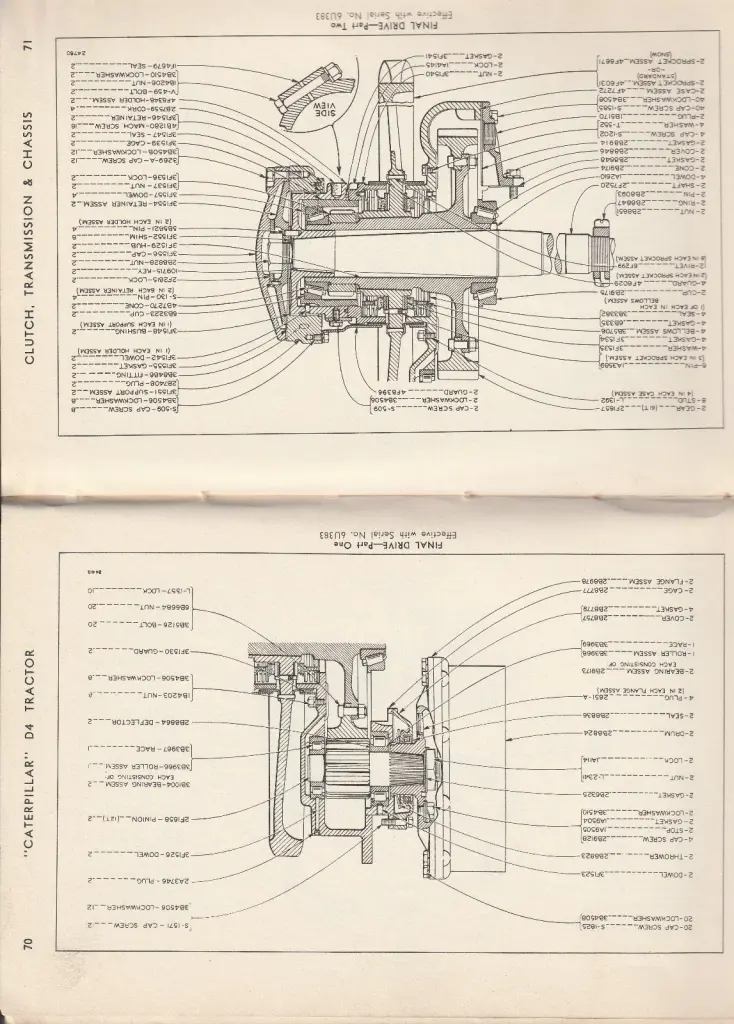
 [attachment=72525]IMG_20230605_0002.jpg[/attachment] the nut i was talking about is under the outer cover.the clamp bolt is part of the adjuster for the sprocket bearingsyou remove it so you can adjust the bearings
Attachment

"i reject your reality and substitute my own" - adam savage. i suspect my final words maybe "well shit, that didnt work"

instead of perfection some times we just have to accept practicality

Please log in or create an account to join the conversation.
Mon, Jun 5, 2023 2:37 PM
trainzkid88
Offline
Member
Send a private message to trainzkid88
Location: b.berg qld
Posts: 2,249
Thank you received: 28
Reply to trainzkid88:
 [attachment=72525]IMG_20230605_0002.jpg[/attachment] the nut i was talking about is under the outer cover.the clamp bolt is part of the adjuster for the sprocket bearingsyou remove it so you can adjust the bearings
Attachment
bugger! i have it upside down.
there is a adjuster nut that you turn with a big c hook spanner to set the bearing tension its under a bolt on cover. yes the diagram is clear as mud.
you can see the nut i say needs to be very tight under the outer cover. no the bearing preload tension isnt that high.

"i reject your reality and substitute my own" - adam savage. i suspect my final words maybe "well shit, that didnt work"

instead of perfection some times we just have to accept practicality

Please log in or create an account to join the conversation.
Mon, Jun 5, 2023 2:42 PM
Showing 1 to 10 of 19 results
1
YouTube Video Placeholder

Follow Us on Social Media

Our channel highlights machines from the earliest Holt and Best track-type tractors, equipment from the start of Caterpillar in 1925, up to units built in the mid-1960s.

Upcoming Events

Veerkamp Open House 2025

Chapter Fifteen

| Placerville, CA

Lake Goldsmith Steam and Vintage Rally

Chapter Nineteen

| 1234 Carngham-Lake Goldsmith Rd, Lake Goldsmith, Victoria, 3373, Australia

Stradsett Park Vintage Rally

Chapter Two

| Stradsett, Nr Downham Market. Norfolk PE33 9HA UK

Chapter 2 The Link Club's AGM

Chapter Two

| Faulkner Farm, West Drove, Wisbech, Cambridgeshire, PE14 7DP, UK
View Calendar
ACMOC

Antique Caterpillar
Machinery Owners Club

1115 Madison St NE # 1117
Salem, OR 97301

[email protected]

Terms & Privacy
Website developed by AdCo

Testimonials

"I also joined a year ago. had been on here a couple of times as a non-member and found the info very helpful so I got a one year subscription (not very expensive at all) to try it out. I really like all the resources on here so I just got a three year. I think its a very small price for what you can get out of this site."
-Jason N

Join Today!