Mike,
I have done 4 or 5 of these carbs and I think I used a different combination on each one. I have a Campbell kit at my shop and tomorrow I will measure both pedestal gaskets and the top cover gasket. Will report back. G
Hi Mike,
from previous posts by others on here you have to mix and match--measure and make a gasket as needed for each individual carb.
I would cut a main cover gasket and pre-assemble the unit with a dob of Blu-Tack, plasticine or similar soft medium, one on each side of the central "Fuel Control tube"
Assemble and dis-assemble the carb and carefully measure the thickness of the two dobs of B-T and cut a gasket of this thickness plus a few thousands of an inch to give it a little crush.
This ensures the tube is held firmly with no leaks at the gasket face and also does not over flex the fragile carb. top cover.
Hope this helps,
Cheers,
Eddie B
if you mount the carb, not install the intake elbow, open fuel and see if its dripping if so you need to use an other gasket because you should not see it dripping , i use a rubber o ring on the lowest middle shaft and paper gaskets for big top gasket and upper middle pedestal. dont tight top and intake of fuel toooo much or top will crack easy!!!
Thanks for the feedback, I look forward to hearing from Gary what thickness gaskets he used on Ernie and Leslie, and I like the suggestion of Eddies to use some Bluetak on the centre pedestal, that will give me a more accurate thickness to aim for, and Marcoten, I understand what you are saying, my old large paper gasket used to weep some fuel and I have now cut a new gasket out of a better quality red gasket paper, and measuring my old paper gaskets I'm thinking the difference in thickness from the large outer gasket and the smaller inner gasket on the pedestal is about .15mm, hopefully Gary can confirm that.
Regards
Mike
Mike,
Here is what I measured, sorry you will have to convert to mm as my caliper is in inches.
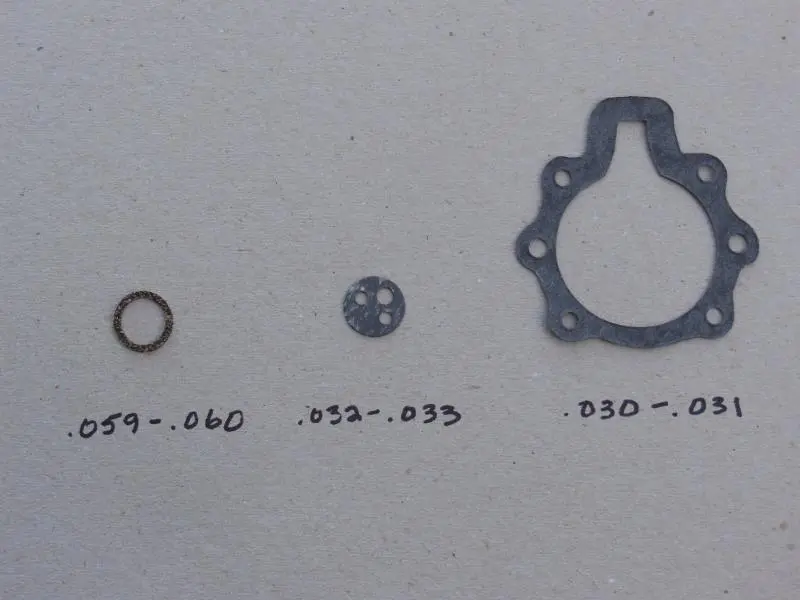
Bottom pedestal is .059 to .060 and is a cork/neoprene combination
Top pedestal is .032 to .033 and is a hard paper
Top cover is .030 to .031 and is also a hard paper but different than the top pedestal
I would have to guess, given my somewhat suspect ability to accurately measure, that the cork/neoprene was cut from a 1/16th sheet and the other 2 were cut from a 1/32nd sheet.
One problem I had with a similar cork/rubber bottom pedestal gasket was that it dramatically shrank after it dried up. It probably was an inferior rubber and not neoprene. G
Mike,
Here is what I measured, sorry you will have to convert to mm as my caliper is in inches.
Bottom pedestal is .059 to .060 and is a cork/neoprene combination
Top pedestal is .032 to .033 and is a hard paper
Top cover is .030 to .031 and is also a hard paper but different than the top pedestal
I would have to guess, given my somewhat suspect ability to accurately measure, that the cork/neoprene was cut from a 1/16th sheet and the other 2 were cut from a 1/32nd sheet.
One problem I had with a similar cork/rubber bottom pedestal gasket was that it dramatically shrank after it dried up. It probably was an inferior rubber and not neoprene. G
[quote="gary ca"]Mike,
Here is what I measured, sorry you will have to convert to mm as my caliper is in inches.
Bottom pedestal is .059 to .060 and is a cork/neoprene combination
Top pedestal is .032 to .033 and is a hard paper
Top cover is .030 to .031 and is also a hard paper but different than the top pedestal
I would have to guess, given my somewhat suspect ability to accurately measure, that the cork/neoprene was cut from a 1/16th sheet and the other 2 were cut from a 1/32nd sheet.
One problem I had with a similar cork/rubber bottom pedestal gasket was that it dramatically shrank after it dried up. It probably was an inferior rubber and not neoprene. G[/quote]
This has just come at the right time for me as i am just rebuilding my carb,Does anyone have a pic of where the cork ring (left on the pic above) goes. I was going to reuse the old gaskets and smear with gasket sealer. The cork ring is missing in mine.It was full of insects,looks like a small wasps nest was inside.
Thanks guys
[quote="blakeystew"]This has just come at the right time for me as i am just rebuilding my carb,Does anyone have a pic of where the cork ring (left on the pic above) goes. I was going to reuse the old gaskets and smear with gasket sealer. The cork ring is missing in mine.It was full of insects,looks like a small wasps nest was inside.
Thanks guys[/quote]
The cork ring goes on the bottom of the pedestal, inside the raised ring in the bowl. Follow edb's and MARCOTEN's directions. You will probably have to experiment some on the right combination of gaskets and thicknesses. Before tightening down the top cover, you should see a slight gap, maybe .010 to .020 inches. If the gap is too big it is possible to break the top cover. Good luck. G
As Stew said, this is a good thread. After sitting for four months, I tried to fire mine up yesterday and had the gas RUNNING out of the carby! I took the pedestal out and reseated it without doing anything with the gaskets. After putting it back on, it took right off and ran without dripping gas. Not sure why what I did fixed it but it did.
I had bought and installed the Olsen gasket kit ($35 US) last year. Again, in trying to get all the drips fixed and the motor to run, I ended up using both of the top gaskets, one tan paper and one black which is thicker, in combination with the top and lower pedestal gaskets to get a working product. Are both top cover gaskets intended to be used? I figured they sent two different ones so either one or the other but not both, would work.
Jan FIFTEEN PV 7207


Our channel highlights machines from the earliest Holt and Best track-type tractors, equipment from the start of Caterpillar in 1925, up to units built in the mid-1960s.
Chapter Nineteen
| Wheatlands Warracknabeal Agricultural Museum 34 Henty Highway, Warracknabeal 3393Chapter Nineteen
| 1234 Carngham - Lake Goldsmith Road Lake Goldsmith VIC 3373Chapter Two
| Folds Farm, Godshillwood, Fordingbridge, Hampshire, SP6 2LU
Antique Caterpillar
Machinery Owners Club
1115 Madison St NE # 1117
Salem, OR 97301
Terms & Privacy
Website developed by
AdCo
"I became a member recently because the wealth of knowledge here is priceless."
-Chris R