Dang....what luck,
Other sources besides cracked head and head gasket would be leaking pre-combustion chamber seal and or pre-com chamber pin hole.
Fill it back up with water and run (if you can) to see if you are getting compression bubbles at the radiator fill. Not practical if you are dealing with a flood or suspect cylinders full of water.
Removing the head will not disturb the liners.
David - The simplest thing to do first is refill the cooling sytem, crank the engine over, and see which specific ports the water comes from. Then remove the precombustion chamber from that cylinder and check it for holes.
Your problem is almost certainly related to corrosion from sitting for an extended period .. and precoms are a major problem area for developing pinholes from corrosion, and letting water into the combustion chamber.
The amount of water in the engine would have been satisfactory, if the water level was visible .. it's been pumped out the exhaust whilst running, and lowered the amount of available coolant, thus creating the overheating.
With luck, you haven't cracked the head .. but unfortunately, these old D333 heads are prone to cracking when they have been overheated.
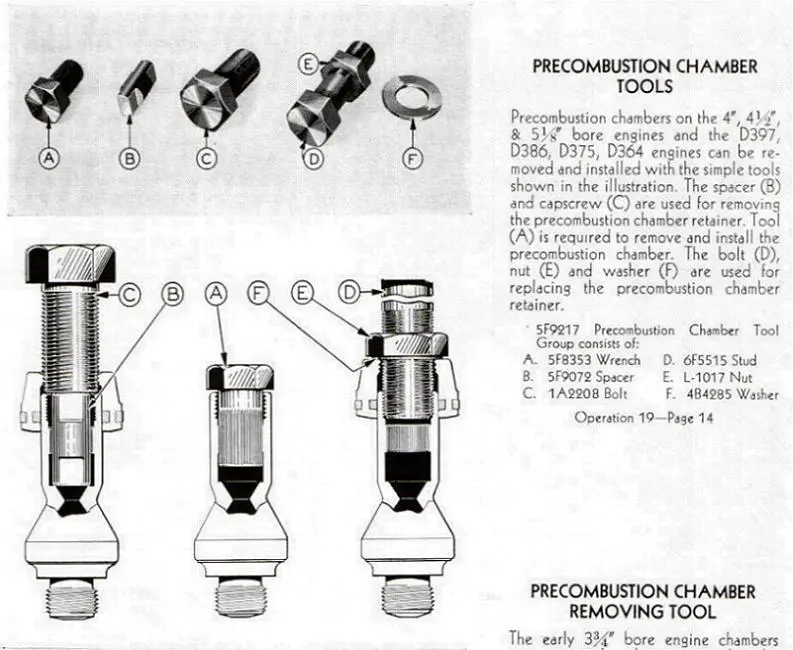
O.K. .. you posted above whilst I was typing. Your #5 precom chamber is definitely holed in a big way. You need the precom removal tool, Cat P/N 5F8353, which looks like a bolt with splines instead of threads. They are often for sale on eBay, or you may be able to borrow one.
You have the later, one-piece precom chambers in your D333, and the 5F8353 tool is shown at (A) in the center bottom pic of this page from the tool book. The other precoms shown are earlier versions.
The precom tool is dropped in the hole vacated by the injector, and engages with the splines on the inside of the precom. You will need a BIG strong 3/4 drive bar, AND a BIG cheater .. 6' long is good .. 😄
These precoms can be VERY tight to remove, so ensure you have a good grip on them, and ensure you can't slip and fall, if the precom lets go with a bang. No need to remove the head yet, you can get the precoms out easier if the head is still bolted to the engine .. rather than trying to wrestle with it attached to a bench.
Here is the page from the manual showing the precom design and removal/installation instructions. When you install the new precom, you need to use anti-seize on the threads, and soap or handcleaner on the o-rings.
Precom design and removal/installation instructions .. http://img364.imageshack.us/img364/8011/precomd333ng1.jpg
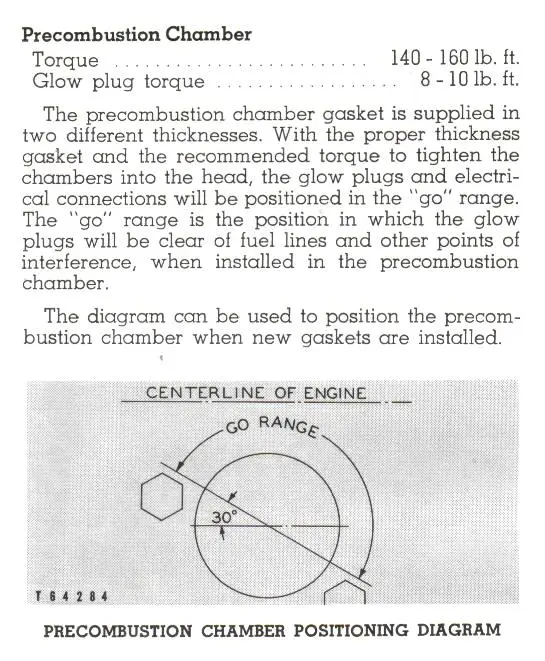
Also, there are several thicknesses of gasket (which is actually a steel ring or washer), and you need to experiment with fitting a couple of different thicknesses to ensure the glowplug hole ends up in the correct position when the precom is tightened.
Cat have a chart that shows a "go" or "no go" arc for the final position of the plow plug hole. This is to ensure that the glow plug can be refitted without problems and doesn't foul components that are close to it.
O.K. .. you posted above whilst I was typing. Your #5 precom chamber is definitely holed in a big way. You need the precom removal tool, Cat P/N 5F8353, which looks like a bolt with splines instead of threads. They are often for sale on eBay, or you may be able to borrow one.
You have the later, one-piece precom chambers in your D333, and the 5F8353 tool is shown at (A) in the center bottom pic of this page from the tool book. The other precoms shown are earlier versions.
The precom tool is dropped in the hole vacated by the injector, and engages with the splines on the inside of the precom. You will need a BIG strong 3/4 drive bar, AND a BIG cheater .. 6' long is good .. 😄
These precoms can be VERY tight to remove, so ensure you have a good grip on them, and ensure you can't slip and fall, if the precom lets go with a bang. No need to remove the head yet, you can get the precoms out easier if the head is still bolted to the engine .. rather than trying to wrestle with it attached to a bench.
Here is the glow plug installation instructions/specifications, and positioning chart, showing the "go" and "no go" positions ..
Un believable!
I am at a loss for words!😊 ( and thats unusual!)
In my wildest dream I never thought that I would find this level of help and knowledge on the net--or anywhere.
Before yall bring tears to my eyes I going to try to print this stuff out and study for tomorow.
Special thanks to you OZ!😊
Fantastic crystal clear explanations
Thanks Guys
David
P.S.
It is against the laws of nature to assemble threaded fasteners with out anti-seize !(Right?)😊
With the rare exceptions.
Rubber assy lube should be OK?
Thanks Magnet!
Need all the support I can get>😊 😊 😊 😊
Actualy the injectors had hex head captive(?) nuts doing a compresion type thing on the injecter.


Our channel highlights machines from the earliest Holt and Best track-type tractors, equipment from the start of Caterpillar in 1925, up to units built in the mid-1960s.
Antique Caterpillar
Machinery Owners Club
1115 Madison St NE # 1117
Salem, OR 97301
Terms & Privacy
Website developed by
AdCo
"I became a member recently because the wealth of knowledge here is priceless."
-Chris R