I would certainly reseal the whole unit while you have it off. An extra $50 or even $100 would be well spent to know you won't be back in there again next year.
Thanks guys is that just a peace of all thread? Were are the pins located and once it's drilled out what do you use to hold the new seal do you have to thread the hole and put a bolt in what size drill bit should be used thanks guys working on doing videos so I can post it for the next guy that comes along
Stevens, search through my posts last summer... I did this repair with the help of people on here. If I recall I measured and took pics of where the pins were located to drill or knock out.
Replace ALL the seals on the unit while you have it out. I missed two on the bottom and need to pull it out again.
Thanks tognot I'll see if I can find it
http://www.acmoc.org/bb/showthread.php?27731-D6-9U-steering-pump-seals/page4
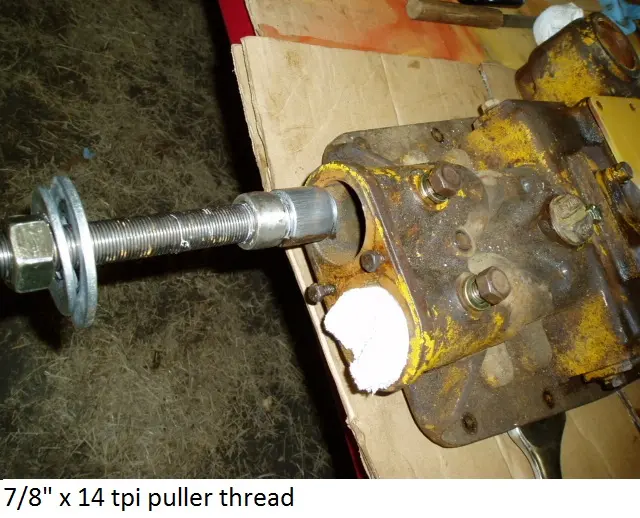
Ok I know you guys gave me pictures of the tool but I'm confused is that just a peace of all thread or is there something welded to the end lol sorry I guess I don't understand how it pulls it out do you just thread the all thread into the retainer and that's it? Thanks again guys
Yes, that's what I recall - 7/8" OD x 14 thread per inch. I used a couple of washers and an old ball bearing ( from a motorcycle axle ?) and let the washers rest against the pump housing so the "puller" would have less friction. I think old magnet posted a picture.
Just double nut two nuts on the all thread, screw it into your pump. Then , with a washer against the pump housing , start cranking on the nut. It took a fair amount of effort , but they pulled out. I set mine out in the Sun ( over 100) to warm it up. : )


Our channel highlights machines from the earliest Holt and Best track-type tractors, equipment from the start of Caterpillar in 1925, up to units built in the mid-1960s.
Antique Caterpillar
Machinery Owners Club
1115 Madison St NE # 1117
Salem, OR 97301
Terms & Privacy
Website developed by
AdCo
"I also joined a year ago. had been on here a couple of times as a non-member and found the info very helpful so I got a one year subscription (not very expensive at all) to try it out. I really like all the resources on here so I just got a three year. I think its a very small price for what you can get out of this site."
-Jason N