I would like someone to verify but I believe it is possible to change the front seal as you describe. Also check coupling alignment while your in there.
Hi Team,
a seal change can be carried out just as you said, remove the pucks and slide the T/C Flange off the splined shaft to access the lip type seal and change it out.
The seal run area may need a Speedy Sleeve repair if worn--fill the groove with epoxy and machine true before fitting the sleeve or the seal lip will likely burn due to heat not being able to transfer away from the sleeve--the air in the groove under the sleeve is a poor conductor of heat.
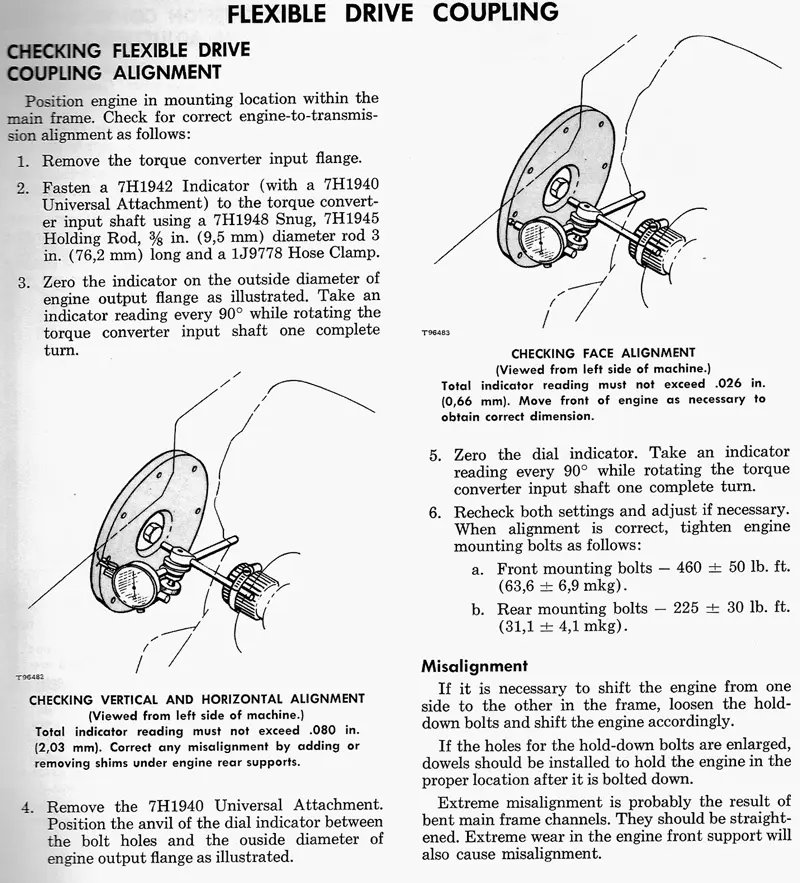
Also as OM recommends check the engine drive flange to T/C shaft alignment as per the scan below. It is well known that the shims under the rear engine mounts were known to wear or be missing after the rear mounts bolts loosened/broke.
We often found if the bolts were loose/missing that both the rear engine mounts and the chassis pads were worn and needed refacing or needed building up to restore a flat mounting surface.
Also check the front engine mount rubberized bushing for failure along with the shims worn/missing--either of these cause misalignment of the flanges and this results in early hour failure of the pucks or worse still a broken crankshaft.
Hope this helps.
Cheers,
Eddie B.
Its best to try make up a contraption to pull the seal in to place as there isn't much room there to tap it in, and if it goes in skew or gets damaged during installation it will most certainly leak again shortly.
I finally had time to work on this today. I am getting a fair amount of play in the torque converter shaft now that I have the drive pucks out. Can the torque converter be removed without pulling the transmission? It looks like I have a bad bearing somewhere in the torque converter!
My service manual shows removing the torque converter and transmission as a unit.
Converter can be removed on it's own.
When putting it back into place make sure the gasket between it and the transmission is glued in place beforehand. Requires a few choice words to assist with installation.
Hi,
Glum has it.
Take the opportunity to fit new "O" Ring seals to the two T/C pipes inside the Trans/T/C joint area.
Be sure to check the coupling drive splines between the Trans and T/C as from memory they are soft and so is the T/C output shaft--had a few in that wore the splines off and naturally there was no drive--hence the T/C units came in without the trans.
To make getting the T/C out easier it pays to remove the trans pump from the front of the T/C case.
Cheers,
Eddie B.
I have it all loose, but there is one shaft that goes between the transmission and the torque converter that is holding it in there. How do I get that shaft out? If sitting on the tractor it's on the left side about 1/4 of the way down. Is it the pinion shaft?
Hi,
only thing I can think of in that area is the steering pump--which I forgot about removing too--now you mention it either one of the pumps is a bit of a Chinese puzzle to get out--pump needs to be just so and turned from its mounted orientation as needed and the flywheel drive flange may need to be removed too, along with a couple of bolts in the flywheel cover plate--all from hazy memory--there were I think two different iterations of drive flange which needed different tactics.
It is some 20 or 30 years since I worked on one.
You should be splitting the T/C away from the Trans at the rearmost bolts of what looks to be an adaptor/spacer ring between the two units.
Hope this helps--sorry about these omissions in the first post.
Regards,
Eddie B.


Our channel highlights machines from the earliest Holt and Best track-type tractors, equipment from the start of Caterpillar in 1925, up to units built in the mid-1960s.
Antique Caterpillar
Machinery Owners Club
1115 Madison St NE # 1117
Salem, OR 97301
Terms & Privacy
Website developed by
AdCo
"I also joined a year ago. had been on here a couple of times as a non-member and found the info very helpful so I got a one year subscription (not very expensive at all) to try it out. I really like all the resources on here so I just got a three year. I think its a very small price for what you can get out of this site."
-Jason N