I am not able to make your photo larger. Thus I cannot tell where the pen is pointing. Can you repost the picture?
Matt
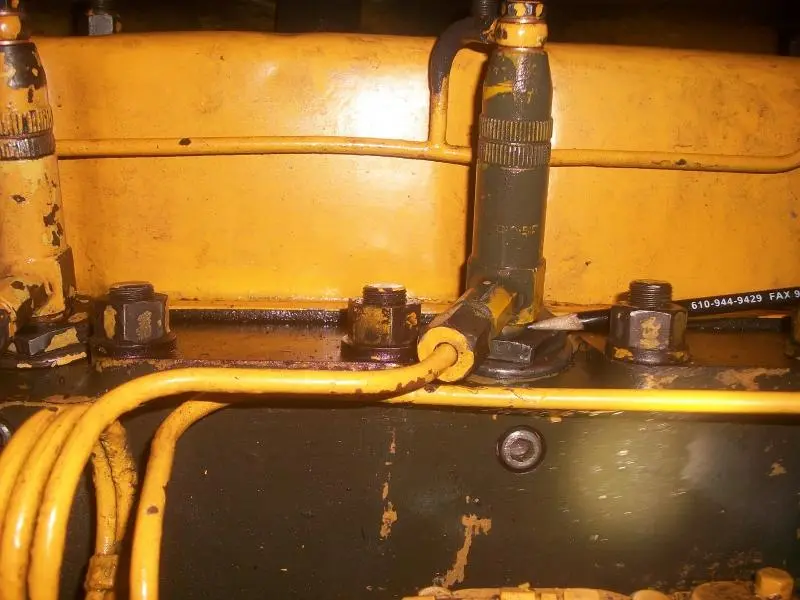
ok will take a new pic of the injector i tried to make it bigger but i couldn't either. It's leaking at the point of the pencil.
Hi Team,
provided you got the dowel in the cap nut to align with the slot in the nozzle body and no lint or dust in between the nozzle and the nut shoulders, the end plate and nozzle body, the concave/convex sealing surfaces of the nozzle and the injector body, also the nut torqued to 70 lb. ft. you should have no leaks for a "new" injector.
If the seat area is scuffed or had crud between the surfaces they will have to be lapped together and everything scrupiously cleaned and resassembled over again.
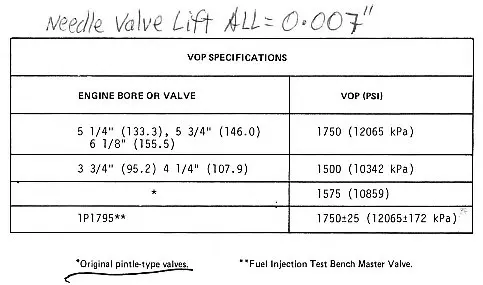
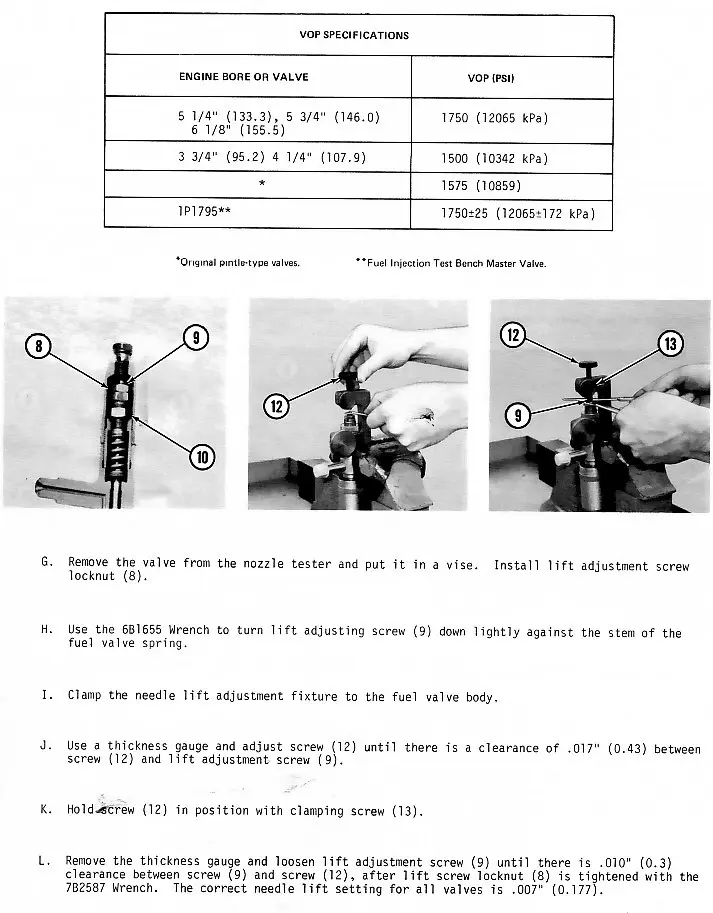
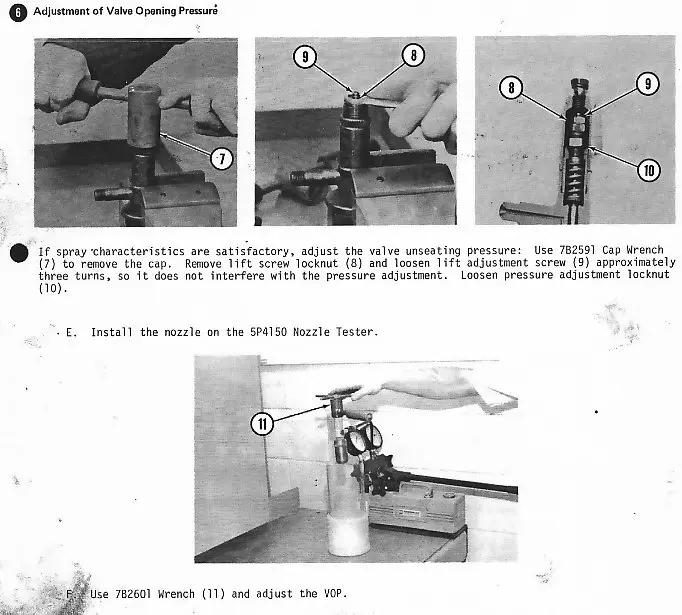
See sequence and adjustments posted below.
These things can be very finnicky to set up and get operating correctly for the inexperienced, I used to get get them sent to me from other Dealers to do up.
I do not know who does them now I have retired.
There is a special concave/convex lapping block set to redo the nozzle and body faces and also to do the concave in the end of the needle seat face.
Hope this helps.
Cheers,
Eddie B.
I second what Edb say's. They can be very tricky to keep clean on assembly. Everything has to go together within microns or internal leaks will result. Another thing that you need to be concerned about is the breaking pressure. Everytime they are apart the pressure needs to be checked.
Matt
cleaned everthing up reassembled and still leaks from there not as bad as it first did. i guess there is a dowel that is used as a lock for the endcap that goes into a hole on the injector body
Hi Team,,
the nut lock dowel, L shaped and about 1/8" dia, is removed from the outside of the nut and is no longer used, the dowel I was talking about is punched flush into the nut, is about 3/32" dia, it protrudes into the nut and positions the injector nozzle within in the nut. If there is any crud at the shoulder inside the nut ,where the end plate of the nozzle seats, the nozzle will not sit square and will distort and leak.
You may have to lap the nozzle and the body together at their concave/convex parting faces, there is a special lapping tool to do these on and at times I have had to still lap the nozzle and body together to get a good seal--they can be finniky-- lap them with a figure of 8 motion as well as twisting back and forth until you can see a good surface contact--not easy-- use the finest engine valve lapping paste you can find. The propper paste is a true lapping compound but is usually only available in largish tubs here in OZ. and expensive.
Make sure you clean out all traces of the paste or the needle will stick and wear out real quick. You can also lap, on a flat sheet of glass, the flat faces of the nozzle plate and body. If the nozzle body to end plate face has dowels in they are usually not too tight and can be gripped carefully with a good pair of vise grips and rotated and pulled at the same time to remove them.
You have to make sure there is no scratches going across the faces but any are circular so they help seal. To do this just rotate a couple of turns after you feel you have a good true face, then clean up and inspect under a magnifier or magnifying glass, what ever you have will have to do.
Hope this helps.
Cheers,
Eddie B.
hello 1948catD4 ,i made this info up from someones info they posted ,may help,bruce oz
Hi Bruce,
I believe he has a fuel leak and not a combustion gas leak where indicated.
Cheers,
Eddie B.
yeah i have a fuel leak the fuel comes up the my penciel is pointing earlier in the thread. I took my old injector out and I used the spray valve retainer nut assembly from it and used the new injector valve assembly, and nozzel end and put it in the old spray valve assembly and tighten everything up and put it back in the precup and tightend down and when i fired it up it didn't leak right away then it started to leak. but the first time I put everything together the the flat nozzel end came off the valve assembly and didn't seal and i flatened the 2 little dowels on the bottom of the valve assembly thats when it leaked alot because it wasn't sealing so i took apart the other injector i have and used that valve assembly and nozzel assembly and but it all back together and not it takes about 5 to 10 mins to start leaking
I guess i better go have it checked out at the local desiel injection shop before i blow the tractor up and waste more desiel fuel . I took off the retainer cap assemblys with a pipe wrench making sure not to damage the cap and tightend them up with the pipewrench so i have noway of getting the 70 lbs torque that they require.
Anymore info would be a big help to me
Thanks
Daniel


Our channel highlights machines from the earliest Holt and Best track-type tractors, equipment from the start of Caterpillar in 1925, up to units built in the mid-1960s.
Antique Caterpillar
Machinery Owners Club
1115 Madison St NE # 1117
Salem, OR 97301
Terms & Privacy
Website developed by
AdCo
"I also joined a year ago. had been on here a couple of times as a non-member and found the info very helpful so I got a one year subscription (not very expensive at all) to try it out. I really like all the resources on here so I just got a three year. I think its a very small price for what you can get out of this site."
-Jason N