The tell tale line could be plumbed back to the tank or maybe into the line from the tank just before the transfer pump. Like SJ says, it's showing there's a problem with the injectors. Doing something about it isn't simple these days though, not sure if the injector parts are still available. Maybe you have some spare injectors? All the fuel leaking out of it isn't getting injected, so it's loosing you some power.
On the generator, I show one 130 watt 6 volt with a switch on the side of the regulator that does not use a battery. I also show a 75 watt with a push pull cable type switch arrangement for no battery. The type of regulator with the 3 terminals (BAT, FLD, GEN (or ARM) usually is used for a battery type system, though I think I have seen one with a NO BAT terminal on it to connect the lights to.
If it has been a long time since the generator ran, it may need to be polarized by connecting a battery across the armature (brush leads) observing correct polarity for NEG ground system. If you have a standard 3 terminal regulator, simply jump from BAT to ARM (GEN) terminal after connecting all the wires to the battery, generator and regulator.
Is this the thread you're looking for?
http://www.acmocbb.org/ACMOC_BB/showthread.php?t=5179
You must have an early J model, later units had the bleed line plumbed in to a provided tap on the suction side of the fuel transfer pump. Cat's response to customer complaints about just that problem.....course without the tell-tale line you don't know what's going on with injector leaks.
bocatfour,
The inspection cover for the steering clutches are under the seat, that's also where you can adjust the brakes and clutches. OR, you could take the two covers off the rear (just below the transmission cover) and gain access that way but you wouldn't be able to get to the adjustments.What you're actually doing is washing the brakes. .not the clutches themselves unless you start hitting the steering clutch levers.
If you do take the cover off under the seat you'll notice the bellcranks that activate the steering clutches. There are bearings in 'em that need some oil as they tend to freeze up and can really stiffen up the clutch levers.
Thanks for all the helpful input! Yesterday I pulled the 2 small covers on the back of the tractor, as well as the larger one under the seat, attempting to find access to the steering clutches for cleaning purposes. But as mentioned, only found adjustment points for brakes and clutches. I did take some slack out of the steering levers while I had access to the adjustments. Brakes seemed ok, but removed the two drain plugs under the rear area for possible drainage. No problem there, all dry!
So today will probably deal with the dripping fuel overflow line by either installing a container to catch the fuel, or tapping it into the main fuel line.
Thanks again for all the help!
BOBCATFOUR
So gave the D4 a test run after adjusting the steering clutches. Its working fine now, so guess the clutches just were not releasing enough before, making turning almost impossible!
I also dealt with the fuel line leak by piping it back into the big main line to the pump.
One other adj I have been trying to make is on the left track, as it sags a bit, and has actually derailed at one point! Right side is ok. But, have made no progress trying to free up the adj nut so I can tighten the track! I've been trying for a couple yrs now by applying heat and penetrating oil, big pipe wrenches, etc, but so far, nothing will budge! Considering the adjustment prob has not been used for 30-40 years, suppose I can't expect it to be free. Any helpful hints for this problem????
Other then that, guess I am ready to go for the Spring weed control chores.
Bobcatfour
If you've backed off the pinch bolts and tried everything and the nut is still frozen up, about the only thing you can do is replace the spring bolt and nut. There is a "mickey mouse" solution I hate to suggest and that's to pull the idler forward (using a comealong between the blade and idler),cut and split a piece of pipe to put in as a shim. You'll have to hose clamp it in place or it'll drop out. .like I said, it's "mickey mouse" but it should work 'til some time you can drop the track and do it right. If you decide to try this, before you put the pipe shim in try once more to free the adjusting nut up. .it might move as it won't have pressure against it now.
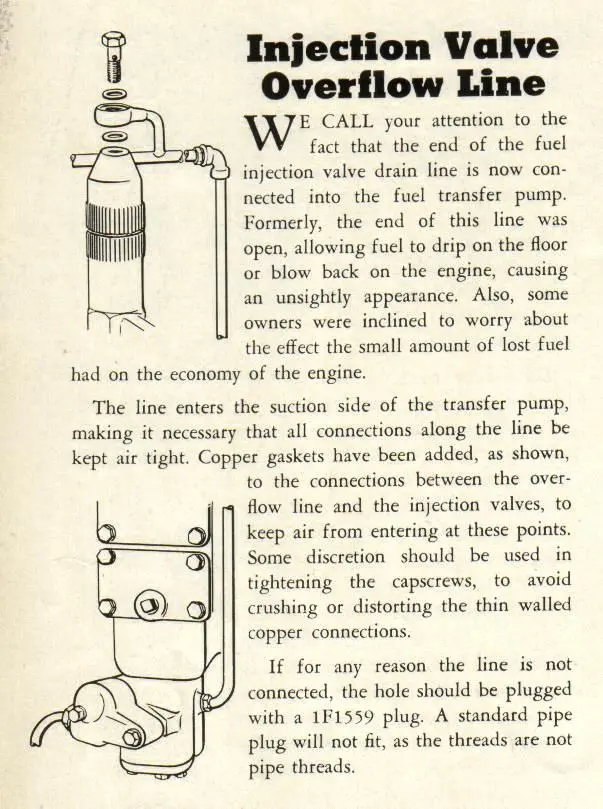
Here is the injection valve overflow line modification advice, from the Caterpillar Service Magazine, dated Sept 20, 1943 ..


Our channel highlights machines from the earliest Holt and Best track-type tractors, equipment from the start of Caterpillar in 1925, up to units built in the mid-1960s.
Chapter Nineteen
| Wheatlands Warracknabeal Agricultural Museum 34 Henty Highway, Warracknabeal 3393Chapter Nineteen
| 1234 Carngham - Lake Goldsmith Road Lake Goldsmith VIC 3373Chapter Two
| Folds Farm, Godshillwood, Fordingbridge, Hampshire, SP6 2LU
Antique Caterpillar
Machinery Owners Club
1115 Madison St NE # 1117
Salem, OR 97301
Terms & Privacy
Website developed by
AdCo
"I became a member recently because the wealth of knowledge here is priceless."
-Chris R