ACMOC
Login
ACMOC
D2 transfer pump rebuild tools

D2 transfer pump rebuild tools

Showing 1 to 10 of 17 results
1
neil
Topic Author
Offline
Moderator
Admin
Send a private message to neil
Posts: 6,981
Thank you received: 21
Would anyone have the rebuild tools they'd be willing to rent so I can get my pump done? I think it's the tamping tool that's the key piece right?
I noticed that the main engine started missing from what I assume was poor transfer pump pressure, particularly after I broke the fuel filter drain off and fuel started pouring out the bottom
__PRESENT
Please log in or create an account to join the conversation.
Mon, Jul 19, 2021 7:42 PM
d2gary
Offline
Member
Send a private message to d2gary
Posts: 1,281
Thank you received: 0
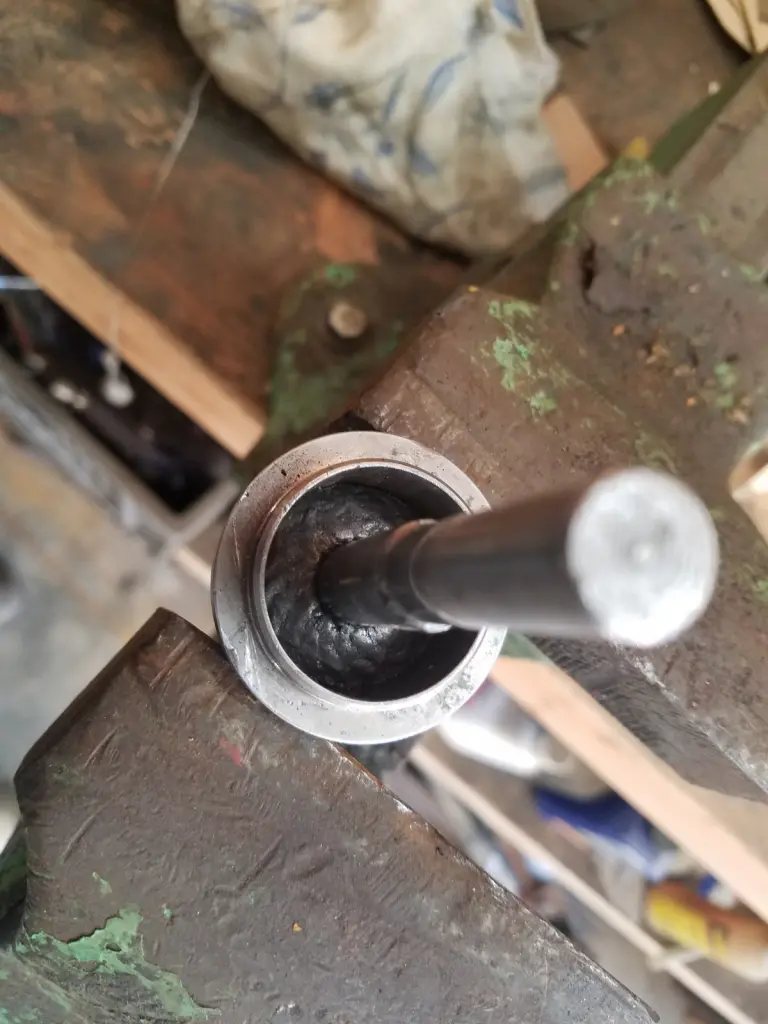
Hey Neil, the tool to hold the spring down can easily be made. I used a bearing splitter and a piece of channel iron for mine but you could just cut a piece of steel and use some clamps to hold it down until the gear is on. I just used an appropriate size deep socket to tamp in the packing. Mine runs in the green with the pony motor and pegs the gauge once the main starts.
Please log in or create an account to join the conversation.
Tue, Jul 20, 2021 9:04 AM
novavalleycat
Offline
Send a private message to novavalleycat
Posts: 208
Thank you received: 0
Reply to d2gary:
Hey Neil, the tool to hold the spring down can easily be made. I used a bearing splitter and a piece of channel iron for mine but you could just cut a piece of steel and use some clamps to hold it down until the gear is on. I just used an appropriate size deep socket to tamp in the packing. Mine runs in the green with the pony motor and pegs the gauge once the main starts.
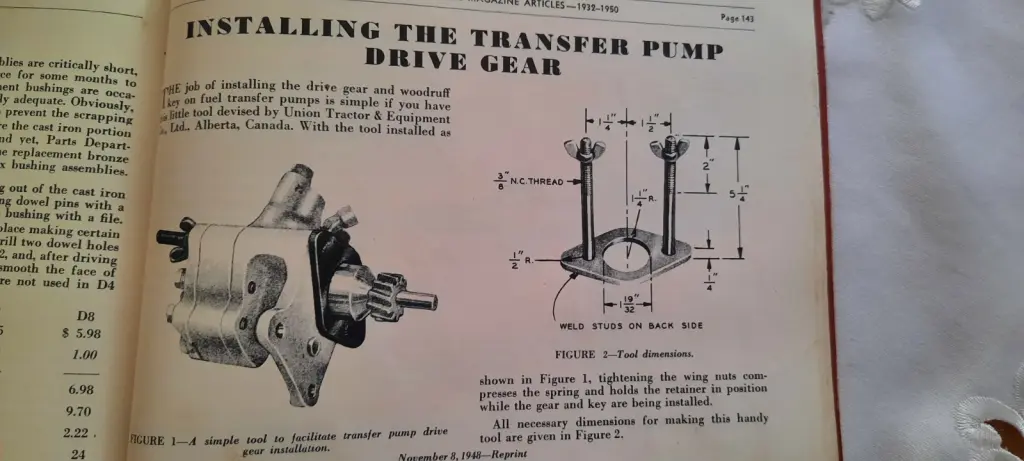
Neil go to YouTube and look under D2..3400 Rebuild by Toby Nelson,he will show you how to build the tools quite simple,I did it and it turned out good not to his specifications a bit simpler but works
Please log in or create an account to join the conversation.
Tue, Jul 20, 2021 10:50 PM
novavalleycat
Offline
Send a private message to novavalleycat
Posts: 208
Thank you received: 0
Reply to novavalleycat:
Neil go to YouTube and look under D2..3400 Rebuild by Toby Nelson,he will show you how to build the tools quite simple,I did it and it turned out good not to his specifications a bit simpler but works
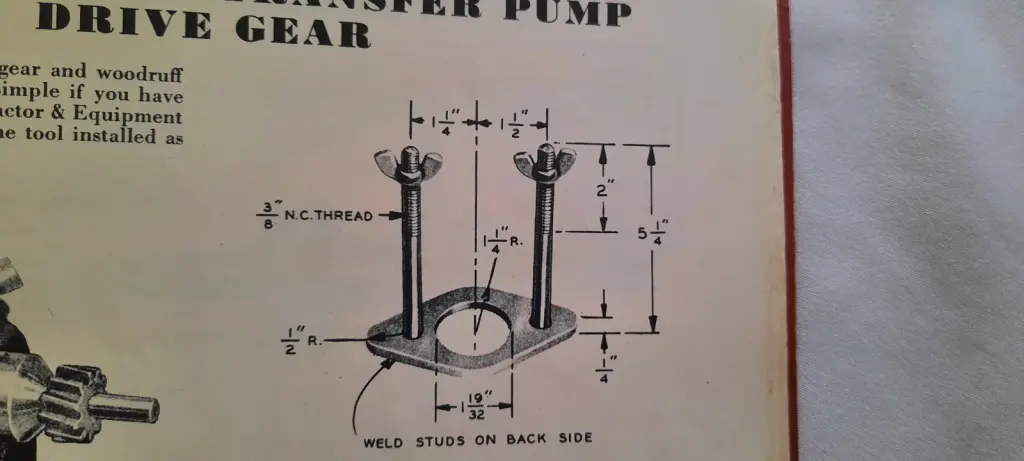
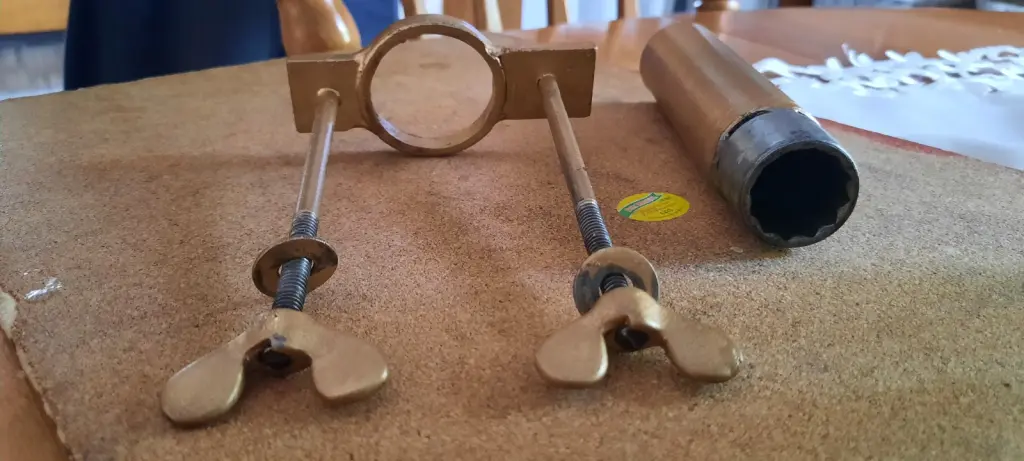
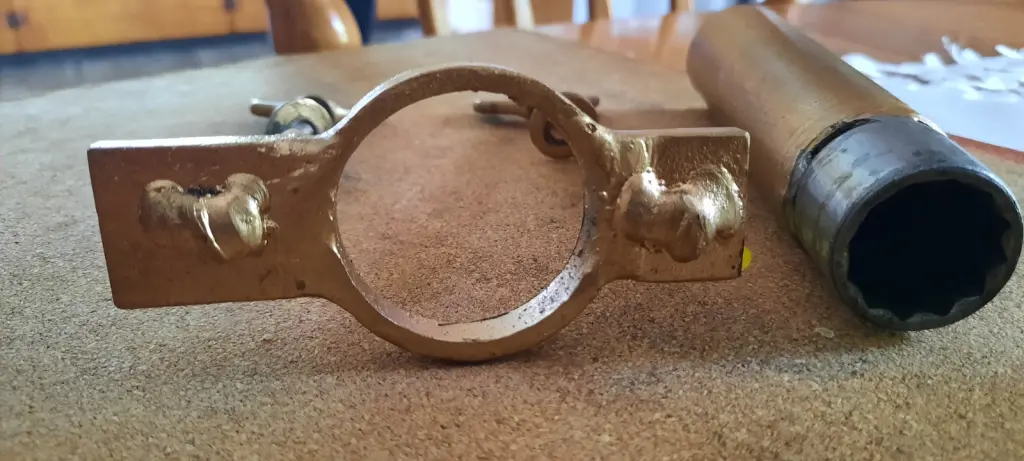
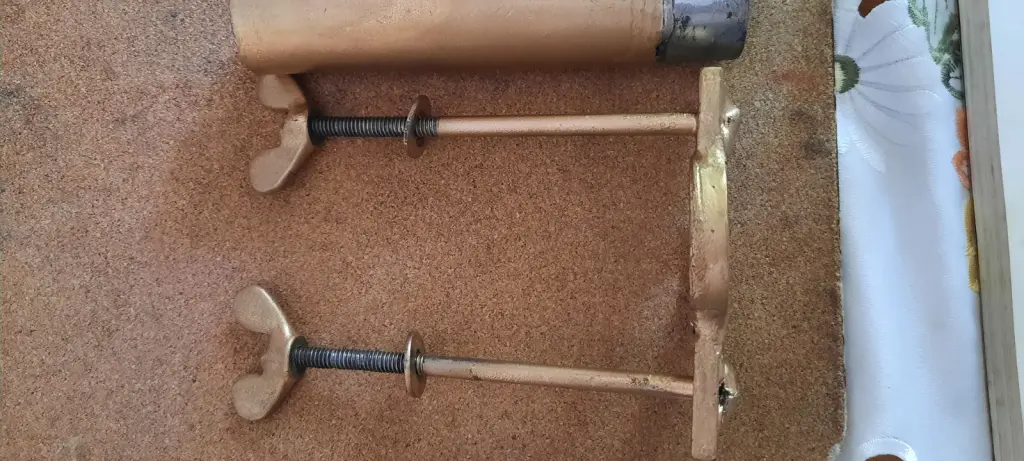
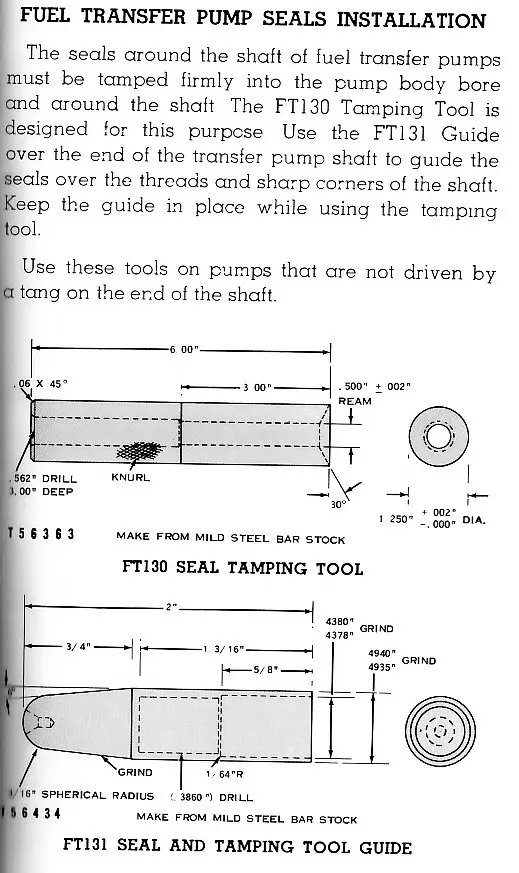
Neil...a couple pics of the design from the book and some pics of the one I made.

[attachment=64144]20210720_154320.jpg[/attachment][attachment=64145]20210720_154328.jpg[/attachment][attachment=64146]20210720_154557.jpg[/attachment][attachment=64147]20210720_154537.jpg[/attachment][attachment=64148]20210720_154428.jpg[/attachment]
Attachment
Attachment
Attachment
Attachment
Attachment
Please log in or create an account to join the conversation.
Wed, Jul 21, 2021 1:57 AM
edb
Offline
Member
Send a private message to edb
Posts: 4,027
Thank you received: 0
Hi Team,
cannot get Search to work correctly to link back to many past postings of drawings for the needed tooling and explanations even when using the " " at each end of the wording--it keeps coming back to the main discussion page index for today.

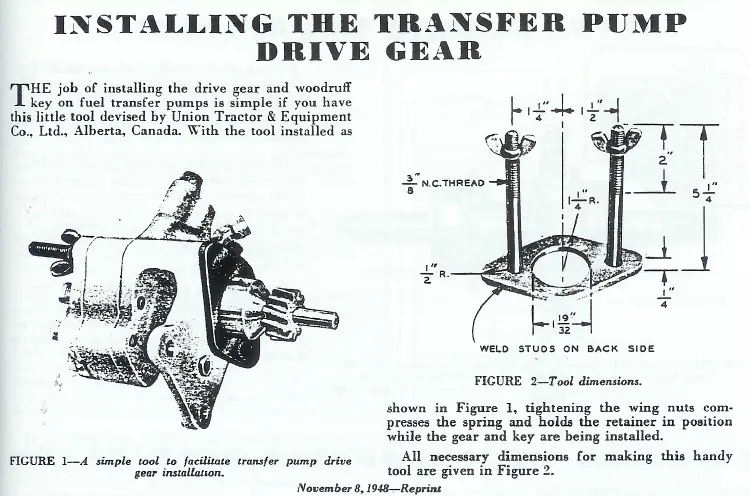
I have added the Cat drawings for compressing  tooling and the guide tooling that is for D4 etc up, you can modify the dimensions to suit the D2 as described below. The one I made has the same taper and outside diameter as the D4 but is longer (2.875") overall and has a full length bore the same as the smaller diameter shown in the drawing. I used a drill of 11mm  diameter as this comes out at the imperial size bore needed to achieve a bore that did not need the reamer to get the neat fit for the shaft diameter--the bore inside is around 1.825" deep on the straight sides--not allowing for the drill point.
Use the guide tool to slide the packings past the sharp edge at the gear step diameter change or you will catch the packing inner bore and jeopardise the packing inner seal surface.
I made my cone spring compressing tool the same as shown above by using a piece of pipe with a suitable inner diameter and added the ears to suit--I used some long/all thread stock to make suitable studs/bolts for drawing down.
Hope this helps.
Cheers,
Eddie B.
 
Attachment
Attachment
Please log in or create an account to join the conversation.
Wed, Jul 21, 2021 8:52 AM
D4Jim
Offline
Member
Send a private message to D4Jim
Location: NW Kansas
Posts: 1,334
Thank you received: 12
Reply to edb:
Hi Team,
cannot get Search to work correctly to link back to many past postings of drawings for the needed tooling and explanations even when using the " " at each end of the wording--it keeps coming back to the main discussion page index for today.

I have added the Cat drawings for compressing  tooling and the guide tooling that is for D4 etc up, you can modify the dimensions to suit the D2 as described below. The one I made has the same taper and outside diameter as the D4 but is longer (2.875") overall and has a full length bore the same as the smaller diameter shown in the drawing. I used a drill of 11mm  diameter as this comes out at the imperial size bore needed to achieve a bore that did not need the reamer to get the neat fit for the shaft diameter--the bore inside is around 1.825" deep on the straight sides--not allowing for the drill point.
Use the guide tool to slide the packings past the sharp edge at the gear step diameter change or you will catch the packing inner bore and jeopardise the packing inner seal surface.
I made my cone spring compressing tool the same as shown above by using a piece of pipe with a suitable inner diameter and added the ears to suit--I used some long/all thread stock to make suitable studs/bolts for drawing down.
Hope this helps.
Cheers,
Eddie B.
 
Attachment
Attachment
I'd highly recommend making the tamping guide out of tool steel and hardened as the one I made from mild steel lasted for one installation. The thin walls are very delicate.

Cats Forever

Please log in or create an account to join the conversation.
Wed, Jul 21, 2021 11:24 AM
neil
Topic Author
Offline
Moderator
Admin
Send a private message to neil
Posts: 6,981
Thank you received: 21
Reply to D4Jim:
I'd highly recommend making the tamping guide out of tool steel and hardened as the one I made from mild steel lasted for one installation. The thin walls are very delicate.
(Just got back from a golf trip so am catching up - thanks for your replies everyone)
Eddie, does the guide stay on the shaft while the tamping takes place, or just when slipping the new seal over the shaft, and then remove it before tamping. And how hard are we talking for tapping the tamping tool? I'm imagining not whaling on it but more than just light taps? And how do I know when I've tamped enough?
Please log in or create an account to join the conversation.
Thu, Jul 22, 2021 9:17 AM
greghill25
Offline
Send a private message to greghill25
Posts: 24
Thank you received: 0
Reply to d2gary:
Hey Neil, the tool to hold the spring down can easily be made. I used a bearing splitter and a piece of channel iron for mine but you could just cut a piece of steel and use some clamps to hold it down until the gear is on. I just used an appropriate size deep socket to tamp in the packing. Mine runs in the green with the pony motor and pegs the gauge once the main starts.
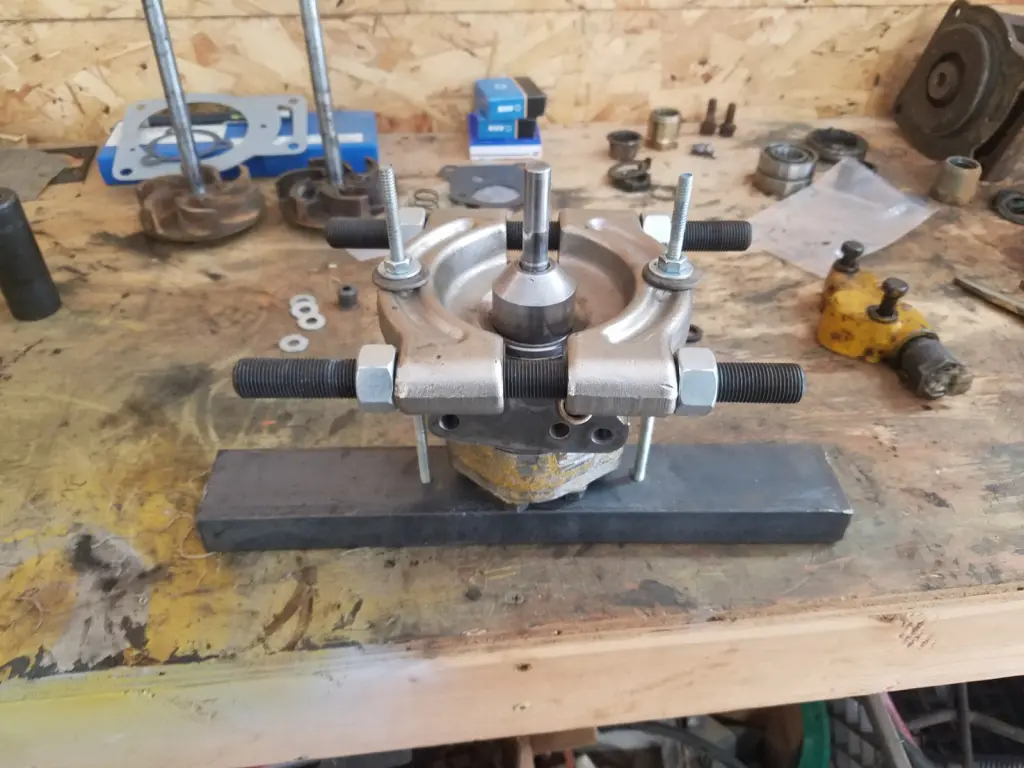
[quote="d2gary post=229937 userid=7234"]Hey Neil, the tool to hold the spring down can easily be made. I used a bearing splitter and a piece of channel iron for mine but you could just cut a piece of steel and use some clamps to hold it down until the gear is on. I just used an appropriate size deep socket to tamp in the packing. Mine runs in the green with the pony motor and pegs the gauge once the main starts.
 [/quote]
We might need that kind of tool. Gonna give this a try.
Please log in or create an account to join the conversation.
Thu, Jul 22, 2021 2:18 PM
d2gary
Offline
Member
Send a private message to d2gary
Posts: 1,281
Thank you received: 0
If I was going to do a bunch of pumps I would make the tool but for one here and there I just used what was at hand. The packing that I got from Cat was quite stiff and I had to open it up to get it around the shaft so there wasn't a problem getting it over the step in the shaft. When you tamp in the packaging you can feel when it hits bottom and seats. According to the Squatch video you just want some resistance when turning the shaft. [attachment=64155]20210501_111408.jpg[/attachment][attachment=64156]20210501_100700.jpg[/attachment]
Attachment
Attachment
Please log in or create an account to join the conversation.
Thu, Jul 22, 2021 8:47 PM
edb
Offline
Member
Send a private message to edb
Posts: 4,027
Thank you received: 0
Reply to d2gary:
If I was going to do a bunch of pumps I would make the tool but for one here and there I just used what was at hand. The packing that I got from Cat was quite stiff and I had to open it up to get it around the shaft so there wasn't a problem getting it over the step in the shaft. When you tamp in the packaging you can feel when it hits bottom and seats. According to the Squatch video you just want some resistance when turning the shaft. [attachment=64155]20210501_111408.jpg[/attachment][attachment=64156]20210501_100700.jpg[/attachment]
Attachment
Attachment
Hi Team,
I use the installer sleeve to slip the packing over the shaft and into the main housing, remove the sleeve and for the old rope style packings you need to tamp or press fairly well to set the packing. Then I install the sleeve into the cone packing and install it into the cone and tamp I leave the sleeve in place and fit it to the shaft at which time the sleeve is forced out of the packing as the cone is installed and the clamp then used to pull the cone into place to enable the drive gear fitment.
The machined ring on one side surface of the gear faces out to indicate it is a later gear used from an update that was done, the drive ratio was changed to make the transfer pumps turn faster for better fuel pressure--the ringed gears cannot be interchanged with the old un-ringed ones and vice/versa or gear damage will ensue--the said gears should be a different tooth count and diameters would be different also.
I will see if I have any data on the change which I feel was back in the 1930's--and post if found.

The new style wrapped packings fall to pieces if tamped and should only require a fairly light pressing to set them as they are softer than the older rope style packings--there is also a stronger packing compression spring that came in at some time--ensure this is fitted to keep more crush on the packings.
An insufficiently tamped/pressed packing would show as fuel leakage at the tell tale drain tubes or engine oil dilution if both leak as was the case of the 212 Grader we worked on recently due to the fuel tank being lower that the filter tower--yes, we had fitted new gaskets, another surfaced lid, and bleed taps and bodies to no avail thinking air was leaking in there, --air would bleed into the filter tower via the non tamped packing fitted from some time in the past history of the unit and thereby causing hard starting.

Cheers,
Eddie B.
Please log in or create an account to join the conversation.
Fri, Jul 23, 2021 9:37 AM
neil
Topic Author
Offline
Moderator
Admin
Send a private message to neil
Posts: 6,981
Thank you received: 21
Reply to edb:
Hi Team,
I use the installer sleeve to slip the packing over the shaft and into the main housing, remove the sleeve and for the old rope style packings you need to tamp or press fairly well to set the packing. Then I install the sleeve into the cone packing and install it into the cone and tamp I leave the sleeve in place and fit it to the shaft at which time the sleeve is forced out of the packing as the cone is installed and the clamp then used to pull the cone into place to enable the drive gear fitment.
The machined ring on one side surface of the gear faces out to indicate it is a later gear used from an update that was done, the drive ratio was changed to make the transfer pumps turn faster for better fuel pressure--the ringed gears cannot be interchanged with the old un-ringed ones and vice/versa or gear damage will ensue--the said gears should be a different tooth count and diameters would be different also.
I will see if I have any data on the change which I feel was back in the 1930's--and post if found.

The new style wrapped packings fall to pieces if tamped and should only require a fairly light pressing to set them as they are softer than the older rope style packings--there is also a stronger packing compression spring that came in at some time--ensure this is fitted to keep more crush on the packings.
An insufficiently tamped/pressed packing would show as fuel leakage at the tell tale drain tubes or engine oil dilution if both leak as was the case of the 212 Grader we worked on recently due to the fuel tank being lower that the filter tower--yes, we had fitted new gaskets, another surfaced lid, and bleed taps and bodies to no avail thinking air was leaking in there, --air would bleed into the filter tower via the non tamped packing fitted from some time in the past history of the unit and thereby causing hard starting.

Cheers,
Eddie B.
Eddie, would worn packings materially affect fuel pressure? (once fully primed and running)
Please log in or create an account to join the conversation.
Fri, Jul 23, 2021 7:56 PM
Showing 1 to 10 of 17 results
1
YouTube Video Placeholder

Follow Us on Social Media

Our channel highlights machines from the earliest Holt and Best track-type tractors, equipment from the start of Caterpillar in 1925, up to units built in the mid-1960s.

Upcoming Events

Sibbertoft Annual Muck Shifting Weekend

Chapter Two

| Avalanche adventure, Welford Rd, Sibbertoft LE16 9UJ, UK

Cromford Steam Rally

Chapter Two

| Highacres Farm, Dewey Lane, Brackenfield, Derbyshire DE55 6DB, UK

The Century of Caterpillar

| Elkader, 203 Johnson St, Elkader, IA 52043, USA

100 YEARS OF CATERPILLAR IN TASMANIA

Chapter Nineteen

| 2 Winkleigh Rd, Exeter TAS 7275
View Calendar
ACMOC

Antique Caterpillar
Machinery Owners Club

1115 Madison St NE # 1117
Salem, OR 97301

[email protected]

Terms & Privacy
Website developed by AdCo

Testimonials

"I also joined a year ago. had been on here a couple of times as a non-member and found the info very helpful so I got a one year subscription (not very expensive at all) to try it out. I really like all the resources on here so I just got a three year. I think its a very small price for what you can get out of this site."
-Jason N

Join Today!