disconnect the fuel supply line from the transfer pump and make sure you have good gravity flow of fuel to that point
the transfer pump is where the fuel line goes into? I will pull the side cover off tonight and try that.
does anyone have a few pages from a manual with the description and details of the fuel system and what is in the large cast housing and injector housing, also how it functions
thanks in advance
the transfer pump is where the fuel line goes into? I will pull the side cover off tonight and try that.
does anyone have a few pages from a manual with the description and details of the fuel system and what is in the large cast housing and injector housing, also how it functions
thanks in advance
To get you started:
- fuel tank - 26 gallons, two valves on underside: one drain and one valve for line to transfer pump. Fill tank or jack up rear of tractor to slope fuel line down to front of tractor. If fuel is old (e.g. a couple of years), replace with fresh - haven't had this issue myself but many have reported stale diesel.
- transfer pump - front left side of engine, has the line coming from the fuel tank. Disconnect that line and check that good gravity flow runs from it for at least a minute into a clean container e.g. 5gal tin (some plugs take time to build up). Remove adaptor that receives the line frorm the tank and clean check valve and spring are clean and in good order (spring can break, crud can prevent ball from seating - when these happen, you have little to no fuel pressure on gauge. You also have little pressure if the pump is worn. Some wear can be taken up by milling the end plates flat
- fuel filter assembly - the housing that the transfer pump is bolted to the base of. Has a drain to remove sludge so go ahead and take a sample and see if crud comes out. Four nuts on top of housing for the cover (top cover is what you can see. Remove that to expose bottom cover which is what the three filter elements fit to. Beware that the element rods are fragile so be careful removing them. Retained by a small pin visible on top of the bottom cover. Pull the bottom cover complete with elements and inspect elements for fouling. (Order new elements from Cat so if you have them on hand, just replace them) Inspect element chamber for sludge - clean and flush as necessary
- fuel gallery - runs from outlet of fuel filter assembly through the main pump assembly. Has two o-rings that fail eventually and allow fuel to pass into the main engine and dilute the oil - replace if this is happening or if you remove the main pump assembly. Check gallery for fouling/sludge
- fuel pumps - four individual pumps on top of main pump assembly. Indexed to rack with a notch on plunger quadrant that matches the rack. You can remove the pumps, carefully remove the plungers (do NOT mix them from pump to pump) and flush all out with clean diesel. Make sure the plungers and bores are absolutely clean - any grit will ruin them. Check that bleeders on pumps and on fuel filter assembly work correctly. Replace and check that pumps are indexed correctly and that rack moves freely.
Fill fuel tank, fill fuel filter assembly before replacing the cover. Using the pony to turn the main engine over not under compression, bleed first at the filter assembly (two bleeders) and then at each of the four pumps. Do not over-tighten the bleeders. Turn on compression, allow some warming, then turn on fuel - you must push the governor control forward past the main detent which can be very hard - use your hand to "smack" the control forward. Control will be at about two o'clock for fuel fully off, twelve o'clock for the detent, and 10 o'clock for full fuel. If engine does not smoke or fire, loosen tube nuts on injection valves (injectors) and confirm fuel delivery. If there is some smoking but engine does not fire, run with fuel fully off and under compression for another five minutes (confirm coolant level ok and shoot temperature at pony coolant outlet, and top of pony cylinder heads - if over 200, shut pony down, remove pony heads and clean crud out of coolant passages in block and heads, including the small 1/4" hole at the very bottom. Snake a wire as far as you can into the pony block coolant passages - bottom inlet from flywheel housing into pony is known sludge collection point / blockage candidate. Cylinder head gasket is reusable - tighten firm but not hard with your 3/8 drive ratchet.
If it does not start, report back with your findings.
[quote="Neil"]To get you started:
- fuel tank - 26 gallons, two valves on underside: one drain and one valve for line to transfer pump. Fill tank or jack up rear of tractor to slope fuel line down to front of tractor. If fuel is old (e.g. a couple of years), replace with fresh - haven't had this issue myself but many have reported stale diesel.
- transfer pump - front left side of engine, has the line coming from the fuel tank. Disconnect that line and check that good gravity flow runs from it for at least a minute into a clean container e.g. 5gal tin (some plugs take time to build up). Remove adaptor that receives the line frorm the tank and clean check valve and spring are clean and in good order (spring can break, crud can prevent ball from seating - when these happen, you have little to no fuel pressure on gauge. You also have little pressure if the pump is worn. Some wear can be taken up by milling the end plates flat
- fuel filter assembly - the housing that the transfer pump is bolted to the base of. Has a drain to remove sludge so go ahead and take a sample and see if crud comes out. Four nuts on top of housing for the cover (top cover is what you can see. Remove that to expose bottom cover which is what the three filter elements fit to. Beware that the element rods are fragile so be careful removing them. Retained by a small pin visible on top of the bottom cover. Pull the bottom cover complete with elements and inspect elements for fouling. (Order new elements from Cat so if you have them on hand, just replace them) Inspect element chamber for sludge - clean and flush as necessary
- fuel gallery - runs from outlet of fuel filter assembly through the main pump assembly. Has two o-rings that fail eventually and allow fuel to pass into the main engine and dilute the oil - replace if this is happening or if you remove the main pump assembly. Check gallery for fouling/sludge
- fuel pumps - four individual pumps on top of main pump assembly. Indexed to rack with a notch on plunger quadrant that matches the rack. You can remove the pumps, carefully remove the plungers (do NOT mix them from pump to pump) and flush all out with clean diesel. Make sure the plungers and bores are absolutely clean - any grit will ruin them. Check that bleeders on pumps and on fuel filter assembly work correctly. Replace and check that pumps are indexed correctly and that rack moves freely.
Fill fuel tank, fill fuel filter assembly before replacing the cover. Using the pony to turn the main engine over not under compression, bleed first at the filter assembly (two bleeders) and then at each of the four pumps. Do not over-tighten the bleeders. Turn on compression, allow some warming, then turn on fuel - you must push the governor control forward past the main detent which can be very hard - use your hand to "smack" the control forward. Control will be at about two o'clock for fuel fully off, twelve o'clock for the detent, and 10 o'clock for full fuel. If engine does not smoke or fire, loosen tube nuts on injection valves (injectors) and confirm fuel delivery. If there is some smoking but engine does not fire, run with fuel fully off and under compression for another five minutes (confirm coolant level ok and shoot temperature at pony coolant outlet, and top of pony cylinder heads - if over 200, shut pony down, remove pony heads and clean crud out of coolant passages in block and heads, including the small 1/4" hole at the very bottom. Snake a wire as far as you can into the pony block coolant passages - bottom inlet from flywheel housing into pony is known sludge collection point / blockage candidate. Cylinder head gasket is reusable - tighten firm but not hard with your 3/8 drive ratchet.
If it does not start, report back with your findings.[/quote]
does anyone have a picture of the fuel filter and transfer pump assembly? opened the tank drain, slow drip, pushed a wire up and black sludge followed by flowing diesel, thinking the sludge is in the system will start with the delivery tube shortly, the cover is a sheet metal one bolted to the outside covers the feed tube and access
as of this morning no luck, took the sheet metal side panel off to get to fuel line, there must be a trick, the fuel line goes into a fitting at both ends, the line has zero flex but its obvious little to no fuel is getting in the line

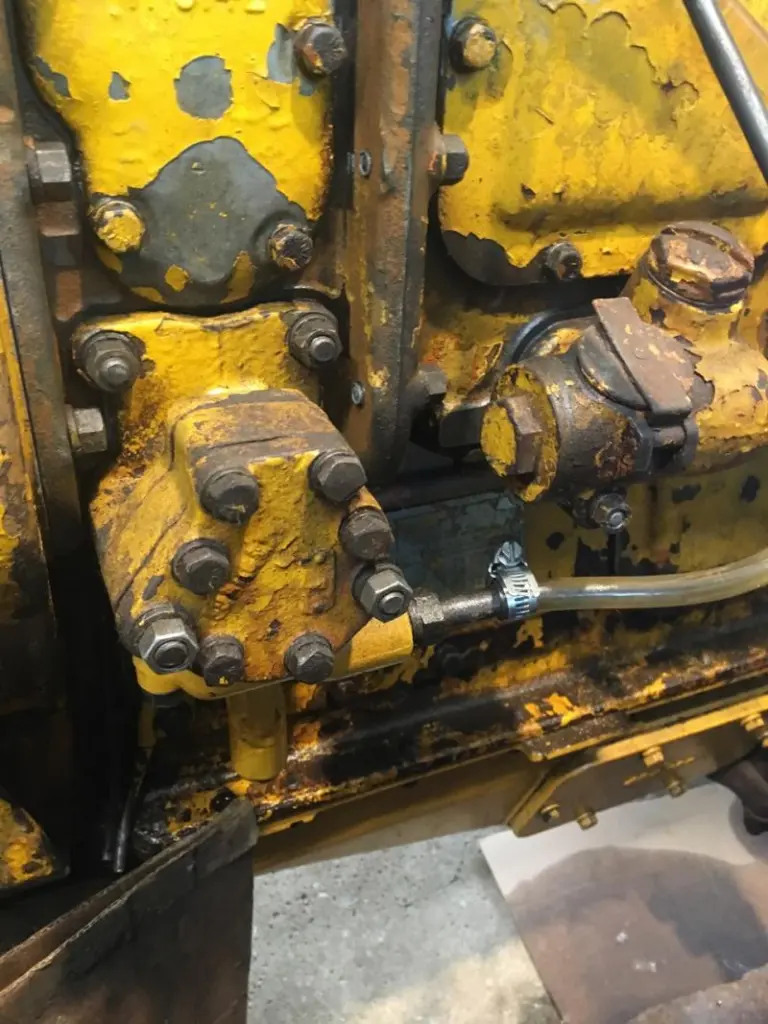
Couple of pictures of the fuel transfer pump with the line coming in from the right (I have a temp tank set up with a nylon line). Disconnect the line there and confirm flow. Spout sticking down below transfer pump is the filter assembly drain.
[attachment=49452]IMG_5646.jpg[/attachment]
Other picture shows two bleeders at top of fuel filter assembly
[attachment=49451]IMG_5647.jpg[/attachment]
[quote="Neil"]Couple of pictures of the fuel transfer pump with the line coming in from the right (I have a temp tank set up with a nylon line). Disconnect the line there and confirm flow. Spout sticking down below transfer pump is the filter assembly drain.
Other picture shows two bleeders at top of fuel filter assembly
[/quote]
thanks, my line is steel however if I take the 6 bolts and 2 nuts to remove the side will it get me into the same area where the line enters?
also, the filter is not what I was expecting and do not recall the bleed screws but will look again, if I remove the top is that how one cleans the filter?
I am still confused about what cover you are talking about to remove??--Does it have louver slots in it for ventilation? The fuel filters are like fabric elements and all 3 should be replaced, the filter housing should be cleaned out also..you should look for a maintenance manual on ebay for your serial number machiine
did you check the oil and fluid levels before you tried to start it? Did the engine right side have a cover panel


Our channel highlights machines from the earliest Holt and Best track-type tractors, equipment from the start of Caterpillar in 1925, up to units built in the mid-1960s.
Chapter Nineteen
| 1234 Carngham - Lake Goldsmith Road Lake Goldsmith VIC 3373Chapter Two
| Folds Farm, Godshillwood, Fordingbridge, Hampshire, SP6 2LU
Antique Caterpillar
Machinery Owners Club
1115 Madison St NE # 1117
Salem, OR 97301
Terms & Privacy
Website developed by
AdCo
"I became a member recently because the wealth of knowledge here is priceless."
-Chris R