The radiator tanks come off with the core.
Disconnect the upper and lower radiator pipes... remove the oil cooler lines... remove the fan shroud... remove the small cover between the lower tank and radiator support ( six 3/8'' bolts ) ... remove both lower engine side covers... connect the radiator to a hoisting device using either the 3/8'' tapped holes in the side or top of the top tank... ( this is very heavy ) then remove the eight 1/2'' bolts that hold the lower tank to the radiator support.
Unless I forgot something, you're ready to hoist the radiator away from the tractor. There are two dowel pins in the radiator support that index into the lower tank... it works best for me to take a little strain on the radiator, and tilt the top of the radiator away from the engine, and then lift away.
In the last photo where the oil lines are, there is a plate that the radiator is sitting on.
That is where the eight 1/2 inch bolts are located, meaning you need to lay on the ground to see them.
The bolts in the first and second photo's, YOU DO NOT REMOVE!
These bolts hold the core to the bottom radiator tank.
If you do not have a Service Manual, I suggest at the bare minimum you get on EBay and find a Parts Manual so you can understand the parts you are looking at.
BTW,
Post your location as there maybe someone close by that can guide or help out.
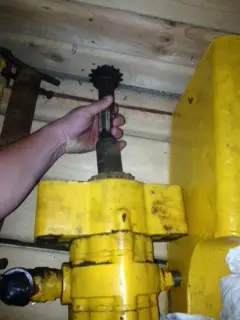
Thanks for the pointers! I finally took a look under and saw the bolts holding the radiator on. Got it removed today here is a picture of my crank pully. None of the bolts line up with the tisco hub so I'm going to have to drill and tap some holes I guess.
Located in bremtwood ca
[img]http://i1276.photobucket.com/albums/y461/christ_ja/utf-8BSU1HLTIwMTMwODA3LTAwMDkyLmpwZw_zpsb53c4724.jpg[/img]


this is how it is mountd by my d2 4u
chane conection, axel tru the radiator and than slide in the hydraulic pump.
I'm looking at the pump and control valve at the links below to operate the two cylinders on my D2. Do you think the pump is big enough?
http://www.northerntool.com/shop/tools/product_200360753_200360753
http://www.northerntool.com/shop/tools/product_200339393_200339393
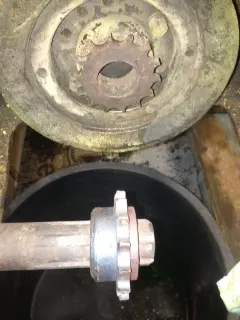
How do I get this keeper plate off? [img]http://i1276.photobucket.com/albums/y461/christ_ja/utf-8BSU1HLTIwMTMwODA4LTAwMDkzLmpwZw_zps1fde937c.jpg[/img]
The aftermarket front mount pumps I'm used to seeing fasten to the 6 outer holes shown in your picture.


Our channel highlights machines from the earliest Holt and Best track-type tractors, equipment from the start of Caterpillar in 1925, up to units built in the mid-1960s.
Chapter Two
| Freshfield Farm, Sloop Lane, Scaynes Hill RH17 7NP UKChapter Two
| Avalanche adventure, Welford Rd, Sibbertoft LE16 9UJ, UKChapter Two
| Highacres Farm, Dewey Lane, Brackenfield, Derbyshire DE55 6DB, UK
Antique Caterpillar
Machinery Owners Club
1115 Madison St NE # 1117
Salem, OR 97301
Terms & Privacy
Website developed by
AdCo
"I also joined a year ago. had been on here a couple of times as a non-member and found the info very helpful so I got a one year subscription (not very expensive at all) to try it out. I really like all the resources on here so I just got a three year. I think its a very small price for what you can get out of this site."
-Jason N
