I would remove the round access cover (by the left brake pedal) and spray some liquid wrench all over everything regarding the pinion. You should be able to take a mirror and light to look through the that oiler hole and examine things. I don't think you are going to hurt anything if you took a pry bar (crowbar) and pried on the end of the pinion to see if you can get it to move. Just take it easy. Better to pry with a bar than to slam on the pinion engagement lever. Worse case, just remove the pinion and repair it. You just have to raise the pony a bit so that it's gear isn't blocking the pinion sliding out. And remove the end cover off the pinion housing (the cover at the end near the governor) or you'll never have space to get the pinion to come out.
One of my D2's will sometimes have trouble with the pinion engaging. But if I start the pony, all of a sudden I can engage the pinion. It won't budge when the pony is stopped. Not sure what's up with it. Doesn't do it every time. I haven't removed the pinion to check it out. I guess when the pony is running, it has the pinion spinning and maybe the latches loosen a little bit, helping it move.
Arthropod,
I did take a paint spray gun and spray a mixture of 50% diesel, 50% automatic transmission fluid through the opening at the top of the bellhousing up into the left top corner where that pinion should be located. So far no luck in breaking the pinion loose. I did use your suggestion and start the pony to see if I could get engagement. No luck with that. Pulling on the pinion lever I get a little bumping of the gear teeth, but not enough to engage the main engine. Pull the pony clutch lever back and gears stop contacting as they should, but no engagement. Will keep trying your suggestions and get it one of these days.
I did use a shopvac and blew air into the bellhousing to dry everything up.
The springs inside the shaft are probably rusted and broke not letting the gear and latch assembly move forward enough to engage. Just removed the pinion on mine and thats what i found. Drain the coolant,raise the left side of the starting engine about an inch, remove the governor rear cover and the govenor housing, remove two upper rear bolts that hold the crankcase inspection cover the remove the pinion assembly. Make sure you have everything clean around the governor before removing. If you have a service manual that will explain it step by step too. A real pain to fix but when fixed right everything works great and as it should. have fun!!
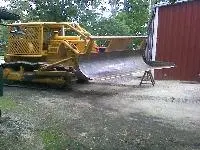
Finally got the pony pinion to engage the flywheel. Sprayed the pinion with a liberal amount of diesel then Kroil. Still pretty stuck. Decided to fire up the pony and see if centrifugal force and vibration would help. Got pinion teeth to bump against the flywheel. Couldn't get full engagement until after several tries. The grinding and banging around finally freed everything. Works as it should now, just as it did last fall before all the problems started. Now just have to get the transfer pump functioning again. Going to check the pressure relief valve - again. This is a '43 orchard D2 and the pressure relief disc is different than the later D2's. I tried the replacement relief valve disc from Cat, but didn't work. Could only keep the engine running by blowing air into the vent hole in the fuel tank cap.
Thanks again for all the help and suggestions. That is where I got my inspiration to go on.
Hello Everyone-
I've been messing with my engaged pinion lever and assembly through the small inspection hole on my D42T. Takes a real gymnast to wriggle around in there to reach those dawgs and pinch them to open them up. That hole can't be over an inch and a half.
We ended up drilling a nice clean hole in the top of the cast cover at a pretty steep angle to allow us to poke something through and be able to depress both dawgs at the same time. It also allowed us to see a little better.
What I realized / learned was that when we pinched one dawg, the other compressed too. You can't see this through the single hole and the main clutch inspection cover just misses for visability from the top. Apparently one will depress them both, which I did not recall. Once I saw that, I gently pryed the sleeve back while depressing the back side of just one of the dawgs and it slid right back. Only wish I'd not drilled that hole....oh well.
I disengaged this pretty easily a year or so ago and damned if I can't remember the method I used then. My next option was to remove the front portion of my bikini transmission cover and expose the whole thing.
"e" you later!
Hi Bernie,
maybe tap a suitable thread for the size hole you drilled and plug it with a short bolt or pipe plug to stop water, etc entry.
Cheers,
Eddie B.
I agree with Eddie B. Tap the hole, then screw in a piece of threaded rod or suitable plug. My most recent D2 project had several holes drilled and tapped in the tops of the final drives because a previous owner had installed these really thick steel plates to support the fenders and seat tank and had made brackets they bolted to the top of the finals. I didn't want the plates to remain so removed them and I just screwed bolts into the holes and then sawed the bolts off flush with the finals. You can't see the plugs once painted.


Our channel highlights machines from the earliest Holt and Best track-type tractors, equipment from the start of Caterpillar in 1925, up to units built in the mid-1960s.
Chapter Twenty Nine
| Hawkesbury Showground, Racecourse Rd, Clarendin, NSW, AustraliaChapter Eighteen
| Geoff Ralph Drive, Taabinga, 4610, Kingaroy, Qld.Chapter Thirty
| 3429 Copper Coast Highway Paskeville, SA 5572Chapter Nineteen
| Victoria Park, Urana NSW
Antique Caterpillar
Machinery Owners Club
1115 Madison St NE # 1117
Salem, OR 97301
Terms & Privacy
Website developed by
AdCo
"I also joined a year ago. had been on here a couple of times as a non-member and found the info very helpful so I got a one year subscription (not very expensive at all) to try it out. I really like all the resources on here so I just got a three year. I think its a very small price for what you can get out of this site."
-Jason N