injector hold-down nut screws into the chamber itself, not the retainer that seals around the top of the chamber. So, probably, the whole chamber is coming out and bringing the retainer with it.
Coolant will come out (and also leak into the cylinder if the PC chamber screws out of the head). However, normally the chamber and retainer if it is a separate piece, will stay put while you unscrew the injector hold-down nut.
I would not heat the nut. If it's coming out with the chamber or the retainer or both, just drain the coolant, unscrew whatever wants to come out and then separate it later. An impact wrench might help to rattle the hold-down nut loose if you end up with a loose PC chamber with an injector and hold down nut stuck in it. Probably could clamp it in a vise with blocks of soft wood etc to hold it while removing the nut and injector.
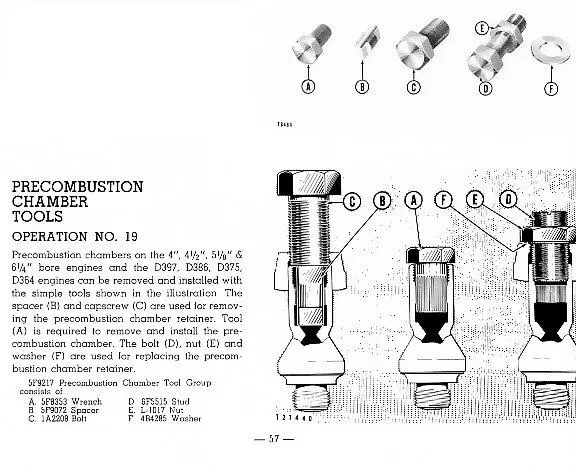
You will need a PC chamber installation tool set to replace the chamber and retainer with new seals.
Threads in the cap (CAT callls it a retainer) are a larger size than those in the upper end of the PC chamber. The cap should stay in place, usually shows no inclination to move when removing the injector hold down nut. It will come out with the precombusion chamber and frequently will go back in with the chamber as long as you do not break the bond of rust and dirt between the two to replace the inner o-ring seal as you should. I didn't know for a long time that the retainer was a separate piece having removed several chambers from our D6 that stayed together.
Newer PC chambers are usually a single piece design with the top surface of the retainer a bit taller to allow for differences in head castings etc. This also allows room for a glow plug port to be drilled and tapped into them, angling in from the outer edge where it would have passed from the old retainer, through the water jacket and into the precombusion chamber if one had attempted to drill one into that style.
Hi Rich,
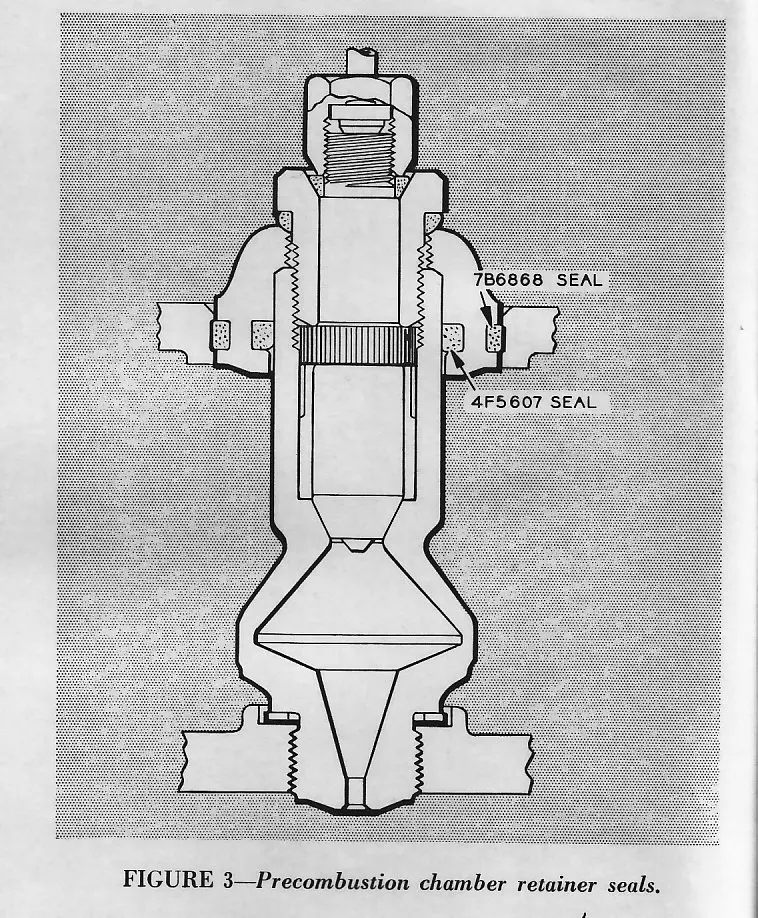
the scan below may explain the set up better.
The retainer is just sitting in place with the "O" ring seals BUT is held in place by the flange on the injector retaining nut.
As CCJ said the threads in the retainer are used with a puller bolt and spacer to remove it--shown in the scan.
Often when the pre-chamber unscrews when trying to remove the injector--loose pre-chamber-- it can be a sign of an overheated engine and/or cracks in the head at the pre-chamber hole.
Hope this helps.
Cheers,
Eddie B.
The crush washer (copper) at the head -chamber joint will need to be replaced. Same thing happened to me last week when backing off the 1 in. retainer nut. Combustion chamber 200 FT. lbs retainer nut 100 Ft. lbs. Bob
When torquing the chamber, do you lube the threads with copper or oil or just leave them dry?
Cheers,
Neil
Eddie
Thanks for the clear pictures. Now I can see what is going on. A picture is worth a thousand words. Looks like I,ll need to find a pre-comb tool kit as well. I,ll drain the coolant again this weekend and see what happens. I hope I can find the tools to put it back together. The search begins.
Neil,
I would think Never-Seize would be an appropriate modern day product for that app.
I,ll post the results?
Thanks again.
Good - that's what I was thinking. I think I have a leaking chamber on my 3J - if so, I'll pull them all. What are folks thoughts on copper vs. steel? I'd lean toward copper as conforming to irregularities better.
Cheers,
Neil.


Our channel highlights machines from the earliest Holt and Best track-type tractors, equipment from the start of Caterpillar in 1925, up to units built in the mid-1960s.
Antique Caterpillar
Machinery Owners Club
1115 Madison St NE # 1117
Salem, OR 97301
Terms & Privacy
Website developed by
AdCo
"I also joined a year ago. had been on here a couple of times as a non-member and found the info very helpful so I got a one year subscription (not very expensive at all) to try it out. I really like all the resources on here so I just got a three year. I think its a very small price for what you can get out of this site."
-Jason N