
Hello Old-n-slo
I have had sheet that was also in bad condition. I bought new 12 gauge and I found a guy that does sheet metal feb work that has a large shear and a large hyd. break. He did a very nice job on the kind off metal that you have that needs work. Call at 520-977-5989
Ernieintucson
I would like to see what you are working/ if OK
Thanks for the metal tip Ernie, I do have some help here in the Phx area when it comes to heavy bending and stuff. I do all the other fabrication tasks myself.
You can see some of my progress with prior threads, just search under my profile for posts.
Tag me back if your in the valley, your welcome to pick up a wrench and help while here or just offer advice.
Good luck on that.
I just repaired a similar panel on my D47u. Looks like the track came off and gouged a good sized hole in the panel. Ripped up the bottom bent over section as well. It's all fixed now. Not a show repair but good enough for a working tractor.
Nice thing about these panels is that it's pretty easy to weld them up.
My recently acquired D2 came with 2 side engine panels that were off the machine. They are dinged up but very repariable. However, they do not appear tall enough, compared to the photo's I have seen of pristine machines, where it appears there are side panels all the way down to the belly pan. I assume I am missing some lower panels?
Thanks guys.
G
I can't give you any exact measurements for a "J" series as I don't have any side panels to fit those, but my mid-run 5U is very similar to them so you'll get a pretty good idea. The standard side panels found on both series basically "boxed in" the sides of the engine, and extended in very close along the gasket joint between the block and oil pan, nearly touching the block itself. You want the clearance to be tight in that area to help keep objects like sticks or brush from poking their way up along the sides of the engine during operation.
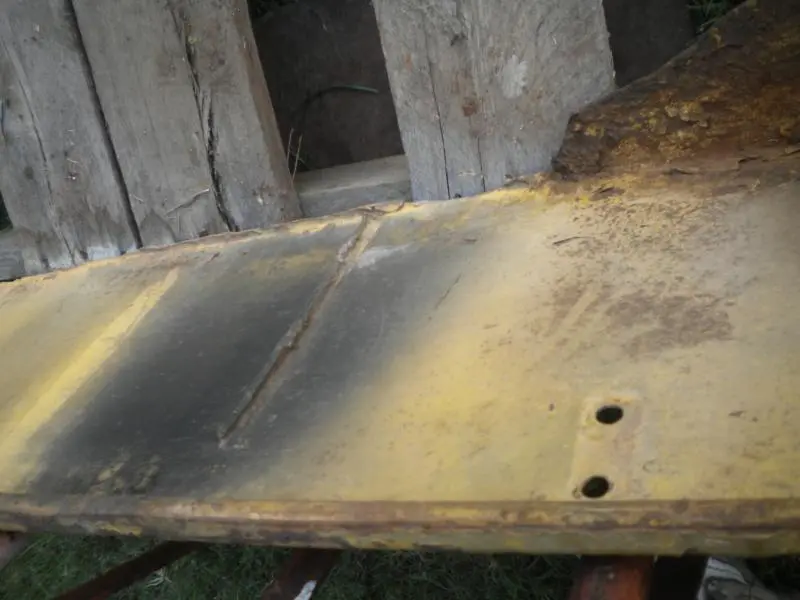
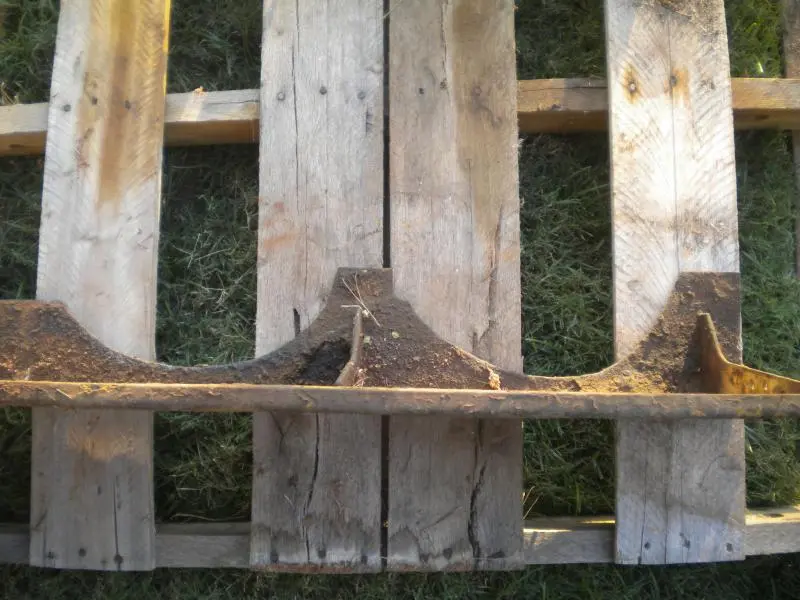
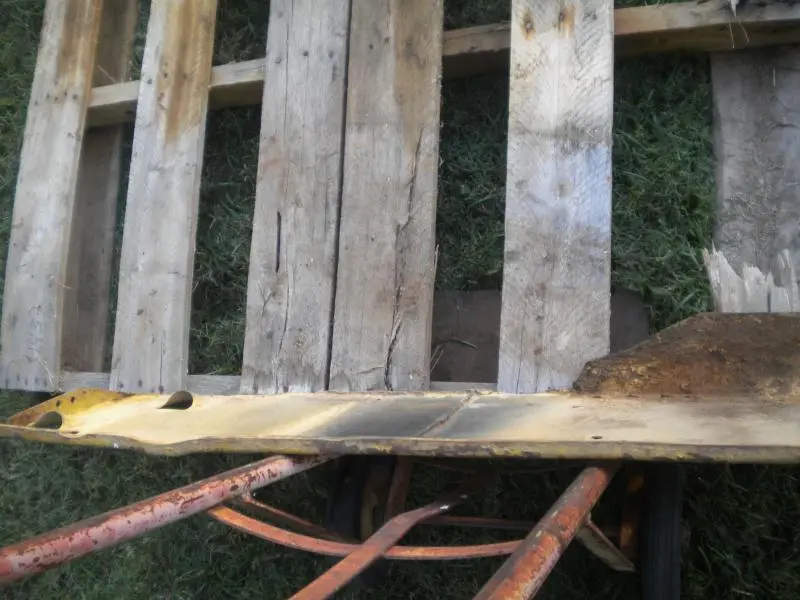
Here's a few pics of one of the old 5U panels that I decided to replace completely because of the extensive damage. I could tell from what was left that the square cutout was to clear the oil filter base and dipstick tube, then it protruded farther in to closely hug the block, protecting the oil cooler lines. It's difficult to see on the severely damaged end, but the panel then was designed to follow the lower radiator support as it flared out to the radiator base, keeping tight clearance the entire way.
[img]http://i802.photobucket.com/albums/yy310/TRNelson/Cat%20D2/011.jpg[/img]
[img]http://i802.photobucket.com/albums/yy310/TRNelson/Cat%20D2/013.jpg[/img]
[img]http://i802.photobucket.com/albums/yy310/TRNelson/Cat%20D2/014.jpg[/img]
I went out tonight and looked at my old 5J, and if I were ever to make the side panels for it someday, I wouldn't necessarily try to make an absolute clone of an original as much as try to keep things closed in as tightly as I could for functionality, starting at the bell housing and working forward, making cutouts for clearance as needed and following every contour of the oil pan/block seam closely. I would then make cutouts to clear the front cover where it extends out away from the block sides, then back in again right along the sides of the radiator support. Keep in mind the original "J" series panels used a nearly square 90 degree bend up until a few inches before the radiator shell, where they then transitioned to a rounded front corner to match the contour of the shell. When I fabricated the panels for my 5U I used a light cardboard to simulate the panel, got the cutouts to the proper size then cut it to contour the block to the clearance I wanted. It's much easier than using steel, and when I got it where I liked it I just used the cardboard as a pattern and traced it onto the steel. Worked great.
Toby, once again...many thanks for coming through with info. I appreciate the comments on bend radii and cutouts. It may be minutia to some, but I enjoy correctness. I'll need to study mine in more detail during daylight, as I have downward pointing exhaust and there just might be a bracket that would support the pipe from vibration during its final inches before exhausting. The pipe now is only held on with a clamp (at the manifold), and I know that a single clamp would not be up to CAT standards.
So....I think we are saying that the left side then would have no cutouts, where now semi-circles exist big enough to cradle the lunar lander.
Would it be safe to say that a gap of say.....1/2"... would be the rule of thumb between panel and block?
If I remember correctly, there isn't much on the left side to worry about as far as making cutouts. I actually held mine about 1/4" from the block where possible, just enough to prevent contact. Here's an old pic where one can see the front corner of the panel and the transition from straight bend to curved radius, right in the area where the hole for the coolant drain is. Probably the easiest way to accomplish that is to have the new panel bent 90 degrees the entire length, then make the curved radius area from a seperate piece, and cut out the square panel corner and weld in the piece, then grind flush.
[img]http://i802.photobucket.com/albums/yy310/TRNelson/015.jpg[/img]
Thanks for the advice and pics!
Toby, I understand the front radius near the radiator. That part is fine on my panel. Thanks for your pics!
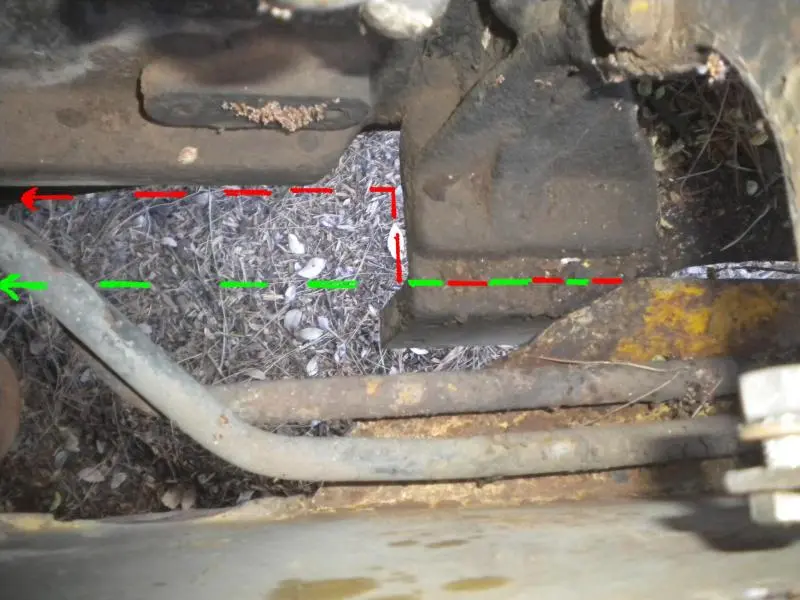
Q1. In the supplied pic below, would the RED pattern be closest to the OE path? Its difficult to determine with the damage to the front of yours. Perhaps the GREEN path? It might even be a rounded curve there.
edited -> Q2. As you move rearward on that right panel, it appears there is more sheet metal (wider width) before the oil filter cutout vs after the cutout. Again, based on your pic, it could just be the damage, but that rearmost bracket does seem a bit shorter on the lower leg (closest to the clutch).


Our channel highlights machines from the earliest Holt and Best track-type tractors, equipment from the start of Caterpillar in 1925, up to units built in the mid-1960s.
Antique Caterpillar
Machinery Owners Club
1115 Madison St NE # 1117
Salem, OR 97301
Terms & Privacy
Website developed by
AdCo
"I became a member recently because the wealth of knowledge here is priceless."
-Chris R