
Hi JMcLean,
I have written at length on this subject and I too have a problem finding the posts and Pix I have put up on this BB.
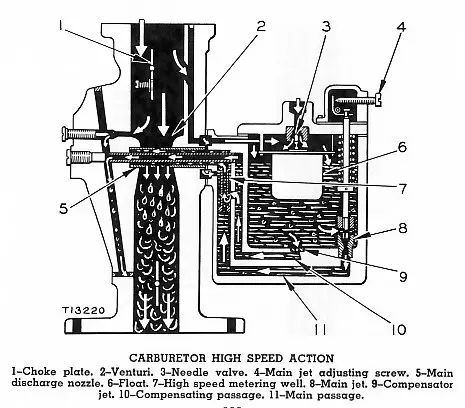
The jet is brass and can have either a small drilling off to one side or have a vee grouve in the side of the jet.
These holes are very small so are prone to blockage by crud.
The only fix is to note the orientation for the jet--it is marked on the outside by a vertically orientated machined line. You will need to mark the top of the line to put the jet back correctly.
To remove the jet simply take a suitable punch and punch the jet in to the carby throat making sure to not foul the butterfly plate.
You should find a machined grouve around the body of the jet which will be full of crud. Clean this and the passage from the mixture screw--actually an air bleed--
To reinstall the jet simply punch it back into the carb body until it is flush with the inner bore.
WARNING IF you punch the jet in too far you will have to punch the jet thru and out again as the small end of the jet is too fragile to withstand punching it back flush.
I believe others ( Mike Meyer) have used lead BB's to plug the passages/drillings as needed. He had a good post going on this subject at one time.
Hope this helps.
Cheers,
Eddie B.
I just had a conversation about this with Ag-Mike about a month or two ago. We had plenty of pictures and discussions but I sure can't find it here. I know the title of the message was something like "WTB D2 Pony carb". I will keep looking.
Jamie
Whoa...! This is to cool, talking to someone on the other side of the world. Wow, who would believe it... Yeah, your pictures are very familiar. #3 is the, what I call the 'throttle body'. And the plug, or jet you say, can just be poked into the throttle body, from outside to inside, then clean the hole and a grove around the hole, then, simply poke the jet back in from the out side in. Don't push it to far or you'll have to do it over 'till you get it right. Have I got that about right? I figured that was just a plug and the jet hole was drilled in the wall of the throttle body. Huh! Well thank you for the info. I've actually got the carburetor back on and am trying to start the pony. But, that ain't going real dandy and I might need to 'un-install' the whole mess again. If I do, ( note the optimism with the 'If...), I'll do the plug thing. And, Thanks again...😆


Our channel highlights machines from the earliest Holt and Best track-type tractors, equipment from the start of Caterpillar in 1925, up to units built in the mid-1960s.
Chapter Twenty Nine
| Hawkesbury Showground, Racecourse Rd, Clarendin, NSW, AustraliaChapter Eighteen
| Geoff Ralph Drive, Taabinga, 4610, Kingaroy, Qld.Chapter Thirty
| 3429 Copper Coast Highway Paskeville, SA 5572
Antique Caterpillar
Machinery Owners Club
1115 Madison St NE # 1117
Salem, OR 97301
Terms & Privacy
Website developed by
AdCo
"I became a member recently because the wealth of knowledge here is priceless."
-Chris R