Hi Don,
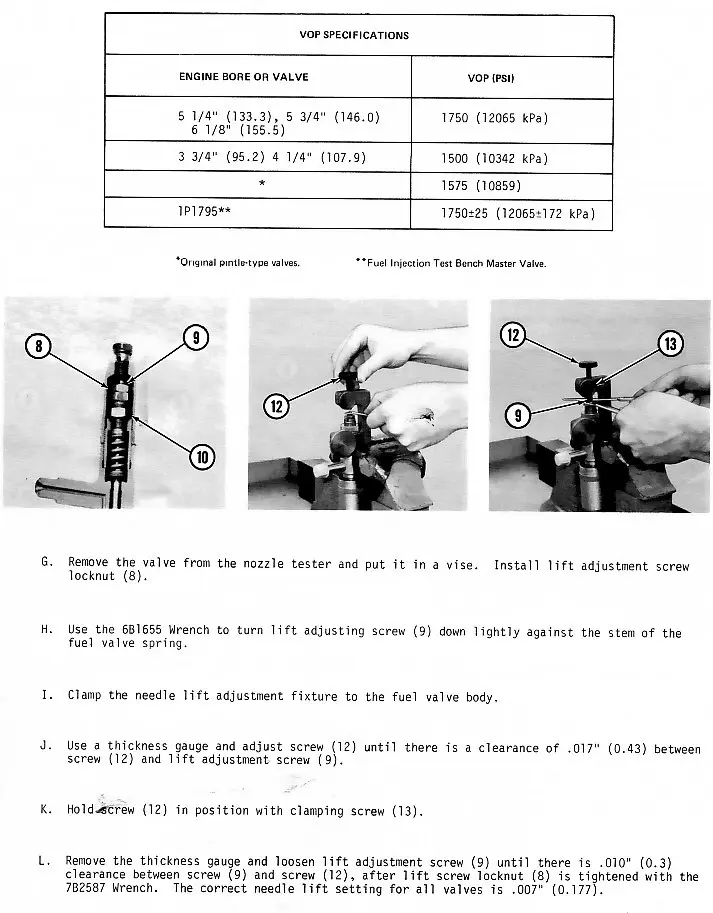
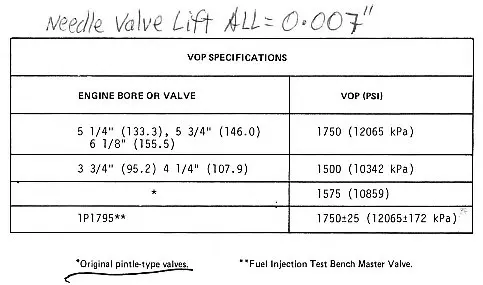
The breaking pressure for the 3-3/4 in bore flat seat injectors is 1500psi at a needle lift of 0.007 in. There is no high low range given in my fuel injection manual like there is on the later capsule type.
Thanks Pete. I was getting around 1000/problem, then the gauge crapped out. Looking for a new gauge now. Always something😮
Yup, I know the drill😊
You can fiddle with the pressure adjustment but try not to disturb the needle lift screw.
I can make all necessary adjustments on these nozzles.
E-mail me for price [email protected]
Hi Team,
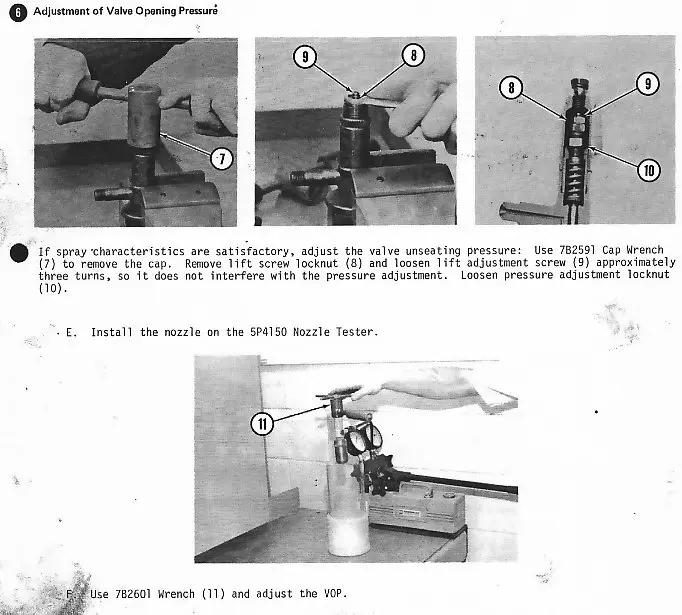
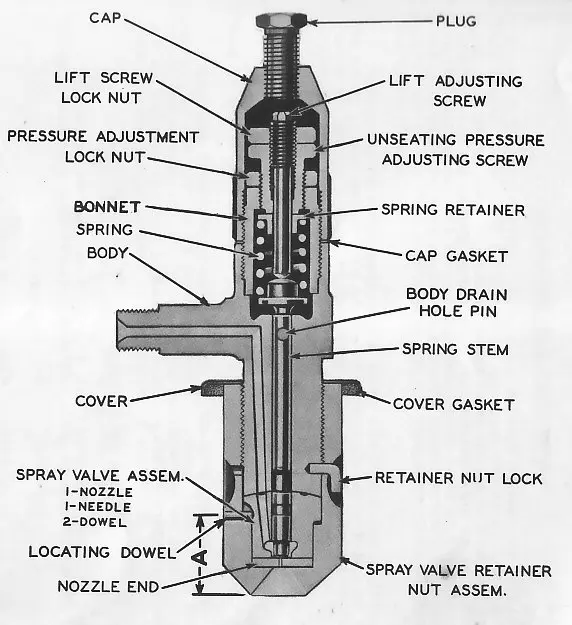
the needle lift screw must be backed off before VOP (Valve Opening Pressure) can be adjusted or else you will crush the needle into the seat and damage both faces after the 0.007" is taken up on the pressure adjust screw, the needle lift screw is locked in the body of the pressure adjust screw ( See OM's pic)
The needle lift is last adj. to be made when setting up these units.
I have found also that you need to search for a sweet spot on some of these units, and some will operate and atomise nicely at up to 150-200 psi below spec VOP and can be up to 100 above for sweet spot, I would'nt go much higher for worn pumps to give even delivery volumes or engine may run unevenly.
I know of engines that were overhauled and they ran no better than before. After adjusting the lifter heights the engines ran as expected.
See scans below for proceedure for Injector servicing.
Hope this helps.
Cheers,
Eddie B.
Hi edb,
Not sure I follow that procedure.
If the needle adjustment is held secure your still going to have the 0.007 in. clearance. Seems to me you are then just adjusting the spring tension to raise the breaking pressure.
Maybe that is just the routine for checking both the lift and pressure.
Hi OM,
the proceedure is correct, and, if you study the diagram, posted by yourself, you should be able to determine that the Lift Adjusting Screw is mounted/locked to the Unseating Pressure Adjusting Screw, therefore, if the Unseating Pressure Adjusting Screw is screwed into the Bonnet, applying more tension to the Spring, the Lift Adjusting Screw goes with it, until it contacts the Spring Stem which in turn is in contact with the Nozzle Needle and the clearance is taken up and pressure applied to the Needle and Seat/Nozzle End with dire results.
Below I have added the location of Needle Lift Clearance to the Injector Parts Pic.
Hope this helps.
Cheers,
Eddie B.
Thanks edb,
I had in mind holding the needle adjustment while threading the spring adjustment instead of letting the whole thing turn. Yes, both jamb nuts would have to be loose but then the spring adjustment would just travel down the needle threads.
Hi OM,
the thread pitch of the Unseating Pressure Adjusting Screw is much coarser than the very fine pitch of the Needle Lift Adjusting Screw so it is not possible to do it the way you originally envisaged. I have found that the needle lift is usually beyond spec. after the needle and seat faces have worn in/out.
Way back when I had a British 5LW Gardner Diesel engine I repowered my 1929 Thornycroft 5Ton tandem drive truck with--used to take my 2Ton etc. to shows. Anyway it used to black smoke at full governed speed in top gear, if a load came on the unit--hill etc--then it would clear and run a colourless exhaust until the load diminished again and the black smoke would reappear. I had done the fuel system up my self and adjusted it all on The Dealers Cat Test Bench after I made suitable drive adapters etc. The Later Service Manual I had mentioned nothing about Injector Needle Valve Lift and this concerned me from my experience of the Cat Flat Seat Injectors and the Cat Pencil Injectors fitted to 3208's etc. A friend had an early Gardner SM and after discussing my theory on the black smoke at High Idle/light load he found reference to needle lift in the older book. When I ground the Nozzle Body face to achieve the spec needle lift the old Gardner ran clean all the time. My fuel consumption improved about 4mpg!!!
Sorry, looks like I highjacked the thread.
Cheers,
Eddie B.


Our channel highlights machines from the earliest Holt and Best track-type tractors, equipment from the start of Caterpillar in 1925, up to units built in the mid-1960s.
Chapter Two
| Highacres Farm, Dewey Lane, Brackenfield, Derbyshire DE55 6DB, UKChapter Nineteen
| 2 Winkleigh Rd, Exeter TAS 7275
Antique Caterpillar
Machinery Owners Club
1115 Madison St NE # 1117
Salem, OR 97301
Terms & Privacy
Website developed by
AdCo
"I also joined a year ago. had been on here a couple of times as a non-member and found the info very helpful so I got a one year subscription (not very expensive at all) to try it out. I really like all the resources on here so I just got a three year. I think its a very small price for what you can get out of this site."
-Jason N