ACMOC
Login
ACMOC
caterpillar twenty-two sprocket removal

caterpillar twenty-two sprocket removal

Showing 1 to 7 of 7 results
Orchard22
Topic Author
Offline
Send a private message to Orchard22
Posts: 189
Thank you received: 0
Hi, y'all!
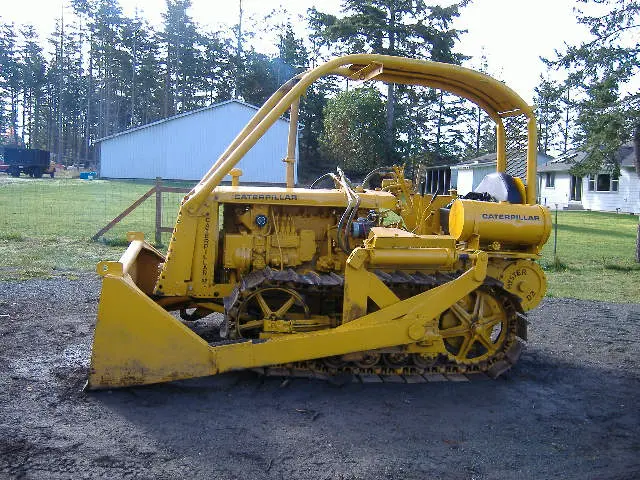
I am about to remove, and swap my 22's sprockets for some better ones, and I have some questions.How much force is needed to remove the sprockets? Can you safely heat, or do you have to heat the sprockets to remove them? Are the sprockets made out of cast-iron or cast-steel? any info. is greatly appreciated!
1935 Caterpillar
Twenty-Two Citrus(or low top seat orchard)
serial number:2F2204
Please log in or create an account to join the conversation.
Fri, Dec 31, 2010 10:48 AM
JasonPayneCrawlers
Offline
Send a private message to JasonPayneCrawlers
Posts: 596
Thank you received: 0
when I restored my wide ten I had to heat and beat and I mean beat. I thought that I was going to break but after trying all other options beating them was the only way I could get them off👍 I was worried that I would mess up the bellows seal but they were okay
Please log in or create an account to join the conversation.
Fri, Dec 31, 2010 10:56 AM
drujinin
Offline
Send a private message to drujinin
Posts: 3,852
Thank you received: 1
Reply to JasonPayneCrawlers:
when I restored my wide ten I had to heat and beat and I mean beat. I thought that I was going to break but after trying all other options beating them was the only way I could get them off👍 I was worried that I would mess up the bellows seal but they were okay
I use a similar to attached photo Gear puller except its rated at 10 ton. Mine is an older 2 and 3 leg style. I'm trying to show you the wings where you beat on it in the attached photo. You attach it and beat on the wings of the puller with a 6 pound hammer. I have had good luck with this tool and heating the casting around the shaft to expand the sprocket hub away from the shaft. I have used this on D-2 and 22 steering clutches and brake drums also.
Jeff
Attachment
Please log in or create an account to join the conversation.
Fri, Dec 31, 2010 7:32 PM
rustrunner
Offline
Send a private message to rustrunner
Posts: 133
Thank you received: 0
Reply to drujinin:
I use a similar to attached photo Gear puller except its rated at 10 ton. Mine is an older 2 and 3 leg style. I'm trying to show you the wings where you beat on it in the attached photo. You attach it and beat on the wings of the puller with a 6 pound hammer. I have had good luck with this tool and heating the casting around the shaft to expand the sprocket hub away from the shaft. I have used this on D-2 and 22 steering clutches and brake drums also.
Jeff
Attachment
My brother started to remove the sprocket on his 22 several years ago. We heat, beat, used pullers, - nada. Did all of the above several times with no luck, so he decided to just remove the nut and run it until the sprocket came off. Well that was 8-10 years ago, and he has farmed with the tractor, we have run it at shows, logged with it, and NADA. Not sure if that sprocket will ever come off.
Please log in or create an account to join the conversation.
Fri, Dec 31, 2010 9:11 PM
Arthropod
Offline
Send a private message to Arthropod
Posts: 302
Thank you received: 0
Reply to rustrunner:
My brother started to remove the sprocket on his 22 several years ago. We heat, beat, used pullers, - nada. Did all of the above several times with no luck, so he decided to just remove the nut and run it until the sprocket came off. Well that was 8-10 years ago, and he has farmed with the tractor, we have run it at shows, logged with it, and NADA. Not sure if that sprocket will ever come off.
Be careful removing sprockets. I have removed several from D2's. Same as the 22. I use an OTC 17 1/2 ton push/puller like this one:
http://www.amazon.com/OTC-938-17-1-Push-Puller/dp/B0002SRH8I

I had to also purchase adapters so I could screw into the sprocket's puller holes near the center of the sprocket.

The method I used successfully-
1. Take a spare large sprocket cap nut and grind the center off, so you have an open nut. Thread this nut onto the sprocket shaft, but leave it a little loose. The purpose of the nut is to keep the sprocket from flying off and killing you or anyone watching you.
2. Attach the push/puller, using adapters so that the two pull shafts are attached to the threaded sprocket holes and the center puller shaft rest on the center sprocket drive shaft.
3. tighten the puller as tight as you can get it. The sprocket probably won't come loose. You are starting to worry that the puller is going to explode or something.
4. Leave the puller attached and tight, then heat all around the sprocket near the drive shaft.
5. Take a 10 pound or so sledge and whack the outer rim of the sprocket. The sprocket should pop loose violently. The modified cap nut will keep the sprocket from flying off.
6. Now the sprocket is loose. Just unscrew the cap nut and slip the sprocket off.

The new sprocket is suppose to be pressed into place. I never had a way to do this, so I just would tighten the cap nut while hitting the sprocket with a sledge. It seemed to get the sprocket tight. If you don't get the sprocket tight, and the sprocket moves, the splines on the drive shaft will become damaged.

Good luck, take your time and be careful.
Please log in or create an account to join the conversation.
Sat, Jan 1, 2011 9:00 AM
ejensen
Offline
Send a private message to ejensen
Posts: 2
Thank you received: 0
Reply to Arthropod:
Be careful removing sprockets. I have removed several from D2's. Same as the 22. I use an OTC 17 1/2 ton push/puller like this one:
http://www.amazon.com/OTC-938-17-1-Push-Puller/dp/B0002SRH8I

I had to also purchase adapters so I could screw into the sprocket's puller holes near the center of the sprocket.

The method I used successfully-
1. Take a spare large sprocket cap nut and grind the center off, so you have an open nut. Thread this nut onto the sprocket shaft, but leave it a little loose. The purpose of the nut is to keep the sprocket from flying off and killing you or anyone watching you.
2. Attach the push/puller, using adapters so that the two pull shafts are attached to the threaded sprocket holes and the center puller shaft rest on the center sprocket drive shaft.
3. tighten the puller as tight as you can get it. The sprocket probably won't come loose. You are starting to worry that the puller is going to explode or something.
4. Leave the puller attached and tight, then heat all around the sprocket near the drive shaft.
5. Take a 10 pound or so sledge and whack the outer rim of the sprocket. The sprocket should pop loose violently. The modified cap nut will keep the sprocket from flying off.
6. Now the sprocket is loose. Just unscrew the cap nut and slip the sprocket off.

The new sprocket is suppose to be pressed into place. I never had a way to do this, so I just would tighten the cap nut while hitting the sprocket with a sledge. It seemed to get the sprocket tight. If you don't get the sprocket tight, and the sprocket moves, the splines on the drive shaft will become damaged.

Good luck, take your time and be careful.
[quote="Arthropod"]Be careful removing sprockets. I have removed several from D2's. Same as the 22. I use an OTC 17 1/2 ton push/puller like this one:
http://www.amazon.com/OTC-938-17-1-Push-Puller/dp/B0002SRH8I

I had to also purchase adapters so I could screw into the sprocket's puller holes near the center of the sprocket.

The method I used successfully-
1. Take a spare large sprocket cap nut and grind the center off, so you have an open nut. Thread this nut onto the sprocket shaft, but leave it a little loose. The purpose of the nut is to keep the sprocket from flying off and killing you or anyone watching you.
2. Attach the push/puller, using adapters so that the two pull shafts are attached to the threaded sprocket holes and the center puller shaft rest on the center sprocket drive shaft.
3. tighten the puller as tight as you can get it. The sprocket probably won't come loose. You are starting to worry that the puller is going to explode or something.
4. Leave the puller attached and tight, then heat all around the sprocket near the drive shaft.
5. Take a 10 pound or so sledge and whack the outer rim of the sprocket. The sprocket should pop loose violently. The modified cap nut will keep the sprocket from flying off.
6. Now the sprocket is loose. Just unscrew the cap nut and slip the sprocket off.

The new sprocket is suppose to be pressed into place. I never had a way to do this, so I just would tighten the cap nut while hitting the sprocket with a sledge. It seemed to get the sprocket tight. If you don't get the sprocket tight, and the sprocket moves, the splines on the drive shaft will become damaged.

Good luck, take your time and be careful.[/quote]
What is the thread size of the holes in the sprocket? What type of adapters and where did you purchase them to attach to the legs of the puller? Thank You,

email: [email protected]
Attachment
Please log in or create an account to join the conversation.
Fri, Mar 25, 2011 11:57 PM
Catmatt
Offline
Send a private message to Catmatt
Location: Blue Bell, PA
Posts: 288
Thank you received: 0
Reply to ejensen:
[quote="Arthropod"]Be careful removing sprockets. I have removed several from D2's. Same as the 22. I use an OTC 17 1/2 ton push/puller like this one:
http://www.amazon.com/OTC-938-17-1-Push-Puller/dp/B0002SRH8I

I had to also purchase adapters so I could screw into the sprocket's puller holes near the center of the sprocket.

The method I used successfully-
1. Take a spare large sprocket cap nut and grind the center off, so you have an open nut. Thread this nut onto the sprocket shaft, but leave it a little loose. The purpose of the nut is to keep the sprocket from flying off and killing you or anyone watching you.
2. Attach the push/puller, using adapters so that the two pull shafts are attached to the threaded sprocket holes and the center puller shaft rest on the center sprocket drive shaft.
3. tighten the puller as tight as you can get it. The sprocket probably won't come loose. You are starting to worry that the puller is going to explode or something.
4. Leave the puller attached and tight, then heat all around the sprocket near the drive shaft.
5. Take a 10 pound or so sledge and whack the outer rim of the sprocket. The sprocket should pop loose violently. The modified cap nut will keep the sprocket from flying off.
6. Now the sprocket is loose. Just unscrew the cap nut and slip the sprocket off.

The new sprocket is suppose to be pressed into place. I never had a way to do this, so I just would tighten the cap nut while hitting the sprocket with a sledge. It seemed to get the sprocket tight. If you don't get the sprocket tight, and the sprocket moves, the splines on the drive shaft will become damaged.

Good luck, take your time and be careful.[/quote]
What is the thread size of the holes in the sprocket? What type of adapters and where did you purchase them to attach to the legs of the puller? Thank You,

email: [email protected]
Attachment
Grainger is where i purchased our puller to remove the sprocket. Once you get a lot of tension on the sprocket with the puller, hit the puller with the sledge and then tighten. repeat. Be careful when it breaks loose it will go flying...make sure you have the nut on loosely to prevent that. I would also apply a lot of heat. If you are still having problems just cut the sprocket off with a torch. You did say you are replacing them because they are trashed????
Please log in or create an account to join the conversation.
Sat, Mar 26, 2011 3:45 AM
ejensen
Offline
Send a private message to ejensen
Posts: 2
Thank you received: 0
Reply to ejensen:
[quote="Arthropod"]Be careful removing sprockets. I have removed several from D2's. Same as the 22. I use an OTC 17 1/2 ton push/puller like this one:
http://www.amazon.com/OTC-938-17-1-Push-Puller/dp/B0002SRH8I

I had to also purchase adapters so I could screw into the sprocket's puller holes near the center of the sprocket.

The method I used successfully-
1. Take a spare large sprocket cap nut and grind the center off, so you have an open nut. Thread this nut onto the sprocket shaft, but leave it a little loose. The purpose of the nut is to keep the sprocket from flying off and killing you or anyone watching you.
2. Attach the push/puller, using adapters so that the two pull shafts are attached to the threaded sprocket holes and the center puller shaft rest on the center sprocket drive shaft.
3. tighten the puller as tight as you can get it. The sprocket probably won't come loose. You are starting to worry that the puller is going to explode or something.
4. Leave the puller attached and tight, then heat all around the sprocket near the drive shaft.
5. Take a 10 pound or so sledge and whack the outer rim of the sprocket. The sprocket should pop loose violently. The modified cap nut will keep the sprocket from flying off.
6. Now the sprocket is loose. Just unscrew the cap nut and slip the sprocket off.

The new sprocket is suppose to be pressed into place. I never had a way to do this, so I just would tighten the cap nut while hitting the sprocket with a sledge. It seemed to get the sprocket tight. If you don't get the sprocket tight, and the sprocket moves, the splines on the drive shaft will become damaged.

Good luck, take your time and be careful.[/quote]
What is the thread size of the holes in the sprocket? What type of adapters and where did you purchase them to attach to the legs of the puller? Thank You,

email: [email protected]
Attachment
[quote="ejensen"]
What is the thread size of the holes in the sprocket? What type of adapters and where did you purchase them to attach to the legs of the puller? Thank You,

email: [email protected][/quote]

The puller holes in the sprocket on my D2 are 5/8 NC. I'm the shanot sure of the thread size of the shaft that the nut attaches to secure the sprocket. Looks like pipe thread.
Please log in or create an account to join the conversation.
Wed, Mar 30, 2011 7:33 PM
Showing 1 to 7 of 7 results
YouTube Video Placeholder

Follow Us on Social Media

Our channel highlights machines from the earliest Holt and Best track-type tractors, equipment from the start of Caterpillar in 1925, up to units built in the mid-1960s.

Upcoming Events

HAMILTON PASTURAL MUSEUM

Chapter Nineteen

| Cnr Hiller Lane and Ballarat Road, Hamilton, Vic, 3300

RUSSELL SAYWELL WORKING DAY

Chapter Two

| Pitt Farm, Little Paxton, St Neots, Cambridgeshire, PE19 6HD, UK

10th Annual Best of the West

Chapter Fifteen

| Historic Santa Margarita Ranch, 20000 El Camino Real, Santa Margarita, CA 93453, USA

ACMOC Chapter 30 - Celebrating 100 Years of Caterpillar

Chapter Thirty

| Hartley - South Australia
View Calendar
ACMOC

Antique Caterpillar
Machinery Owners Club

1115 Madison St NE # 1117
Salem, OR 97301

[email protected]

Terms & Privacy
Website developed by AdCo

Testimonials

"I also joined a year ago. had been on here a couple of times as a non-member and found the info very helpful so I got a one year subscription (not very expensive at all) to try it out. I really like all the resources on here so I just got a three year. I think its a very small price for what you can get out of this site."
-Jason N

Join Today!