ACMOC
Login
ACMOC
cat d2 pinion gear removal help

cat d2 pinion gear removal help

Showing 1 to 10 of 14 results
1
matty101
Topic Author
Offline
Send a private message to matty101
Posts: 6
Thank you received: 0
hi guys, i'm new to all this so please be patient with me.

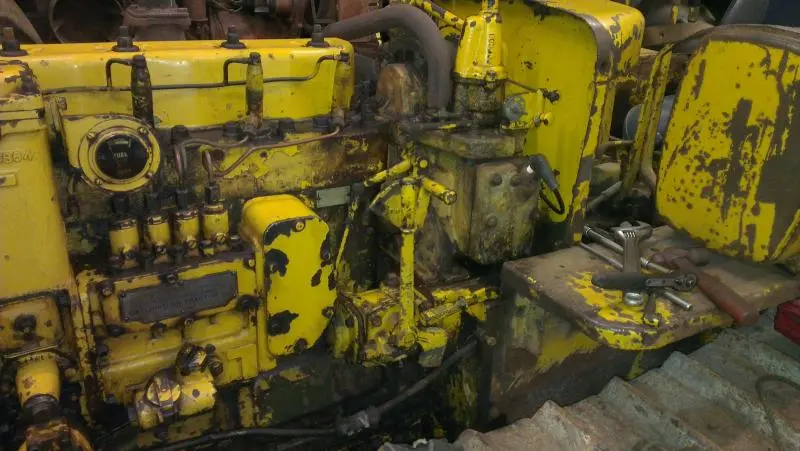
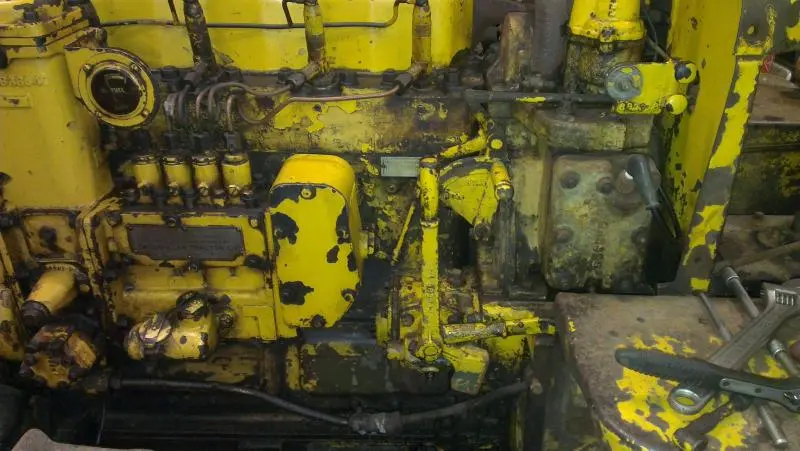
we have a cat d2 (5j if I remember rightly) it has been sat in the corner for 5-6 years and never been looked at. we recently decided we would start it up and did all the usual checks oil etc.. and after cleaning the points on the pony engine we managed to get that to start to run with no problems. once the pony was running we went through the usual starting procedure, tall lever right back, but when we tried to pull the smaller lever up it doesn't feel right at all. you can only pull it maybe half way up and it feels completely solid, and when you do the pony motor just gets dragged down to the point of almost stalling.

we have removed the inspection cover that allows you to access the latches on the pinion gear and from what I can see it is completely rusted up and more than likely seized. am I right in thinking that this is most likely to be the problem?

either way we think its probably a good idea to remove the pinion gear assembly and give it the once over. I have managed to lift the donkey engine and can see that I have enough clearance, but I think I will remove it completely as the gasket between the pony motor and the machine has been weeping now for a while.

so another question for you clever people, besides lifting the pony engine what else is needed in order to remove the pinion gear assembly?

[attachment=19975]IMAG1048.jpg[/attachment][attachment=19976]IMAG1049.jpg[/attachment]

any help would be greatly appreciated

go easy on me!
Attachment
Attachment
Please log in or create an account to join the conversation.
Thu, Oct 10, 2013 6:36 AM
Steve A
Offline
Member
Send a private message to Steve A
Posts: 1,254
Thank you received: 0
If memory serves me, once the pony is lifted or off your ready to remove pinion.

There is a magic set of moves and twist to get it out but it will come out without removing the govenor
Please log in or create an account to join the conversation.
Thu, Oct 10, 2013 7:06 AM
dpendzic
Offline
Send a private message to dpendzic
Posts: 2,763
Thank you received: 1
Reply to Steve A:
If memory serves me, once the pony is lifted or off your ready to remove pinion.

There is a magic set of moves and twist to get it out but it will come out without removing the govenor
when the pony motor gets dragged down is the diesel spinning at all??
Please log in or create an account to join the conversation.
Thu, Oct 10, 2013 7:20 AM
ccjersey
Offline
Send a private message to ccjersey
Posts: 4,422
Thank you received: 0
It is easier to remove the pinion if it is latched. That makes it shorter! So better clearance.

I would be spraying it with penetrating oil and trying to get it to latch with a pry bar before unbolting the pinion from the clutch housing.

Also, be careful prying on the flange of the pinion housing. It is easy to break off the "ears" where the bolts go through while trying to get the assembly to break loose from the clutch housing.
D2-5J's, D6-9U's, D318 and D333 power units, 12E-99E grader, 922B & 944A wheel loaders, D330C generator set, DW20 water tanker and a bunch of Jersey cows to take care of in my spare time😄
Please log in or create an account to join the conversation.
Thu, Oct 10, 2013 7:29 AM
Sasquatch
Offline
Member
Send a private message to Sasquatch
Posts: 1,238
Thank you received: 1
Reply to ccjersey:
It is easier to remove the pinion if it is latched. That makes it shorter! So better clearance.

I would be spraying it with penetrating oil and trying to get it to latch with a pry bar before unbolting the pinion from the clutch housing.

Also, be careful prying on the flange of the pinion housing. It is easy to break off the "ears" where the bolts go through while trying to get the assembly to break loose from the clutch housing.
If removal of the pinion assembly becomes necessary, the easiest way I've found to remove it on this D3400 engine goes like this:
-Lift the pony engine (I always go far enough to replace the old base gasket while I'm at it, they always leak if I don't.
-Remove the front square cover from the pinion housing assembly (the one held on with the 4 bolts that has the drain plug in it).
-Remove the side cover with the engagement lever still attached, just take out the 3 bolts and you can manipulate the cover to get the shift fork to disengage from the shift collar.
-Remove one bolt from the upper rear corner of the crankcase inspection cover on the engine block (the one that's directly under the pinion housing) as this bolt needs to get out of the way to permit removal of one of the pinion housing bolts. Look under there with a flashlight or mirror and you'll see what I'm talking about.
-Engage the pinion to shorten the assembly, remove the 4 pinion housing bolts and it will slide right out, might have to give it a slight turn to clear the governor housing, but it will fit. If you can't engage the pinion, it might still clear, but it wouldn't be as easy.
Please log in or create an account to join the conversation.
Thu, Oct 10, 2013 9:46 AM
matty101
Topic Author
Offline
Send a private message to matty101
Posts: 6
Thank you received: 0
Reply to dpendzic:
when the pony motor gets dragged down is the diesel spinning at all??


I dont think so no. You can turn the dielsel over by turning the fan with decompression on though so I don't think the diesel engine is seized.

Toby. Thankyou very much for the you walk through. It's exactly what I was looking for.

Thankyou for all the replys!!!!
Please log in or create an account to join the conversation.
Thu, Oct 10, 2013 1:31 PM
matty101
Topic Author
Offline
Send a private message to matty101
Posts: 6
Thank you received: 0
Reply to matty101:


I dont think so no. You can turn the dielsel over by turning the fan with decompression on though so I don't think the diesel engine is seized.

Toby. Thankyou very much for the you walk through. It's exactly what I was looking for.

Thankyou for all the replys!!!!
right then guys, im in need of advice again. I have managed to remove the pony motor and the pinion gear assembly. as I kind of thought the pinion gear was rusted up solid. I have managed to get it all unseized and its working perfect now.

The problem im having now is that the lever that pushes on the end of the pinion gear assembly is rather worn and i am not sure what to do about it. how hard is the lever mechanism to remove? or is it even worth fixing?
I was thinking just building it up again with weld and then dressing it off to the right size and shape? but if it is a big or complicated job to remove the lever i was thinking i could add a little on to the end of the pinion gear mechanism to compensate for the wear or is this a big no no?

any help, pictures, diagrams would really be appreciated guys.

thanks in advance!
Please log in or create an account to join the conversation.
Sun, Oct 13, 2013 5:06 AM
ccjersey
Offline
Send a private message to ccjersey
Posts: 4,422
Thank you received: 0
I think adding some to the button on the end of the pinion is going to be a lot easier than the lever/hook which I believe requires the tractor to be split to remove?

The button on the end of the pinion latch assembly is a separate piece, not sure how it is retained, but it would have to be easier to work on that out on the bench than the lever inside the clutch housing. Also the lever is a piece of steel, I suppose it could get brittle and snap off if you welded on it?????? Maybe not a problem, I just don't know, but anyway, no danger of that happening on the button.
D2-5J's, D6-9U's, D318 and D333 power units, 12E-99E grader, 922B & 944A wheel loaders, D330C generator set, DW20 water tanker and a bunch of Jersey cows to take care of in my spare time😄
Please log in or create an account to join the conversation.
Sun, Oct 13, 2013 5:45 AM
neil
Offline
Moderator
Admin
Send a private message to neil
Posts: 7,002
Thank you received: 23
Reply to ccjersey:
I think adding some to the button on the end of the pinion is going to be a lot easier than the lever/hook which I believe requires the tractor to be split to remove?

The button on the end of the pinion latch assembly is a separate piece, not sure how it is retained, but it would have to be easier to work on that out on the bench than the lever inside the clutch housing. Also the lever is a piece of steel, I suppose it could get brittle and snap off if you welded on it?????? Maybe not a problem, I just don't know, but anyway, no danger of that happening on the button.
The arm that pushes the pinion latch housing on my 5U is half-broken off. To change it out would require splitting the tractor so I'm just going to build it up with some weld. The button on the latch is fine.
Cheers,
Neil
Please log in or create an account to join the conversation.
Sun, Oct 13, 2013 7:11 AM
Sasquatch
Offline
Member
Send a private message to Sasquatch
Posts: 1,238
Thank you received: 1
Reply to neil:
The arm that pushes the pinion latch housing on my 5U is half-broken off. To change it out would require splitting the tractor so I'm just going to build it up with some weld. The button on the latch is fine.
Cheers,
Neil
I also don't know if the pinion engagement arm can be totally removed without splitting the tractor, it may not completely slide out of its bore before hitting the inside of the transmission housing. With the pinion clutch already removed, it may be possible for a person to reach inside that opening and grab the shaft to give it a try.

The pinion engagement arm is retained in its bore by the close fit of the engagement lever shaft. See scan-


[img]http://i802.photobucket.com/albums/yy310/TRNelson/Cat%20D2/002_zps2419661e.jpg[/img]


The 3B2632 lever assembly fits inside a flat that is machined into the side of the 4B5298 bar assembly, as illustrated in the small inset picture I added to the scan page. The hand lever for engaging the pinion keeps the two pieces mated together because of the way it is clamped to the 3B2632 lever, and the 4B5293 pin keeps everything aligned via a seperate bore of its own.

This is usually where splitting the tractor becomes necessary. To disassemble the mechanisms, first loosen the clamp bolt on the hand lever and slide it off of 3B2632. Then you can push 3B2632 inward far enough to disengage it from the 4B5298 bar, which will allow 4B5298 to be slid out of its bores and removed. Reverse the removal procedure for reassembly, making sure to position the hand engagement lever tight enough to the bell housing to keep both pieces mated together without binding.
Please log in or create an account to join the conversation.
Sun, Oct 13, 2013 10:11 AM
matty101
Topic Author
Offline
Send a private message to matty101
Posts: 6
Thank you received: 0
Reply to Sasquatch:
I also don't know if the pinion engagement arm can be totally removed without splitting the tractor, it may not completely slide out of its bore before hitting the inside of the transmission housing. With the pinion clutch already removed, it may be possible for a person to reach inside that opening and grab the shaft to give it a try.

The pinion engagement arm is retained in its bore by the close fit of the engagement lever shaft. See scan-


[img]http://i802.photobucket.com/albums/yy310/TRNelson/Cat%20D2/002_zps2419661e.jpg[/img]


The 3B2632 lever assembly fits inside a flat that is machined into the side of the 4B5298 bar assembly, as illustrated in the small inset picture I added to the scan page. The hand lever for engaging the pinion keeps the two pieces mated together because of the way it is clamped to the 3B2632 lever, and the 4B5293 pin keeps everything aligned via a seperate bore of its own.

This is usually where splitting the tractor becomes necessary. To disassemble the mechanisms, first loosen the clamp bolt on the hand lever and slide it off of 3B2632. Then you can push 3B2632 inward far enough to disengage it from the 4B5298 bar, which will allow 4B5298 to be slid out of its bores and removed. Reverse the removal procedure for reassembly, making sure to position the hand engagement lever tight enough to the bell housing to keep both pieces mated together without binding.
Thanks for all the help guys, I think splitting the machine is out of the question just to replace the lever so I think welding something on the back of the pinion gear mechanism is what I will do. So Does any one have any info on how to dismantle the pinion gear so I can weld something on the end.

Thanks again for all the help guys!
Please log in or create an account to join the conversation.
Sun, Oct 13, 2013 10:45 PM
Showing 1 to 10 of 14 results
1
YouTube Video Placeholder

Follow Us on Social Media

Our channel highlights machines from the earliest Holt and Best track-type tractors, equipment from the start of Caterpillar in 1925, up to units built in the mid-1960s.

Upcoming Events

Cromford Steam Rally

Chapter Two

| Highacres Farm, Dewey Lane, Brackenfield, Derbyshire DE55 6DB, UK

The Century of Caterpillar

| Elkader, 203 Johnson St, Elkader, IA 52043, USA

100 YEARS OF CATERPILLAR IN TASMANIA

Chapter Nineteen

| 2 Winkleigh Rd, Exeter TAS 7275
View Calendar
ACMOC

Antique Caterpillar
Machinery Owners Club

1115 Madison St NE # 1117
Salem, OR 97301

[email protected]

Terms & Privacy
Website developed by AdCo

Testimonials

"I also joined a year ago. had been on here a couple of times as a non-member and found the info very helpful so I got a one year subscription (not very expensive at all) to try it out. I really like all the resources on here so I just got a three year. I think its a very small price for what you can get out of this site."
-Jason N

Join Today!