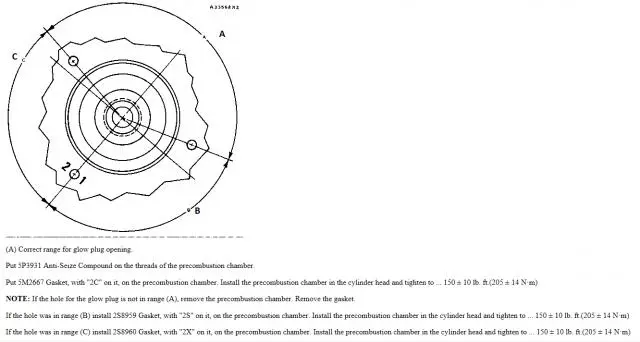
The different thickness gaskets are used to locate the glow plug so that they don't interfere with the injection lines.

Thanks for the quick reply.
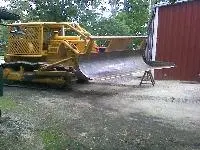
Sorry I am a complete novice. I looked at your diagram but I am not sure what I am looking at or what I need to measure. I have included a photo of the head, I can see the hole where the injector and glow plug must reside but at this stage I haven't removed the chamber so I don't fully understand the set up.
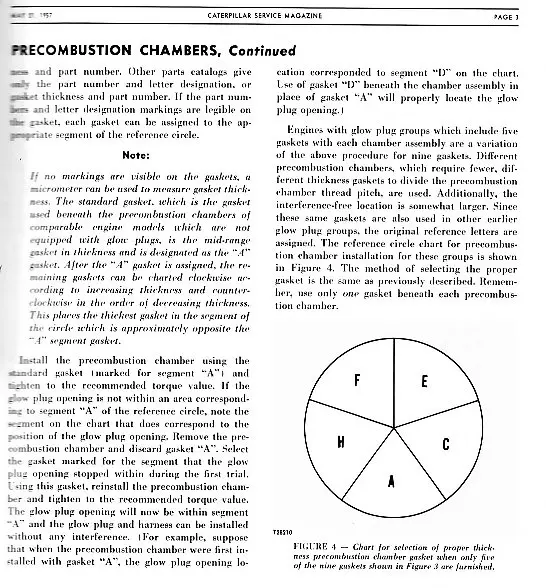
When the precombustion chambers are reinstalled with standard copper ring seals and torqued down to spec, if the glow plug hole stops at a position in the no-go part of the circle as shown in the diagram, the glow plug will interfere with the fuel injection line when they are installed later. So a different thickness copper ring seal is selected to move the position of glow plug hole when tightened down on the thicker ring.
If a chamber tightens in and after proper torque, the glow plug hole is in the go range, you’re done, you should have no problems installing glow plugs and injectors.
It is not a good idea to reuse a copper seal. Sort of like a head gasket, crush it once and then replace it if you must disassemble it. So you start with standard thickness seals and do the first assembly. Then select a thicker seal as required to move any that are in the no-go range. Discard the ring used for the initial unsuccessful installation.
Did you pressure test the oil cooler? It would cause a lot of anguish to get your overhaul done and still have the original problem all over again. It’s a good idea to flush it out anyway and clean any scale from the coolant side.
The other thing that should be checked is liner protrusion above the block deck. Very important for a successful long lasting overhaul. You need a service manual that shows all these procedures.
On the precombustion chamber engines it is usually cheap enough to just install new injection valves, but your old ones can be checked on a test stand and reused if they perform properly.
No Copper Seals under combustion chambers on a 3306, the Seals are Steel made in a number of thickness sizes to set the heater plugs in the correct Zone location, the coolant leaking into your engine is most probably from the water pump and simple to fix. tctractors.
No Copper Seals under combustion chambers on a 3306, the Seals are Steel made in a number of thickness sizes to set the heater plugs in the correct Zone location, the coolant leaking into your engine is most probably from the water pump and simple to fix. tctractors.
Many thanks for the replies. I probably need to uninstall the injector cup assembly myself to get a better understanding of how it fits together.
The oil cleaner has been removed, checked and cleaned. The water pump also removed and checked. Whilst these were off the oil cooler hole was plugged and system pressure tested and coolant still getting into the sump. I wish it had been an easy repair.
I have bought a service manual from the States and awaiting delivery, these motors don't seem so common here in Australia.
Point taken on the liner protrusion. Whilst I am doing all the work I have a mechanic drop in weekly to check on me!
Hopefully will lift the motor this week to access the underneath. No nasty surprises so far, all bolts came out, which was fantastic given it has been in a marine environment for nearly forty years.
I would tend to think you might need to re - inspect the water pump, it could well be a rot hole in a cylinder liner though, all easy enough to sort. tctractors.
A 66D1651 is actually a D333C Industrial Engine not a true 3306 although it is a forerunner to the 3306 and is near identical to that Industrial Engine version. Marine applications are handled by the addition of various attachments.
Parts book form number is a UE070091
If everything else has been checked I would suspect liner seals as the leak culprit.


Our channel highlights machines from the earliest Holt and Best track-type tractors, equipment from the start of Caterpillar in 1925, up to units built in the mid-1960s.
Chapter Nineteen
| 1234 Carngham - Lake Goldsmith Road Lake Goldsmith VIC 3373Chapter Two
| Folds Farm, Godshillwood, Fordingbridge, Hampshire, SP6 2LU
Antique Caterpillar
Machinery Owners Club
1115 Madison St NE # 1117
Salem, OR 97301
Terms & Privacy
Website developed by
AdCo
"I became a member recently because the wealth of knowledge here is priceless."
-Chris R