
[attachment=76795]Capture.JPG[/attachment] [attachment=76796]Capture.JPG[/attachment]
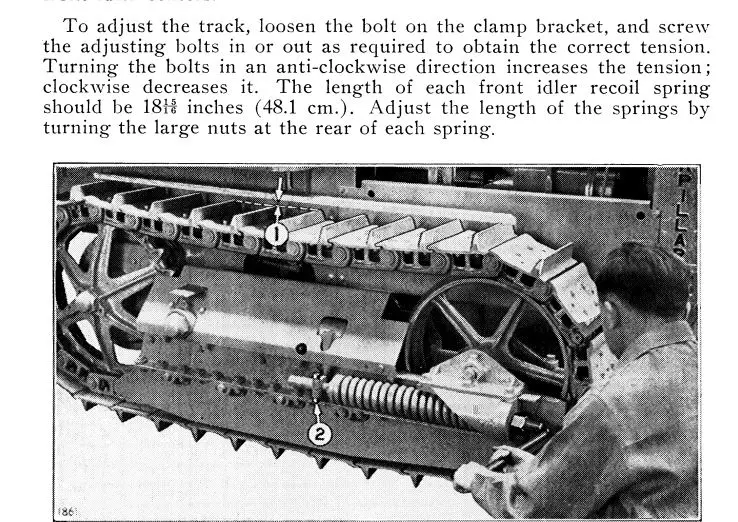
Loosen the clamp bolt, do not turn the nut on the threaded rod turn the head of the bolt towards the front of the tractor to tighten the tracks, back that bolt out to make it shorter on the threaded end by the clamp. They can be quite stubborn at times work it back-and-forth use big impact wrench. Lots of loose juice. Skinner
Thanks Bruce. I have a Jensales manual so I cant see anything in their photos. Some of their wording does not seem to make sense to me. It appears that the manual is saying to adjust the track tension, use the large bolt head at the front and to make the spring the correct length use the nut at the back of the spring. I would think that the nut on the back of the spring would also affect track tension?
Skinner, you are absolutely right about stubborn being the key word. 90 years of rust has almost welded this machine together. I will try again tomorrow. Thanks all. Grant.
You have a wonderful day. Best wishes. Deas Plant.
Hi, Grantj.
Another thing to check when adjusting tracks with this older form of adjustment is to make sure that the idler is correctly aligned before declaring, "JOB DONE". To do this, check the distance between the idler and frame rail at the front and rear of the idler should be equal. If you want to be real fastidious, do it inside as well as outside.
This is due to the adjustment being on both inside and outside of the track frame rail.
One of the biggest advancements that Cat made in the early days was switching to a single central point for track adjustment on each track.
Just my 0.02
Deas Plant, that is exactly why I am trying to adjust the track. The idler is cocked a little inward and I am trying to get more tension on the inboard spring. The sag in the tracks is just about right, but I dont want to ruin a track from things being out of line. None of the springs measure the 18 15/16 that the manual says, but I am not sure where to measure from. You cant reach the front of the spring. After 90 years the springs may weaken at different rates. At this point it is all a guess on my part.
Thanks, Grant
You have a wonderful day. Best wishes. Deas Plant.
Hi, Grantj.
My memories of Cat 22s are around 68 years old. How-wevver, azza 'ruff' guide, if you allow around a 1/2" thickness for the front of the spring cup and them measure from there to the rear end of the spring, I don't think you will be too far wrong.
As has been said before, the track adjustment involves extending or retracting the idler via the bolt which runs through the clamp behind the spring on each side of each track while the spring tension adjustment is adjusted with the nut at the rear of each spring retainer plate at the rear of each spring.
It is NOT the tension on the spring that you need to adjust for the idler alignment but the actual track adjusters themselves, which involves loosening the clamp bolts on the threads at the rear of the track adjuster assembly and turning the head of the long bolt that runs right through the front spring cup and the spring and into and through that clamp - I believe anti-clockwise to tighten the track, clockwise to loosen it
Adjusting only the inside adjuster to align your idler will affect track tension so you might need to do a 'balancing act' between the inner and outer adjusters to get your idler into alignment.
See the scan from bruce oz above.
Hope this helps.
Just my 0.02.
Deas Plant, thank you that clears it up for me. Now I just need about a 6 foot extension on my breaker bar. I tried my 1 inch socket breaker bar and stood on it and got no movement at all. I have not tried heat yet on the big front nut. Maybe today??? Thanks Grant.
You have a wonderful day. Best wishes. Deas Plant.
Hi, Grantj.
That "big front nut" right at the front of the track adjuster/recoil spring assembly is the head of the bolt that you need to turn to adjust the tracks. 'Loose juice' sprayed in around it certainly won't hurt your endeavors but what you need to get freed up is the clamp - #2 in bruce oz's scan above - at the rear of that assembly.
To help get that clamp free, you could even take the clamp bolt right out, make a 'foxing' wedge' by grinding a long, gentle taper on a piece of old car or light pickup spring, and wedge the clamp open a little. LOTTTTZA 'loose juice' in there may also help. A BIG 'rattle gun' may also be helpful.
Hope this helps.
Just my 0.02.
I feel a heating torch in the near future. I thought that I had that clamp free and the stuck stuff was in the front, but it could be the clamp. Heat and PB Blaster and maybe some "MAGIC WORDS" will get it loose. This is one of way too many projects. Grant.
You have a wonderful day. Best wishes. Deas Plant.


Our channel highlights machines from the earliest Holt and Best track-type tractors, equipment from the start of Caterpillar in 1925, up to units built in the mid-1960s.
Chapter Nineteen
| 1234 Carngham - Lake Goldsmith Road Lake Goldsmith VIC 3373Chapter Two
| Folds Farm, Godshillwood, Fordingbridge, Hampshire, SP6 2LU
Antique Caterpillar
Machinery Owners Club
1115 Madison St NE # 1117
Salem, OR 97301
Terms & Privacy
Website developed by
AdCo
"I also joined a year ago. had been on here a couple of times as a non-member and found the info very helpful so I got a one year subscription (not very expensive at all) to try it out. I really like all the resources on here so I just got a three year. I think its a very small price for what you can get out of this site."
-Jason N