ACMOC
Login
ACMOC
Cat 22 Thermostat and Temp Gauge

Cat 22 Thermostat and Temp Gauge

Showing 1 to 10 of 14 results
1
wingman83
Topic Author
Offline
Send a private message to wingman83
Posts: 32
Thank you received: 0
Hello all, I could use some help and advice.

I am currently trying to figure out how to fix my current water temp gauge and thermostat on my Cat 22 that I'm trying to rebuild.

The thermostat is damaged and the mercury line to the temp gauge is broken beyond repair.

My question, is there a way to salvage the original gauge by getting a new thermostat and run a and new temperature line to the gauge? Or does the gauge and all components have to be replaced?
Please log in or create an account to join the conversation.
Sun, Aug 2, 2015 11:59 AM
Mike Meyer
Offline
Member
Send a private message to Mike Meyer
Posts: 3,324
Thank you received: 1
Hello Wingman, I remember reading a thread about the temperature gauge repair a few years ago and they used a bulb and line from a newer temp gauge and soldered it into the old gauge, from memory it involved putting the new bulb on dry ice, or ice cubes during the transfer process, but it was successful though I can't remember if the gauge needed to be recalibrated, if you do a search through old threads you might find it.

The ACMOC Board have been busy researching the manufacture of new gauges to suit the old Cats like your 22 and I saw Peter Bloom discussing the prototype oil gauge just a week or 2 ago so I suspect you may be able to buy a new old style oil gauge before Christmas if we are lucky, and I'm hoping Peter can find a good supplier who can replicate the temperature gauges for us too at a reasonable price, because I also need them for my 22's here in Australia, and do many other folks.

I'm sure Peter will chime in soon on this topic.
Regards
Mike
Please log in or create an account to join the conversation.
Sun, Aug 2, 2015 4:33 PM
drujinin
Offline
Send a private message to drujinin
Posts: 3,852
Thank you received: 0
Reply to Mike Meyer:
Hello Wingman, I remember reading a thread about the temperature gauge repair a few years ago and they used a bulb and line from a newer temp gauge and soldered it into the old gauge, from memory it involved putting the new bulb on dry ice, or ice cubes during the transfer process, but it was successful though I can't remember if the gauge needed to be recalibrated, if you do a search through old threads you might find it.

The ACMOC Board have been busy researching the manufacture of new gauges to suit the old Cats like your 22 and I saw Peter Bloom discussing the prototype oil gauge just a week or 2 ago so I suspect you may be able to buy a new old style oil gauge before Christmas if we are lucky, and I'm hoping Peter can find a good supplier who can replicate the temperature gauges for us too at a reasonable price, because I also need them for my 22's here in Australia, and do many other folks.

I'm sure Peter will chime in soon on this topic.
Regards
Mike
See the link on this page as it discusses what Mike is trying to explain!
Please log in or create an account to join the conversation.
Sun, Aug 2, 2015 6:32 PM
wingman83
Topic Author
Offline
Send a private message to wingman83
Posts: 32
Thank you received: 0
Reply to drujinin:
See the link on this page as it discusses what Mike is trying to explain!


Thanks for the info Mike.

drujinin, I saw the link, but that link just takes me to ebay webpage and shows oil temp gauges for sale. And what I am looking for is water temp gauges, while trying to keep the orginal gauge.
Please log in or create an account to join the conversation.
Mon, Aug 3, 2015 2:33 AM
daron
Offline
Member
Send a private message to daron
Posts: 605
Thank you received: 1
Reply to wingman83:


Thanks for the info Mike.

drujinin, I saw the link, but that link just takes me to ebay webpage and shows oil temp gauges for sale. And what I am looking for is water temp gauges, while trying to keep the orginal gauge.
Sometime back Garlic Pete posted a link to a repair technique, I believe, used by someone who repaired an old Plymouth water temp gauge. Perhaps he can repost it.

Daron

Found link:

http://www.ply33.com/Repair/tempgauge
Please log in or create an account to join the conversation.
Mon, Aug 3, 2015 4:23 AM
STEPHEN
Offline
Send a private message to STEPHEN
Posts: 2,461
Thank you received: 0
Reply to daron:
Sometime back Garlic Pete posted a link to a repair technique, I believe, used by someone who repaired an old Plymouth water temp gauge. Perhaps he can repost it.

Daron

Found link:

http://www.ply33.com/Repair/tempgauge
try a web search, the method was described on an old car site.
roughly:
1) get suitable new gauge with long enough lead.
2) cutting old lead a few inches from the gauge head, prep for solder by sanding O.D. of lead and tinning
3) make a sleeve to connect the leads from suitable material.
4) prep new lead by sanding at site of future cut and tinning
5) put new bulb in dry ice to keep the either from escaping
6) cut new lead and solder onto old head using the sleeve.
7) look for leaks as bulb warms up
😎 check for calibration in a water bath( 212 deg is convenient because no thermometer is needed.
9) either formulations may vary with resulting difference in coefficient of expansion = gauge may not work perfectly, but you can get the hand to read correctly at the most important temp by resetting the hand, or bending of the works inside.

This is what I remember reading over a year ago, I may have missed something.
Please log in or create an account to join the conversation.
Mon, Aug 3, 2015 4:51 AM
drujinin
Offline
Send a private message to drujinin
Posts: 3,852
Thank you received: 0
Reply to STEPHEN:
try a web search, the method was described on an old car site.
roughly:
1) get suitable new gauge with long enough lead.
2) cutting old lead a few inches from the gauge head, prep for solder by sanding O.D. of lead and tinning
3) make a sleeve to connect the leads from suitable material.
4) prep new lead by sanding at site of future cut and tinning
5) put new bulb in dry ice to keep the either from escaping
6) cut new lead and solder onto old head using the sleeve.
7) look for leaks as bulb warms up
😎 check for calibration in a water bath( 212 deg is convenient because no thermometer is needed.
9) either formulations may vary with resulting difference in coefficient of expansion = gauge may not work perfectly, but you can get the hand to read correctly at the most important temp by resetting the hand, or bending of the works inside.

This is what I remember reading over a year ago, I may have missed something.
I SEARCHED, that link appeared to be the right Thread? I didn't check the Link that was in the post. OH, Well! The Link that Daron posted was the one, I was thinking of.
Please log in or create an account to join the conversation.
Mon, Aug 3, 2015 6:51 AM
neil
Offline
Moderator
Admin
Send a private message to neil
Posts: 6,932
Thank you received: 4
Reply to drujinin:
I SEARCHED, that link appeared to be the right Thread? I didn't check the Link that was in the post. OH, Well! The Link that Daron posted was the one, I was thinking of.
Hi Stephen, did it mention how to cut the tube? Sidecutters would crimp it, and a hacksaw would be too rough.
Please log in or create an account to join the conversation.
Mon, Aug 3, 2015 10:26 AM
brewzer
Offline
Send a private message to brewzer
Posts: 690
Thank you received: 0
Reply to neil:
Hi Stephen, did it mention how to cut the tube? Sidecutters would crimp it, and a hacksaw would be too rough.
I can give you 2 options.
1. Have your old gage repaired by APT Instruments. 9632 Humboldt Ave. South, Bloomington MN 55431. (952) 881-7095. They can make it look and work like new. Not cheap.
2. Replace it with a Stewart Warner " Wings style " gage. It will not look like the original but it is as close as you can come. You will have to use a bushing adapter for the bulb end. I can give you numbers if you are interested.
Wally
Please log in or create an account to join the conversation.
Mon, Aug 3, 2015 11:49 AM
wingman83
Topic Author
Offline
Send a private message to wingman83
Posts: 32
Thank you received: 0
Reply to neil:
Hi Stephen, did it mention how to cut the tube? Sidecutters would crimp it, and a hacksaw would be too rough.
Wow, thanks for all this info and links. I think I can fix the original or at least give it a good try.

What about a thermostat? Anyone know of a part number or what kind would work?

-Matt
Please log in or create an account to join the conversation.
Mon, Aug 3, 2015 12:06 PM
Mike Meyer
Offline
Member
Send a private message to Mike Meyer
Posts: 3,324
Thank you received: 1
Reply to wingman83:
Wow, thanks for all this info and links. I think I can fix the original or at least give it a good try.

What about a thermostat? Anyone know of a part number or what kind would work?

-Matt
[quote="wingman83"]Wow, thanks for all this info and links. I think I can fix the original or at least give it a good try.

What about a thermostat? Anyone know of a part number or what kind would work?

-Matt[/quote]

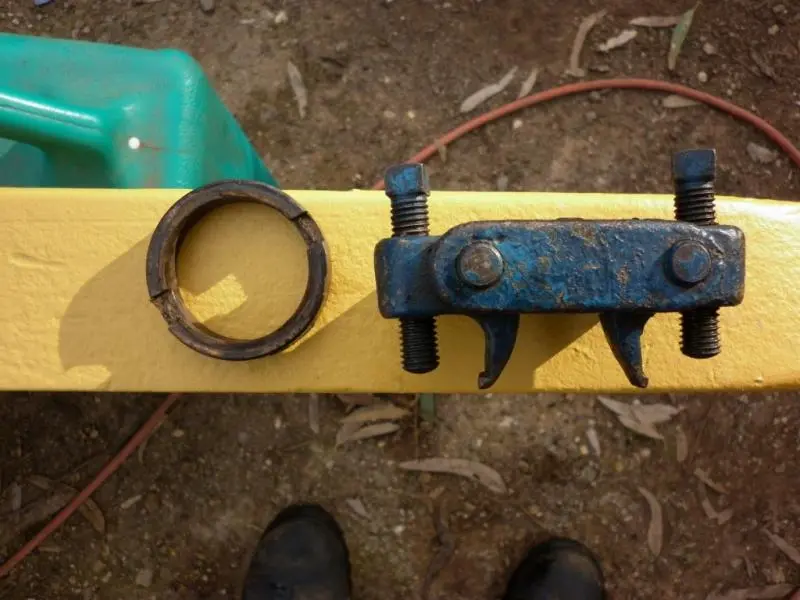
What is the serial number of your tractor, I've bought aftermarket Stant thermostats for my 22's that open around 170F or 175F but you need to measure your upper water manifold diameter to make sure you get the right size, Cat changed the thermostat design at 2F1757 and again at 1J917, the trick is getting the brass locking ring out of that water manifold, if you don't have the Cat tool then use a slide pull hammer to pop it out.
Mike
Attachment
Please log in or create an account to join the conversation.
Mon, Aug 3, 2015 1:10 PM
Showing 1 to 10 of 14 results
1
YouTube Video Placeholder

Follow Us on Social Media

Our channel highlights machines from the earliest Holt and Best track-type tractors, equipment from the start of Caterpillar in 1925, up to units built in the mid-1960s.

Upcoming Events

Wheatlands Warracknabeal Easter Rally

Chapter Nineteen

| 34 Henty Hwy, Warracknabeal

Veerkamp Open House 2025

Chapter Fifteen

| Placerville, CA

Stradsett Park Vintage Rally

Chapter Two

| Stradsett, Nr Downham Market. Norfolk PE33 9HA UK
View Calendar
ACMOC

Antique Caterpillar
Machinery Owners Club

1115 Madison St NE # 1117
Salem, OR 97301

[email protected]

Terms & Privacy
Website developed by AdCo

Testimonials

"I also joined a year ago. had been on here a couple of times as a non-member and found the info very helpful so I got a one year subscription (not very expensive at all) to try it out. I really like all the resources on here so I just got a three year. I think its a very small price for what you can get out of this site."
-Jason N

Join Today!