If you are talking about fuel injection pump plungers and barrels, unless it's sticking, any resurfacing is just adding wear.
If it's sticking, then I think polishing with very fine abrasive by rotating the plunger is the technique you want. No vertical scratches on either plunger or bore.
Maybe Eddie will be along soon to advise.
[quote="ccjersey"]If you are talking about fuel injection pump plungers and barrels, unless it's sticking, any resurfacing is just adding wear.
If it's sticking, then I think polishing with very fine abrasive by rotating the plunger is the technique you want. No vertical scratches on either plunger or bore.
Maybe Eddie will be along soon to advise.[/quote]
Hi champ I'm not talking about the bore itself I'm talking about the bonnet surface and the pump surface
Where the bonnet comes away from the pump that sealing surface
[quote="Justinc"]Hi champ I'm not talking about the bore itself I'm talking about the bonnet surface and the pump surface
Where the bonnet comes away from the pump that sealing surface[/quote]
Are you are talking about the flat surfaces where the injection pump mounts to the injection pump housing? Then proceed with caution because that is a critical dimension. I guess you could use a very fine stone to remove burs, or a rust remover to clean up rust. If you are talking about something else we may need an interpreter. Any blokes here? please chime in.
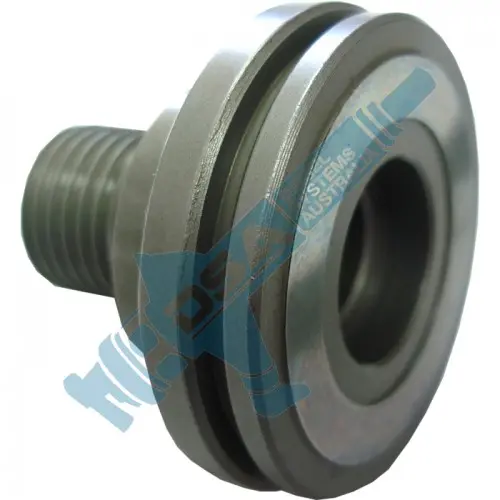
Hi mate i'm talking about the surface where the pump bonnet detach's from the pump itself iv attach a pic of the bonnet you will see the surface i'm talking about
[attachment=30576]1w9171.jpg[/attachment]
Hi mate i'm talking about the surface where the pump bonnet detach's from the pump itself iv attach a pic of the bonnet you will see the surface i'm talking about
[attachment=30576]1w9171.jpg[/attachment]
[quote="Justinc"]Hi mate i'm talking about the surface where the pump bonnet detach's from the pump itself iv attach a pic of the bonnet you will see the surface i'm talking about
[/quote]
OK, what system does that fit? anything newer than 1957 is uncharted territory for me! I thought you were talking about a forged body type system.
Hi Stephen,
that bonnet fits a Compact Pump. I believe the Compact pumps first appeared in 1958 on the new D311H engines. See Service Magazine December 23 1958 for announcement of tooling for the all new Compactly designed style Injection Pumps. These then went on to be known as the Compact pump.
Cheers,
Eddie B.
Hi All,
If I recall correctly, at our branch we used a piece of glass as the lapping bench. As Ed mentioned figure 8 pattern is very important. We used kero for lube and I can't recall the lapping paste. I'd say it came from a very old unmarked can!!
Regards
Mark


Our channel highlights machines from the earliest Holt and Best track-type tractors, equipment from the start of Caterpillar in 1925, up to units built in the mid-1960s.
Antique Caterpillar
Machinery Owners Club
1115 Madison St NE # 1117
Salem, OR 97301
Terms & Privacy
Website developed by
AdCo
"I also joined a year ago. had been on here a couple of times as a non-member and found the info very helpful so I got a one year subscription (not very expensive at all) to try it out. I really like all the resources on here so I just got a three year. I think its a very small price for what you can get out of this site."
-Jason N