Hi Uisum
At the back of machine under the fuel tank unbolt that panel,and on top of the final drive housing there are two alloy upside down covers.I think three 9/16 af bolts in each,
one on the left and one on the right of the final drive.Under these you will see a threaded bar with lock nut just screw up or down to loosen or tighten steering pedals.
Keep checking height of pedals and do not over tighten or it will not release clutch first.It been 30 years since ive done one,but nothing changes on old cats
regards glen
[quote="rover"]Hi Uisum
At the back of machine under the fuel tank unbolt that panel,and on top of the final drive housing there are two alloy upside down covers.I think three 9/16 af bolts in each,
one on the left and one on the right of the final drive.Under these you will see a threaded bar with lock nut just screw up or down to loosen or tighten steering pedals.
Keep checking height of pedals and do not over tighten or it will not release clutch first.It been 30 years since ive done one,but nothing changes on old cats
regards glen[/quote]
Ok thanks you
I just went through my pedals the other day, and i filmed it. There is another adjustment point for the clutches if you dig further into the machine, but i would just start with the linkages and that should do.
[video]https://youtu.be/N-c6zLW_AWg[/video]
[quote="cg3p0"]I just went through my pedals the other day, and i filmed it. There is another adjustment point for the clutches if you dig further into the machine, but i would just start with the linkages and that should do.
[video]https://youtu.be/N-c6zLW_AWg[/video][/quote]
wow, I love this kind of video.
thanks friend
keep it up...
Prego! Buona fortuna!
Hello. do you have a pdf manual?
You know the safety lever that allows you to enter the gears (accelerator side), the lever goes down by itself. Perhaps there is a spring that holds the mechanism?
Without pattern I can't understand.
thank you
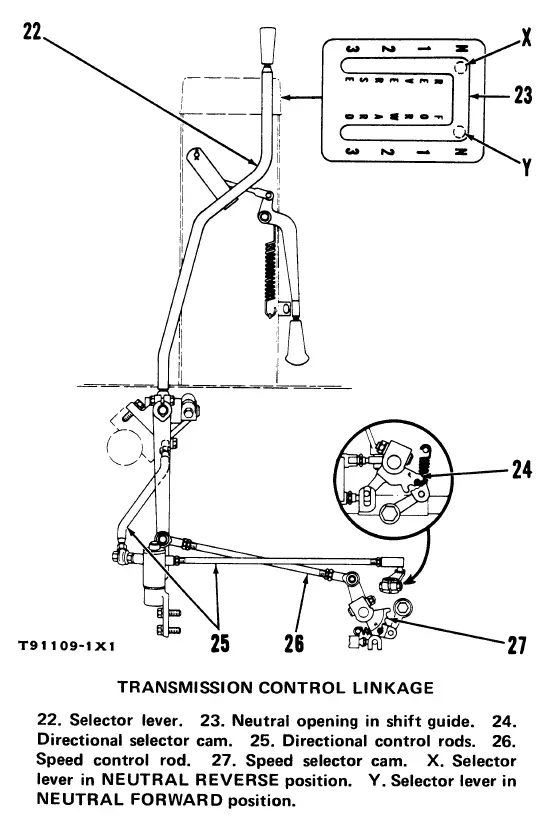
This is the only picture i could find of it. Hope that helps.
[attachment=54625]italia.jpg[/attachment]
There is allot more to adjust than just the linkage rods, there is the yolk arm links and the roller arm linkages for the clutch booster. The clearances vary according to serial numbers.
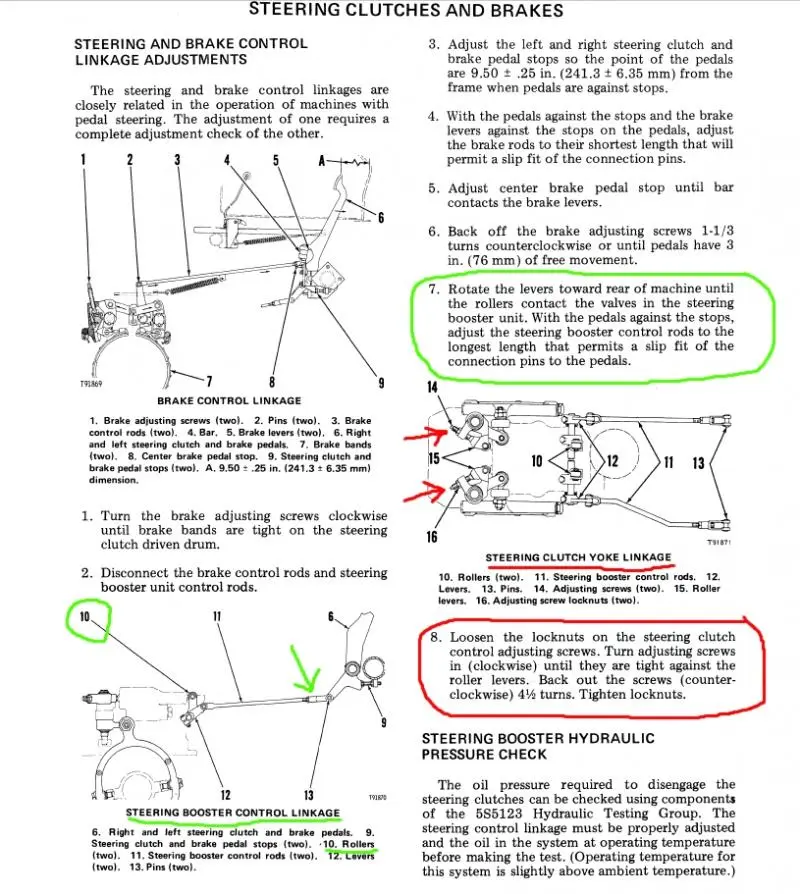
The rollers are adjusted with the rod linkage adjustments (green). The yolk linkage adjustments, at least on my machine, require the gas tank to be lifted (red). There are two plates on top the steering booster cover in the back that reveal the adjustment point.
This manual covers serial number:
57J1-up
64J1-9257
71J1-5831
85J1-10128
[attachment=54626]adjustments.jpg[/attachment]


Our channel highlights machines from the earliest Holt and Best track-type tractors, equipment from the start of Caterpillar in 1925, up to units built in the mid-1960s.
Chapter Two
| Highacres Farm, Dewey Lane, Brackenfield, Derbyshire DE55 6DB, UKChapter Nineteen
| 2 Winkleigh Rd, Exeter TAS 7275
Antique Caterpillar
Machinery Owners Club
1115 Madison St NE # 1117
Salem, OR 97301
Terms & Privacy
Website developed by
AdCo
"I became a member recently because the wealth of knowledge here is priceless."
-Chris R