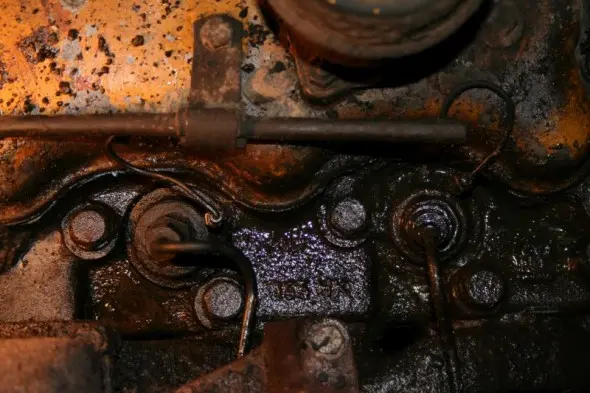
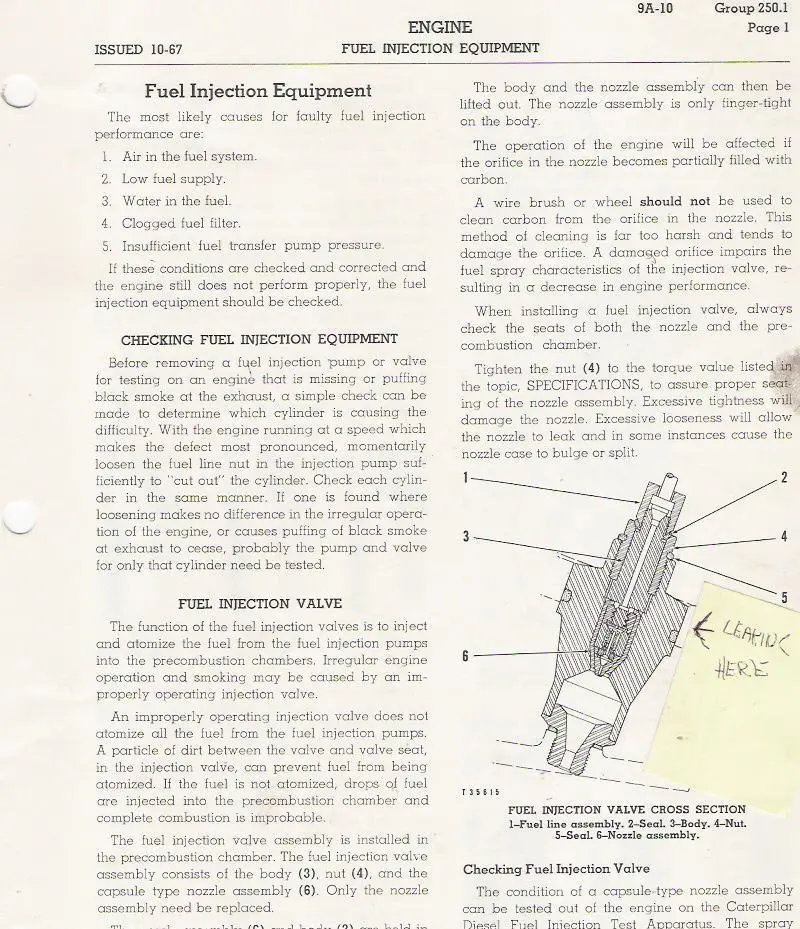
That's not a big job but you will need the 5F8353 splined bolt tool to remove the pre-combustion chamber to replace the upper seal and bottom washer.
Be sure to drain the cooling system before disturbing the chamber or you will have water inside the engine.
Ekasl, I would be very tempted to steam clean your radiator,then strip off the oil cooler/s (Water/oil heat exchangers) from the engine to clean out the water side of them, as the usual cause of C/chamber seals leaking is the C/head is not cooling correctly, the steel washers at the bottom of the chamber come in about 6 hights to set the glow plug into the correct position.
tctractors.
Picked up parts for the 955, 1 small round gasket and about 2" o ring plus the 5F8353 splinted bolt tool. Now I just need to know
how to use the tool. What holds the chamber in place? A lock bolt ??? Threads, left or right hand ???
Thanks,
EKasl
They have right hand thread the same as a std. bolt so it,s no biggy to get them out.What you need to do is get a can of never seize & coat the bottom threads good on the chamber & also coat the seal at the top.There is a torque for the chamber when it goes back in but I don,t have the spec. for it but I,m sure OM has it.I think your making a mistake by not changing the other three seals on the other chambers as heat probably caused the one to leak & it won,t be long till the other three will go.It will save draining the system again right away & you,ll not have to worry about loosing water & a possible overheating of the engine & cause more problems like a cracked head.
The installation torque required is 150 ft-lbs. You will be lucky if the one small gasket gets you by. These come in various thickness to allow you to index the position of the glow plugs as tctractors mentioned earlier.
Yes there is a few different thicknesses of the bottom washers to get the glow plus to come out right & I was pretty sure the torque was 150 lbs. but didn,t want to post it if I wasn,t correct. I only have some specs. on an engine or two in my collection but not the equip. with the D333 in it.


Our channel highlights machines from the earliest Holt and Best track-type tractors, equipment from the start of Caterpillar in 1925, up to units built in the mid-1960s.
Chapter Nineteen
| 1234 Carngham - Lake Goldsmith Road Lake Goldsmith VIC 3373Chapter Two
| Folds Farm, Godshillwood, Fordingbridge, Hampshire, SP6 2LU
Antique Caterpillar
Machinery Owners Club
1115 Madison St NE # 1117
Salem, OR 97301
Terms & Privacy
Website developed by
AdCo
"I also joined a year ago. had been on here a couple of times as a non-member and found the info very helpful so I got a one year subscription (not very expensive at all) to try it out. I really like all the resources on here so I just got a three year. I think its a very small price for what you can get out of this site."
-Jason N