The spacers are for timing the injection. You need the pump mounted and the engine rotated to each TDC. Then measure down through a fixture to the lifter. The spacers are changed under the fixture until the correct measurement is obtained from the top of the fixture to the lifter. This dimension is in the Fuel Setting Book.
Later Bob
[quote="bob"]The spacers are for timing the injection. You need the pump mounted and the engine rotated to each TDC. Then measure down through a fixture to the lifter. The spacers are changed under the fixture until the correct measurement is obtained from the top of the fixture to the lifter. This dimension is in the Fuel Setting Book.
Later Bob[/quote]
Thanks Bob is the fuel setting book separate to the service manual? Also do you know where to buy this tool or can one be mad up useing a micrometer? Cheers
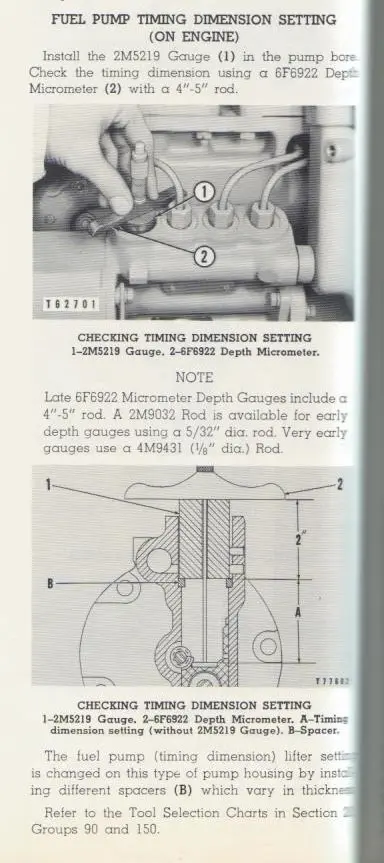
I seem to think the tool is 2.000" long with an od that will fit down the bore and sit on the shim/spacer with a hole in the center for the depth micrometer to go down. Once you finish your rebuild, put the pump back on and turn the engine to the flywheel markings, check the valve positions foe TDC compression then measure through the tool you make. Turn the engine over a few times and then get the shims even. If you want better results, get the proper tool and the proper spec's then some new shims to get the dimension right. The most likely problem you had was an uneven running engine and the two dowels and the horseshoe drive spring for the governor weights would correct that.
Later Bob
Hi Justin,
The scan attached shows the tooling needed for compact pumps. The spacer is 2" long as stated earlier.
Sorry I do not have the settings for this late of an engine.
Be sure to download this and any other scans you think you might need in future to your computer as I am about to start deleting older scans due to my storage file being nearly full.
Hope this helps.
Cheers,
Eddie B.
Takes a s/n to get the right rack setting info.
Thanks for your support , I really appreciate it.
My serial number is 60A4315 if this helps
Would of any of you guys know possibly where to find this tool ??
Cheers
Did you try Cat for the 2M5219 gauge?
You will also need the 8M530 Rack Setting Gauge (micrometer) to set the rack.
Where are you located?
The on engine fuel injection pump timing with pistons at top center using the 2M5219 Gauge is 4.2284" +/- 0.0020 " (Found in the Service Manual for the 60A 955).
The rack setting is 0.120"
You need to hold the rack at zero to remove and install the pumping elements.
Later Bob
In a pinch, I have centered the rack visualy, placing the center tooth as near centered as possible and then slowly lowering the pump into position,and centered, be able to match the pump up with the rack.


Our channel highlights machines from the earliest Holt and Best track-type tractors, equipment from the start of Caterpillar in 1925, up to units built in the mid-1960s.
Antique Caterpillar
Machinery Owners Club
1115 Madison St NE # 1117
Salem, OR 97301
Terms & Privacy
Website developed by
AdCo
"I became a member recently because the wealth of knowledge here is priceless."
-Chris R