Sorry I don’t have the numbers, but once you get it off you can take it in and match it up........usually. Caterpillar used off the shelf hydraulic brake components in everything I’ve ever worked on. Most of it has been Wagner I think. You may well find that a quick hone and some new cups will get it going. More likely to have one of those kits than a whole cylinder.
For those prices I think I would investigate purchasing hydraulic tooling! I actually made a fixture to use a couple 20 ton hydraulic jacks to press the hub back on since I didn’t have a hollow ram cylinder big enough for the 40 tons DRY CLEAN press fit.
I borrowed a big T bar type puller to remove it. Guy I borrowed it from said to tighten it up and then smack the forcing screw head with a sledge hammer and it would pop off and he was exactly right. You can’t leave the round spindle cover nut on but as I remember the whole tire, wheel and hub didn’t go flying or anything. My rims were stuck to the hubs really bad, so after the first one, if I didn’t have to take one off the hub I didn’t.
6B4074 comes up as a spacer plate???
6B4074 comes up as a spacer plate???
I hate this getting old.
The correct numbers are:
old: 6B2715
new: 8D4074
And of course I can't take one of the cylinders off until the drums are pulled. The real mechanic has the hydraulic puller but as I stated earlier he will cost us $800.00 plus for one day so I want to limit use of him to no more than one day if at all possible.
I suppose I can try to rig up some sort of a frame and jack arrangement but the biggest jack I have is only 20 ton so I'm not very confident I would be able to get them off and back on with that.
I do need to get the brakes working as I want to try to find a younger person willing to take over the operation of the grader as I don't know how much longer I'll be able to do it and I don't want to start them off with a machine with no brakes.

Pulling is the wild card. I had one on the grader when I bought it that had come loose and messed up both spindle and hub so I just had to be able to press the new/used hub back on the new/used spindle. That was a front spindle so no brakes behind it.
Then I jacked up the other side and could hear something loose and scraping around in there when I rolled it over. So it had to come off to even diagnose the problem. That’s when I borrowed the t bar puller. I could have welded up one once I saw what it took to get one off. The forcing screw was about 1 or 1-1/8” fine thread and as I remember the threaded holes in the hub for pulling are 5/8 coarse. I just grabbed some grade 5 nuts and all thread and it worked just fine.
If I had to build one, I would buy about 16 - 18” of grade 8 all thread and two nuts to fit. Then a piece of heavy 2” square tubing for the cross bar and the spacer. Drill two holes near the ends of the cross bar spaced apart the same distance as the holes in the cast hub. Drill another one in the center between the two for the forcing screw. Cut another piece of the square tubing to stand the braces Opoff about the same distance above the crossbar as the two small holes are apart. Then you can use 4 pieces of flat iron say 1/4x2” to brace from the nut to the ends of the cross bar.
So this thing would look like a large triangle split in equal smaller triangles by a vertical section of the same square tube with the nut at the top of the
and the 4 braces (two to each end) angling down to the ends of the crossbar.
Note, I drew this with the nut under the bottom of the cross tubing but realized later that though this would reduce the need for really good welding to attach the nut to the top of the standoff tube, it might just crush the cross ways piece of tubing.
I did some browsing on McMasterCarr and they have both 1 and 1-1/8” fine thread grade 8 in 3' sticks for about $60 and nuts are about $12 each so you would have maybe $150 in materials plus welding if you couldn’t do it yourself. I usually build this type thing for a specific job but later it gets modified for other uses by drilling holes on different spacing
I'm looking where I found the information. I believe it was for a 112E but works for the early style motor graders.
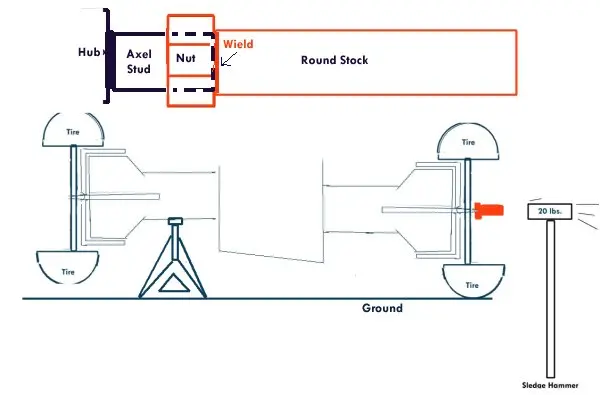
[attachment=58318]Breaking drum loose.jpg[/attachment]
This is how the manual explained how to break the drum loose.
The side you want to break loose is on the ground.
I'll find the source..
@ccjersey: I see you beat me to it
[quote="Fat Dan"]
I'll find the source..
@ccjersey: I see you beat me to it[/quote]
Sadly the source is on the old computer what crashed.:doh: I gleaned the pic back off a forum I had uploaded it to before crash.


Our channel highlights machines from the earliest Holt and Best track-type tractors, equipment from the start of Caterpillar in 1925, up to units built in the mid-1960s.
Antique Caterpillar
Machinery Owners Club
1115 Madison St NE # 1117
Salem, OR 97301
Terms & Privacy
Website developed by
AdCo
"I became a member recently because the wealth of knowledge here is priceless."
-Chris R