Are the linings simply too long? I wonder if you couldn't just shorten them so the top corners don't hit so quickly.
I relined one shoe on one side of mine using some generic material that I had to clamp in place, drill, countersink and rivet to the shoes. I didn't have any problem getting it to stop afterward, but maybe I was just lucky.
I would be hesitant to modify/potentially ruin the shoes instead of getting the linings right.
How about a program of driving with the brake applied until the drums are hot followed by readjusting when things have cooled down. Seems like it would soon take care of the problem. Popping those hubs off is not a small job, so I would be trying something that didn't involve disassembly first!
Yes I have the shoes touching and I left the adjusting windows open so any dust can get in there to help in cutting them down. I have the tooling to pop the wheel off and push it back on but it's still kinda tuff. Thanks for the reply. Chalie
Hi Team,
adjusting Grader brakes is an old black magic art.
A Serial Number would help us give correct adjustment procedure for your machine as there are differences.
Does your machine have the eccentric anchor bolts--later ones did not and this may be your problem and would require special fitting procedures.
If eccentric bolts are fitted, it is most important to adjust both the anchor bolts and the screw adjusters at the top, they are adjusted together initially, to get the shoe surface to touch the drum surface along the shoes entire length--that is they need to be centred--can only be achieved if the shoe radius is somewhat matching the drums.
It sounds like you have correct running clearance at the top and maybe be have a large gap at the bottom or vice versa.
The anchor bolts are eccentric and are usually seized, use never seize when re-assembling. The anchor bolts usually do need to be adjusted again until the shoes have worn in.
The correct procedure is given in the Grey Operation and Maintenance Instruction book.
Sometimes at The Dealer we had a Brake specialist company fit and bond, as well as rivet, spacers under the standard linings to get them to suit the curvature of maximum diameter drums. I would suspect that modifying and welding on brake components would be taboo.
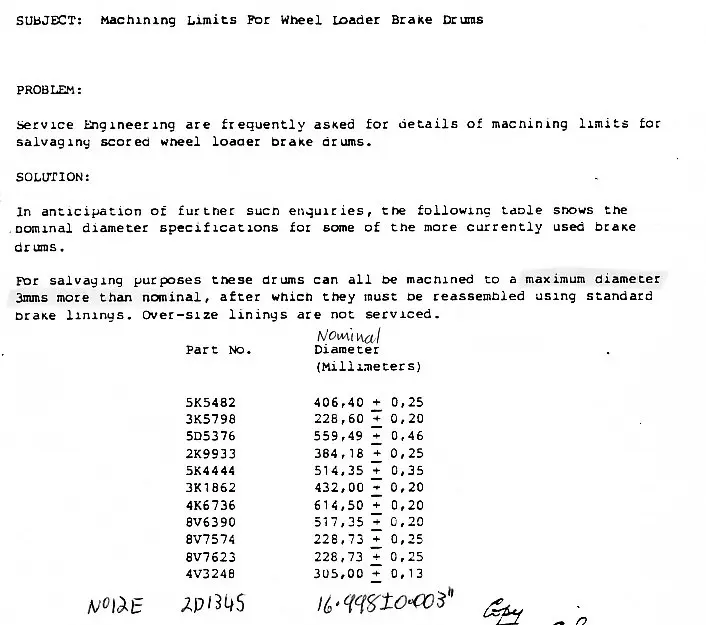
The Cat recommended Maximum Diameters for most early machine brake drums, by Part Number, are shown in the chart below.
As an aside--
we also found in trying to achieve maximum customer (a Government Dept.) specified brake pedal pressure versus braking efficiency that we had to fit Trade sourced Softer linings to achieve the figure. These machines were much heavier than standard with lots of accessories added--spare tyre, cutting edges, scarifier tines, rippers, a few had dozer blades, lights etc.
I did lots of Grader testing and brake lining swapping as an Apprentice at The Dealer.
Working with C of A Engineers we did achieve the results needed by fitting four wheel brakes and No 14 Brake Boosters to these machines--Cat of Australia then started fitting the boosters as standard to all their Australian built No 12's.
If your linings are non asbestos type I would have thought it OK to radius grind these linings--but I note what you say.
Hope this helps.
Cheers,
Eddie B.
Grader is 9T 775. I have the operation and maintenance book that shows the adjusting process which I followed. All adjusters are free and movable. Thanks for your input. Charlie


Our channel highlights machines from the earliest Holt and Best track-type tractors, equipment from the start of Caterpillar in 1925, up to units built in the mid-1960s.
Antique Caterpillar
Machinery Owners Club
1115 Madison St NE # 1117
Salem, OR 97301
Terms & Privacy
Website developed by
AdCo
"I became a member recently because the wealth of knowledge here is priceless."
-Chris R