Are you doing this on or off the machine? If it's to be done on the critter, make sure you ground to the sprocket itself or you stand a good chance of frying bearings. If you're doing this on the bench, still put the ground on the sprocket so there's no arc flash between the sprocket and bench.
For the welding, I'd use E 7018 low hydrogen rod, probably 1/8". Proper alignment is critical, as is getting a good bevel on the spokes. I'd go for a 100% weld and if you have to do a bit of grinding to get it, it's your best bet. Skip around a bit while welding so you don't get major distortion in one place.
One more thought, I can't remember for sure but I think Hobart makes a low hy rod that's designed to be used with an AC welder. Works well on DC too. .
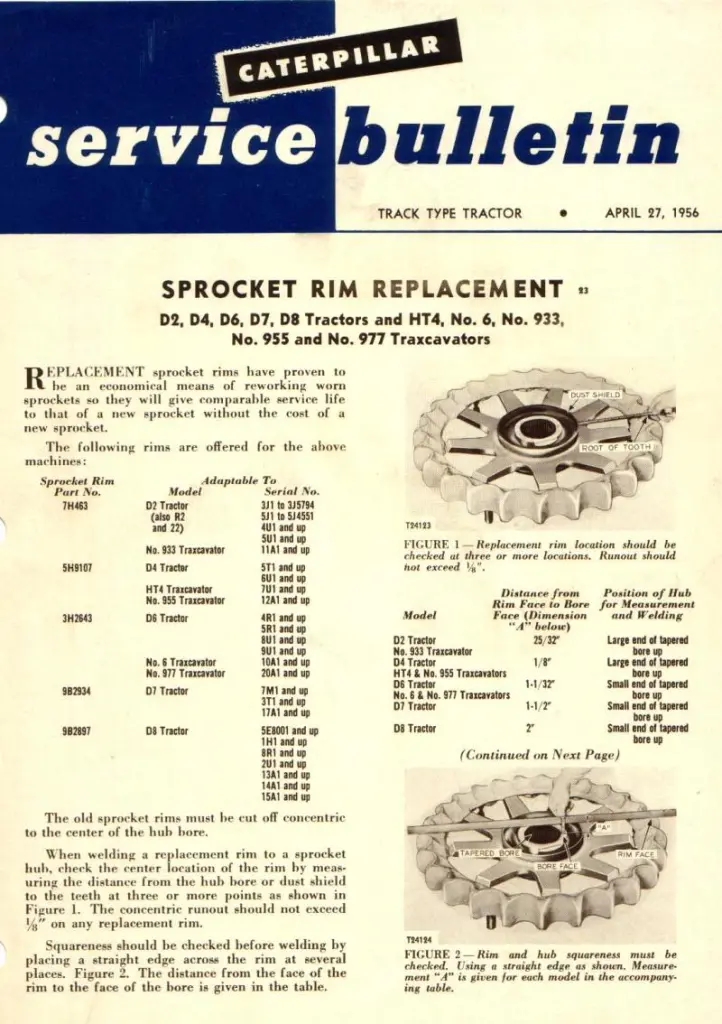
I got to thinking about it and remembered I'd saved the sprocket replacement files.
[attachment=12867]sprocketrimreplacement2ep3.jpg[/attachment][attachment=12868]sprocketrimreplacement13rc.jpg[/attachment]
[quote="ol Grump"]I got to thinking about it and remembered I'd saved the sprocket replacement files.
[/quote]
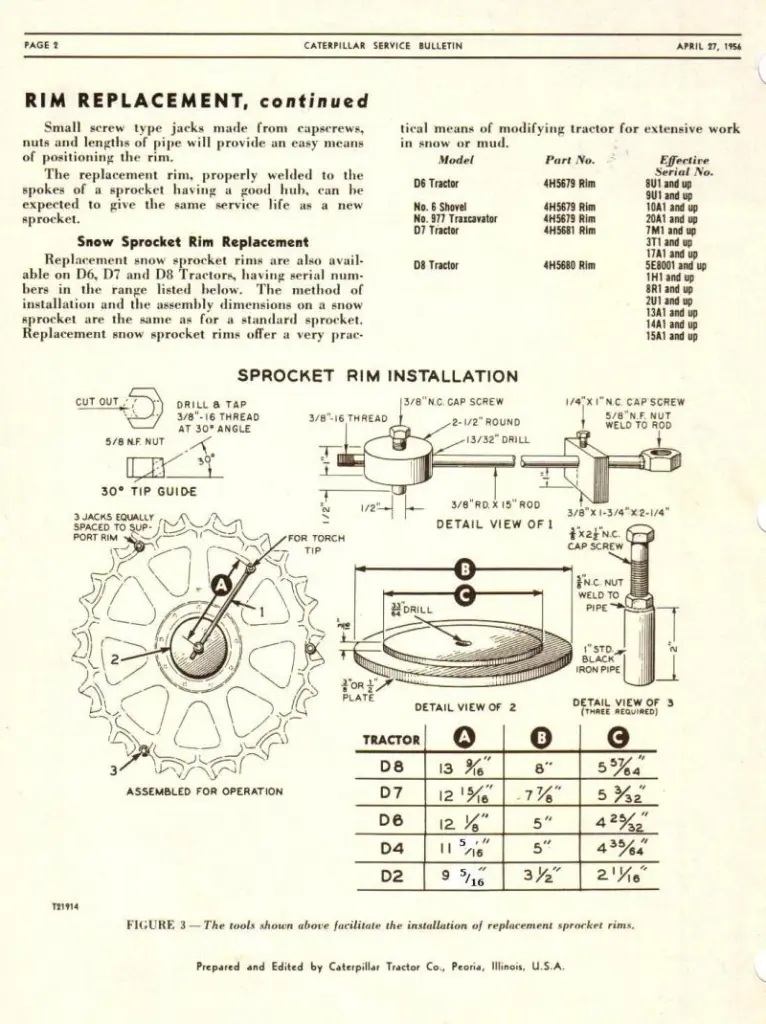
Note:
There was a change in the dimensions on the service bulletin which OG has posted, note changes below.
[attachment=12869]sprocket rim replacement%Supplementary information%Dec.11,1956.jpg[/attachment]
Yes, I think Hobart LH 718 (701😎 is the rod OG is referring to, works well with AC or DC reverse polarity.
Kelly
Here is a later version:
Thanks all. I picked up some rod today. I'll be doing the job on the machine, so I'll have to rig a way to hold the rim.
I need to weld one on my HT4 sometime. What I plan to do is cut a segment out of the ring, probably between 2 spokes.
That way I won't have to disturb the track frame. It seems to me someone on here recommended grinding a deep vee from the outside only and welding it from one side. The only one that I have done was a D2 and I had the final off so I could weld it flat and turn it over.
I would jack the Cat up so you can rotate the sprocket. Just tack it here and there and keep checking for runout. It would probably be easiest to do the major welding at or near the bottom.
I did my 941B sprocket rims in place about 20 years ago. When I cut the old spokes I made sure they were at the radius or greater than the new rim. I had to grind here and there to get the constant radius but also a tight fit to hold the new rim in place on the old spokes. I took the tracks off so i could spin the sprocket to minimize the run- out.I v grooved each side and welded with 6013 rods with my fathers old buzz box.After 500 hours of use no cracks have appeared. 😖hocked:😖hocked:
Thanks Kelly and OM for the updated info. If I remember correctly there was a discussion a few years ago on replacing the sprocket rings and rebuilding track links. .not sure if it was here or over on ACME. The files have been saved to my "Misc Cat" folder.
The updated info will definitely come in handy. I've been looking everywhere for this info. Should have asked here in the first place, lol. You guys rock.👍


Our channel highlights machines from the earliest Holt and Best track-type tractors, equipment from the start of Caterpillar in 1925, up to units built in the mid-1960s.
Chapter Two
| Highacres Farm, Dewey Lane, Brackenfield, Derbyshire DE55 6DB, UKChapter Nineteen
| 2 Winkleigh Rd, Exeter TAS 7275
Antique Caterpillar
Machinery Owners Club
1115 Madison St NE # 1117
Salem, OR 97301
Terms & Privacy
Website developed by
AdCo
"I also joined a year ago. had been on here a couple of times as a non-member and found the info very helpful so I got a one year subscription (not very expensive at all) to try it out. I really like all the resources on here so I just got a three year. I think its a very small price for what you can get out of this site."
-Jason N