Hi ragsdale,
was this an out of chassis rebuild--complete strip down? If so have you timed the balancer shafts correctly.
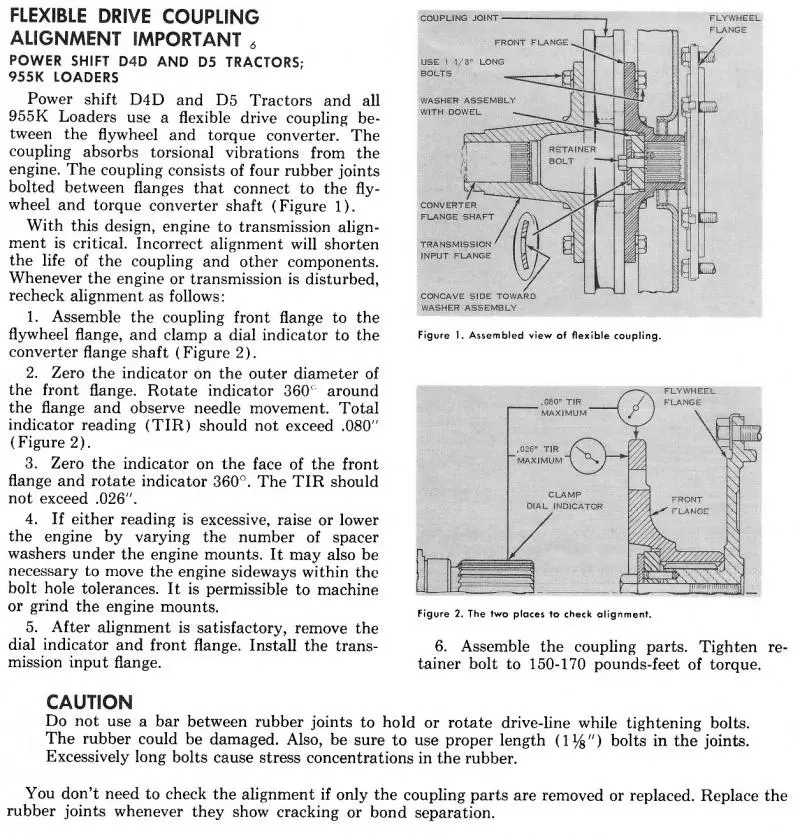
Another thing to check if engine was out is that the engine/transmission needs to be aligned with shims under the flywheel housing and front support bar mounts.
The rubber pucks in the coupling can only absorb a small amount of missalignment before early failure and vibration occurs.
Below is a scan of the proceedure to use for 941/951 as well as the listed models.
Operating with failing pucks will cause vibration and crankshft breakage.
Hope this helps.
Cheers,
Eddie B.
Was a complete down to the block rebuild. Ballancer shafts were timed. Used the old shims in the same place when the engine was reinstalled, but did not do a alignment check with the dial indicator. Will give that a try tomorrow. Since it is vibrating with out the transmission engaged, I was thinking the vibration wouldnt be caused by a miss alignment, but I need to double check that anyway. I did use a mix of rubber pucks from two engines I had taken out.. Could that be a source of the problem.
thanks
jr
Hi again ragsdale,
these powershift transmissions have a high parasitic load due to the drag of the 2 pumps--trans. and steering-- the torque converter, the clutch packs and planetaries all rotating even in neutral, one clutch is engaged in neutral. This varies with oil viscosity and temp of the oils.
Having used pucks of varying hardness would likely cause the coupling flanges to runout/wallow due to uneven flexing and resulting in the vibration, especially if two soft ones were next to each other and not a soft one opposite a soft etc.
I would also suggest that you fit ALL the pucks with the bolts loose and then tighten the bolts after ALL pucks and bolts are started, this will help to ensure a better alignment. It is how I did them at The Dealer.
Hope this helps.
Cheers,
Eddie B.
Now that you have to check the runout and will be taking the pucks and torque flange off to set up the dial gauge,run the engine while its disconnected from the torque and see if the vibration has gone,if it has ok its the runout,set it,if not still check the runout anyway and set it and tighten down the engine,you will then need to drop the oil pan,put the timing pin in at #1 TDC,hole is above the starter motor,with the pin in the hole the two balance shafts should be lined up so the two locating bolts will screw into them through the sump plate,if you got to alter it you will have to lower the oil pump.
AJ
Looks like have some work to do this weekend. I do appreciate the input and will put it to use tomorrow. Will update the post with the results. Sounds like really good things to do. Hopefully this will get it going..
thanks
jr
kind of simple, I once had a D7H with a
vibration. I thought I had check everything,had a cat mechanic come out,the last thing we check was take fan belts off, no vibration. Turn out fan had been tweeked, bought new fan problem solved.
Sure wish I had check the fan first.
This may help.
Get a piece of rod that the dial indicator willl clamp to. Bend it 90 deg and grind the sides in a "V" shape on the end to be clamped into the trans shaft spilnes.
Start with engine sitting loose at all 4 mounts.
Spin the dial around the OD of the engine flange and record the difference between 12 Oclock and 6 Oclock readings.
Raise or lower the engine with shims one half of the difference and recheck.
With the 12 and 6 Oclock readings as close to equal as possible, record the difference in readings at 3 and 9 Oclock.
Take a prybar and shift the engine side to side untill they are equal.
At this point there should be minimal runout all around 360 deg.
Tighten the rear mounts down good and then recheck runout.
The engine will likely be a bit low now so try to shim as close to zero runout as you can and retighten te rear mounts.
Now set the dial indicator to run on the flange face as far out as possible.
Record the difference in readings at 12 and 6 Oclock. Then change the shims under each front mount 3 times the difference in these readings, tighten the front mounts and spin the dial again. Make minor shim adjustments as necesary, retighten mounts and recheck untill you get as close to zero runout as you can.
Once the 12 and 6 Oclock readings are equal loosen the front mounts and shift the front of the engine side to side untill the readings at 3 and 9 Oclock are equal. Tighten all mounts down and give a final check of both readings. 0.080" and 0.026" are the max runout but shoot for Zero if you can.
Vibration is most likely a ballancer out of time if the engine has been apart. It's a challenge getting the pump back up with the crank and shafts pinned but it can be done.
Later Bob
Here is the manual instructions in case you don't have them....


Our channel highlights machines from the earliest Holt and Best track-type tractors, equipment from the start of Caterpillar in 1925, up to units built in the mid-1960s.
Chapter Two
| Highacres Farm, Dewey Lane, Brackenfield, Derbyshire DE55 6DB, UKChapter Nineteen
| 2 Winkleigh Rd, Exeter TAS 7275
Antique Caterpillar
Machinery Owners Club
1115 Madison St NE # 1117
Salem, OR 97301
Terms & Privacy
Website developed by
AdCo
"I became a member recently because the wealth of knowledge here is priceless."
-Chris R