MIke,
The little Ensign Side-draft BE carbs are a PIA to get going right. The floats even with a Carb Shop or Campbell rebuild kit will possibly stick causing excess fuel to flow. Pete was right about the gasket setting on the fuel adjustment tube. Zimmerman used to pay with gasket sizes and test fire carbs on a ten to get them right. I have never had one of these BE carbs work right first time after a rebuild.
Patience is the best advice I can offer!
Greg
Greg,
Thanks for the advice, I haven't looked at the carb yet it's still on the tractor. I was hopefull that some one may have a service bulletin or a spread sheet on the carbs, and if I'm real lucky some one might even scan and post it for me.:typing:
I've got a pic of the rascal tractor, older photo taken in the U.S.
Thanks Mike.

Hi Team,
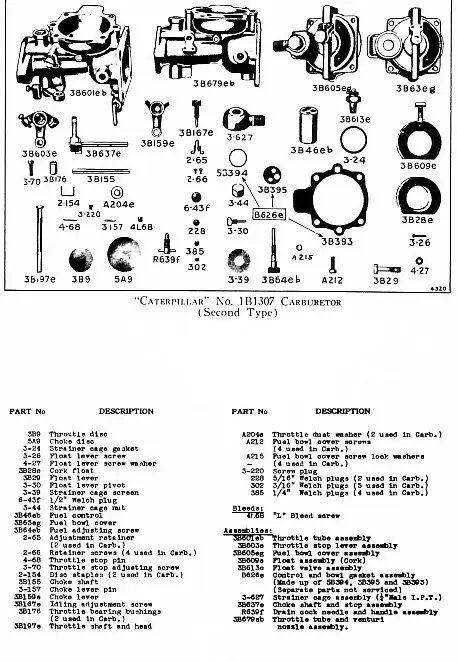
here are scans from my Parts Book and my General Instruction Book For Early Products out of the 10 Tractor Instruction Book section.
Hope this helps.
Cheers,
Eddie B.
Nice wide ten Mike
edb,
Thanks Ed for the scans,I'll print them off and I'm sure they will be a help! That's more than I have on info for the carb anyway.
I've been told to treat the carb with kid glove's cause the old pot metal alloy will be old n brittle, as these carbs are hard to get and if one is up for grabs you'll have to donate a kidney or give your right leg for it apparently?
Greg,
the wide ten was on fleabay at first, and it came from a place called Orossi Cal.The tractor needs a few bit's n piece's replaced,firewall/dashplate,fenders,drawbar, otherwise it's good.
Thanks Mike.
lyoncat,
The critical thing is getting the gaskets just right above and underneath the internal, center pedistal. Too loose...and it will only suck air. Too tight...you risk breaking the pot metal cover. Just take your time and test fit it a lot!
I got my floats from Jim Zimmerman and love them! They are not cork and are less susceptible to the corrosive fuels we have today. I still sealed it.
I didn't like the big brass gascolator hanging off the carb all by itself so I mounted it solid to the carb with a special mount I made. I imagine those tended to break the pot metal covers too.
These are tricky carburetors and have a funky path for everything to follow...but mine has been working flawlessly for over four years now.
I previouly posted some graphics I made of these carburetors...and how the fuel and air travel travel through them. They should be easily found using the search.
Pat
Pat,
How thick is your bowl gasket and how thick is the gasket you place at the base of the metering valve?
Greg
Greg,
Sorry...I did not record the thicknesses...but I used the bowl gasket that came in the kit. The gaskets for the metering pedistal were the same thicknesses. My first attempt failed to pull any fuel. So I re-made a thicker gasket for the top of the metering pedistal. It has worked great ever since.
My carburetor has a bronze bowl and pot metal cover...I felt like it wasn't the original top cover. I believe there were slight differences in the carburetors over the production run. I've always felt like that was the reason I had to make a thicker gasket for the top of the metering pedistal.
Pat
Pat,
Thanks for the info on the gasket thickness...I've got the carb off and looks like it's all pot metal alloy, a little wear on the throtle shaft, no numbers or lettering on the main body?..other wise it looks pretty good..
Is there any measurement needed to set float level or fuel level by ?
Pat what do you use to seal the float with ?
Thanks Mike.


Our channel highlights machines from the earliest Holt and Best track-type tractors, equipment from the start of Caterpillar in 1925, up to units built in the mid-1960s.
Chapter Two
| Highacres Farm, Dewey Lane, Brackenfield, Derbyshire DE55 6DB, UKChapter Nineteen
| 2 Winkleigh Rd, Exeter TAS 7275
Antique Caterpillar
Machinery Owners Club
1115 Madison St NE # 1117
Salem, OR 97301
Terms & Privacy
Website developed by
AdCo
"I became a member recently because the wealth of knowledge here is priceless."
-Chris R