First cut each cylinder out in turn until you know which ones don't make the tractor idle worse or which ones eliminate any bad sound (popping etc)
Do this by loosening a nut on each injector line either at the fuel pump or injector.
Once you have an idea what's what,
Clean up the injector lines and nuts on each end
remove lines placing them on a clean surface
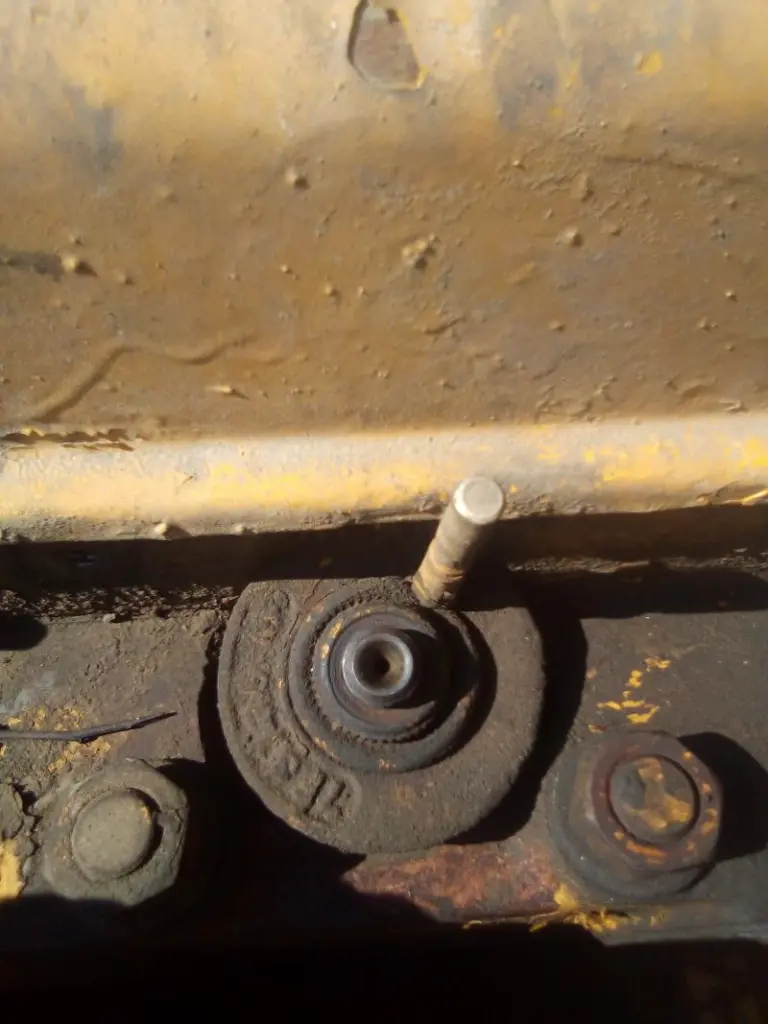
Then using a 1" socket, remove injector hold down nut with its rubber dirt seal (o-ring) from the precombustion chamber that is screwed into the head. There is an additional dirt seal around the threaded top of the injector body that was compressed by the injector line nut. Remove this Once the nut is off, you can usually use your fingers or a pair of pliers to pull the injector adapter and the injector "valve" as CAT calls it out of the precombustion chamber. If it is stuck, screw the line back on it and use a screwdriver or a small bar to pry up under the nut to break it loose. You can use a flat washer under a fine thread nut if you want instead of the injector line, but they usually aren't stuck too badly.
The valves or capsule type injectors are not servicable other than cleaning the orifice with a tiny drill bit to remove carbon. They screw on the body piece just finger tight, but if the mating surfaces are clean it will seal well enough to check on an injector tester pump. Usually if there's a problem with one, its not a bad idea to replace the whole set. The last time I bought any, the aftermarket suppliers sell them for about $30 each. If the injector sprays an even cone shaped pattern of fine spray, they should not drip and should "crack" at 450 psi. I would personally run a set that were spraying a good pattern, no dripping at lower pressure, but were cracking at 420 psi or so.
When reinstalling the injectors, make sure the precombustion chambers are clean down inside where the capsule nozzles seat. Use a brush and compressed air to blow out any rust etc. Screw the injector on the body piece finger tight and drop the whole thing into the precombustion chamber so the splines keep it from turning. Install dust seal on the hold down nut and tighten it to 100- 110 pound foot max. Put new dust seal on threaded nipple of the injector body and install line on top of it. I have had some new seals be too thick to allow the nut to start, so I had to just reuse the old ones on those or you could leave them off. Do not over tighten the line nut, spec is 25-35 foot pounds. If it leaks, loosen it again, tap the line to perhaps realign the ferrule in its socket and retighten. It is possible to crush the cone shaped ferrule so it leaks worse. I have some that seep a little and make a mess that I want to find a soft copper washer that will fit in that joint and try to get them to seal up. Project for another day!
Good luck with your project. Its not too complicated, just need to approach it logically and be clean.
With hood off. Have had mine stick so made up adapter for the slide hammer. 6" piece of 1/4 cable with fine nut on end .

Hi Team,
some pics of the unit and a tool for removal--any nut that fits the nozzle adaptor thread can be used to make the tool.
Sometimes putting the injection line back on, after loosening the hold down nut a turn or so, by prying under the injection line nut can often work, if not, a slide hammer tool made from any junk around the shop will do it.
Cheers,
Eddie B.
Thank you for all the info I'm sorry I took so long to get back to you all I could not figure out how to get back to my discussion on the forum ended up just doing a search online again and found it


Our channel highlights machines from the earliest Holt and Best track-type tractors, equipment from the start of Caterpillar in 1925, up to units built in the mid-1960s.
Chapter Fifteen
| Historic Santa Margarita Ranch, 20000 El Camino Real, Santa Margarita, CA 93453, USAChapter Thirty
| Hartley - South AustraliaChapter Two
| Newby Hall, Ripon, Noth Yorkshire, HG4 5AJChapter Two
| Freshfield Farm, Sloop Lane, Scaynes Hill RH17 7NP UK
Antique Caterpillar
Machinery Owners Club
1115 Madison St NE # 1117
Salem, OR 97301
Terms & Privacy
Website developed by
AdCo
"I became a member recently because the wealth of knowledge here is priceless."
-Chris R