Valve adjustment.....
4-cyl, 1,3,4,2 firing order
Position #1 @ TDC
Adj. Intake #1 & 2, Exh #1 & 3
Rotate 360 deg. to #4 @ TDC
Adj Intake #4 & 3, Exh #4 & 2
Intake adjustment 0.015"
Exhaust adjustment 0.025"
Adjustments made with cold engine.
[quote="Old Magnet"]Valve adjustment.....
4-cyl, 1,3,4,2 firing order
Position #1 @ TDC
Adj. Intake #1 & 2, Exh #1 & 3
Rotate 360 deg. to #4 @ TDC
Adj Intake #4 & 3, Exh #4 & 2
Intake adjustment 0.015"
Exhaust adjustment 0.025"
Adjustments made with cold engine.[/quote]
hello I thank you.
I didn't understand.
on the flywheel I removed the cap 4h6112, I inserted the bolt.
Pistons 1 and 4 have risen to the top. the central pistons went down.
I reassembled the used head and the valves. In the piston 1 the valves were crushed, I unscrewed and brought them closed ... I did the same with the last piston.
I don't understand anything ... I'm doing old magnet wrong?
I'm afraid of making trouble
You have to follow the adjustment sequence. You can't adjust piston 1 and 4 at the same time.
Make sure you are at #1 piston top dead center not #4.
Installing the bolt at #1 TDC is where you start the adjustments.
When the #1 TDC position valve adjustments are done, rotate the crankshaft one full turn to where you could insert the bolt with #4 at TDC.
Complete the adjustments for the #4 TDC position and you are done.
If you don't understand get some help from someone who knows engines.
Don't guess if you don't know as severe engine damage can occur if you get it wrong.
Ok I'll try.
When I set the valves in the order you told me, they must be completely closed, right?
ps. piston dead center 1, and when it's completely up, right?
Piston 1 is the one near the flywheel, right?
I'll let you know tomorrow.
THANK YOU
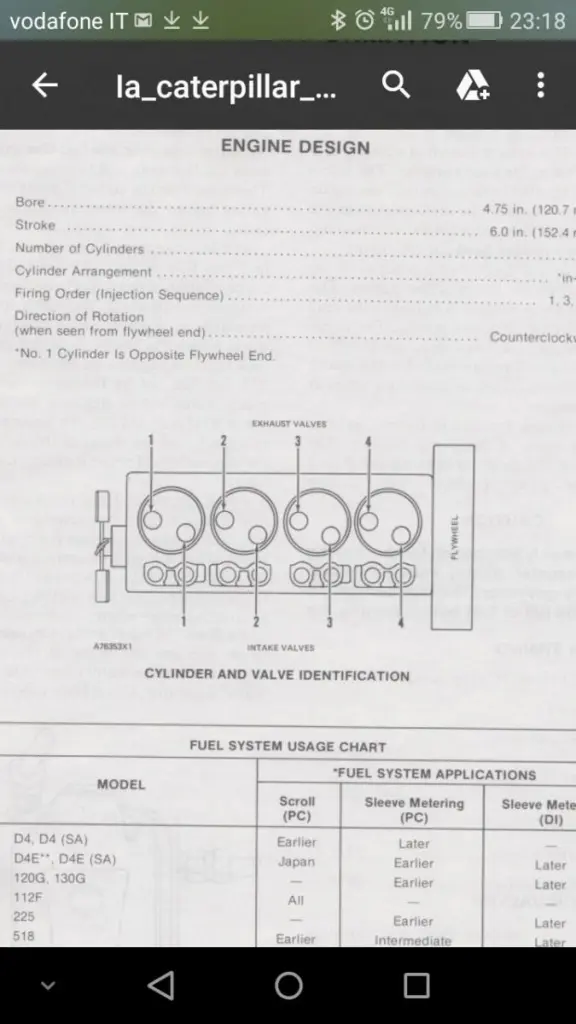
[attachment=54162]IMG_20190530_232306.jpg[/attachment]
Is this the order of the pistons?
piston 1 opposite the flywheel
Evviva!!! you got it!
Yes, valve should be closed for adjustment.
#1 is at the front of the engine.
To check when done put #1 piston at TDC again. Both intake and exhaust should be closed.
Have any of the pump units been removed and replaced in the injection pump?
It's quite easy to reinstall them out of time with the rack. This results in strange sounds and lots of black smoke. If the manifold is installed already, the test for which one is wrong is to loosen each injection pipe connection in turn until the strange noise and smoke stops.


Our channel highlights machines from the earliest Holt and Best track-type tractors, equipment from the start of Caterpillar in 1925, up to units built in the mid-1960s.
Chapter Two
| Newby Hall, Ripon, Noth Yorkshire, HG4 5AJChapter Two
| Freshfield Farm, Sloop Lane, Scaynes Hill RH17 7NP UKChapter Two
| Avalanche adventure, Welford Rd, Sibbertoft LE16 9UJ, UKChapter Two
| Highacres Farm, Dewey Lane, Brackenfield, Derbyshire DE55 6DB, UK
Antique Caterpillar
Machinery Owners Club
1115 Madison St NE # 1117
Salem, OR 97301
Terms & Privacy
Website developed by
AdCo
"I also joined a year ago. had been on here a couple of times as a non-member and found the info very helpful so I got a one year subscription (not very expensive at all) to try it out. I really like all the resources on here so I just got a three year. I think its a very small price for what you can get out of this site."
-Jason N