ACMOC
Login
ACMOC
Cat No. 120 motor grader clutch adjustment

Cat No. 120 motor grader clutch adjustment

Showing 1 to 10 of 10 results
Jamesgang307
Topic Author
Offline
Send a private message to Jamesgang307
Posts: 5
Thank you received: 0
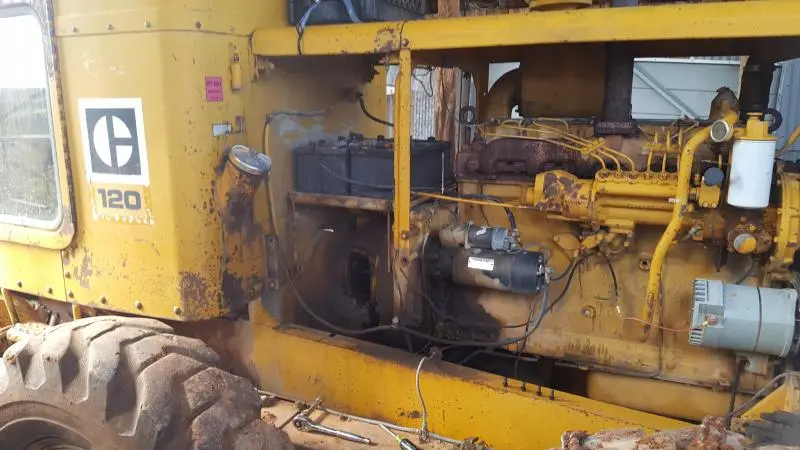
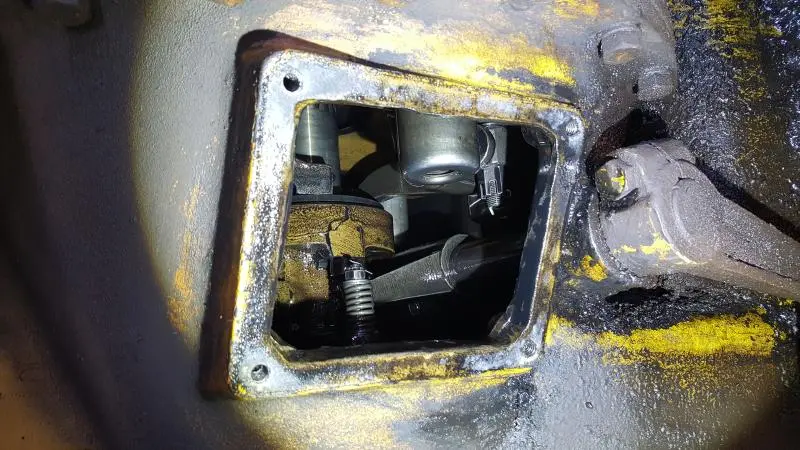
New member here. I have a Cat 120 motor grader that I picked up at an auction a couple years ago. This past winter while clearing snow drifts, I noticed the clutch slipping. I limped home in low gear. Now I'm ready to hopefully adjust it. It's quite different than any clutch system I've worked on. The manual I have is very basic and I like to know any advice and of any pdf's I can download to get a really good ideal what I'm doing. Also I noticed oil sitting at the bottom inside of the bell housing. Is it a wet clutch system or not?
Attachment
Attachment
Attachment
Please log in or create an account to join the conversation.
Sun, May 12, 2019 6:03 AM
nomorejohndeere
Offline
Send a private message to nomorejohndeere
Posts: 341
Thank you received: 0
I dunno
But does it have a dipstick or fill hole?

another fella just asked a similar question a couple of posts back
Please log in or create an account to join the conversation.
Sun, May 12, 2019 6:58 AM
ccjersey
Offline
Send a private message to ccjersey
Posts: 4,422
Thank you received: 0
I think the adjustment is carried out by adjusting the release levers on the pressure plate.

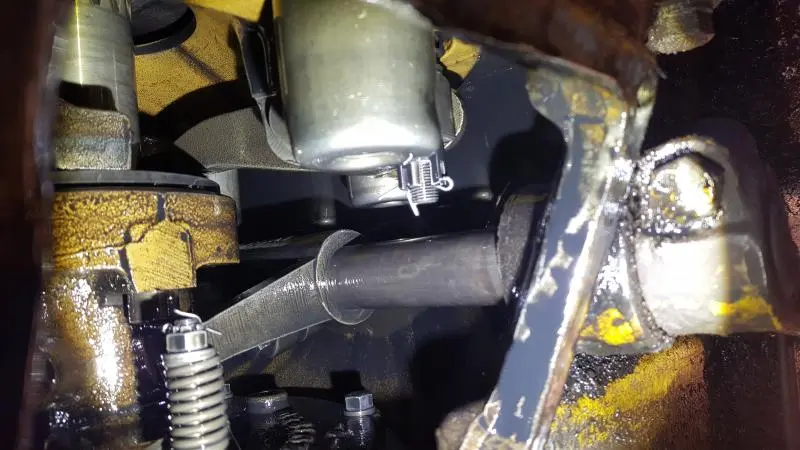
In your third picture, the one looking deep into the clutch, you will need to adjust the nut on the link in the TOP of the picture. Roll engine over until you can reach everything conveniently. Pull cotter pin and loosen/adjust castellated nut until there is 3/16" clearance between the face of the throw out bearing and the other end of the release lever. Repeat for the other levers.

I found a small piece of flat iron and drilled a hole in it so I could tie a shoe lace on it to secure it to something outside the clutch housing. Don't want to have to fish it out of the bottom of the clutch if you accidentally drop it!

Caterpillar used the same method of adjusting on the older graders. I had a dry clutch 212 and now have an oil clutch 12E, both adjust the same way.

Looks like the 120 started in 1965, so about has to have an oil clutch. If it doesn't have a dipstick and filler/breather cap, it will use engine oil pumped through it by a section of the engine oil pump for cooling and lubrication.
D2-5J's, D6-9U's, D318 and D333 power units, 12E-99E grader, 922B & 944A wheel loaders, D330C generator set, DW20 water tanker and a bunch of Jersey cows to take care of in my spare time😄
Please log in or create an account to join the conversation.
Sun, May 12, 2019 8:11 AM
kracked1
Offline
Send a private message to kracked1
Posts: 741
Thank you received: 0
Reply to ccjersey:
I think the adjustment is carried out by adjusting the release levers on the pressure plate.

In your third picture, the one looking deep into the clutch, you will need to adjust the nut on the link in the TOP of the picture. Roll engine over until you can reach everything conveniently. Pull cotter pin and loosen/adjust castellated nut until there is 3/16" clearance between the face of the throw out bearing and the other end of the release lever. Repeat for the other levers.

I found a small piece of flat iron and drilled a hole in it so I could tie a shoe lace on it to secure it to something outside the clutch housing. Don't want to have to fish it out of the bottom of the clutch if you accidentally drop it!

Caterpillar used the same method of adjusting on the older graders. I had a dry clutch 212 and now have an oil clutch 12E, both adjust the same way.

Looks like the 120 started in 1965, so about has to have an oil clutch. If it doesn't have a dipstick and filler/breather cap, it will use engine oil pumped through it by a section of the engine oil pump for cooling and lubrication.
Go around twice when adjusting the clutch. Otherwise as stated the flat piece of steel or a drill bit work fine for setting finger gap.
Please log in or create an account to join the conversation.
Sun, May 12, 2019 6:56 PM
Jamesgang307
Topic Author
Offline
Send a private message to Jamesgang307
Posts: 5
Thank you received: 0
Reply to kracked1:
Go around twice when adjusting the clutch. Otherwise as stated the flat piece of steel or a drill bit work fine for setting finger gap.
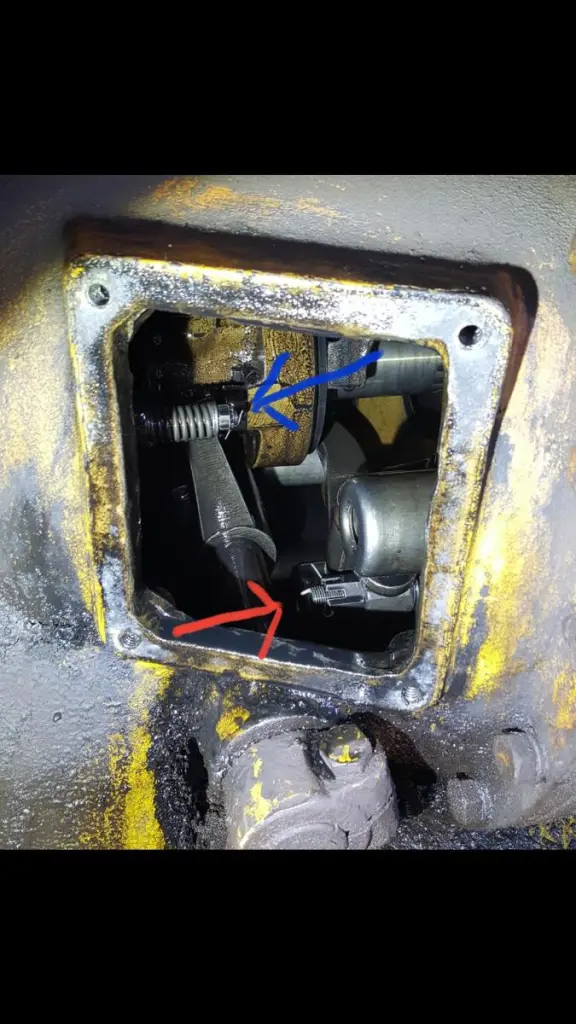
My first few pictures were sideways. This new pic has red arrow pointed towards, I believe clutch plate adjustment and blue arrow pointed towards thurst bearing/plate
Attachment
Please log in or create an account to join the conversation.
Mon, May 13, 2019 12:54 AM
ccjersey
Offline
Send a private message to ccjersey
Posts: 4,422
Thank you received: 0
Yes, you got it correct.
D2-5J's, D6-9U's, D318 and D333 power units, 12E-99E grader, 922B & 944A wheel loaders, D330C generator set, DW20 water tanker and a bunch of Jersey cows to take care of in my spare time😄
Please log in or create an account to join the conversation.
Mon, May 13, 2019 3:13 AM
edb
Offline
Member
Send a private message to edb
Posts: 4,027
Thank you received: 0
Reply to ccjersey:
Yes, you got it correct.
Hi Team,
as said by others adjustment procedure should be same as for other earlier oil clutch units.
Note the lanyard attached to the gauge tool--any tools used in this compartment should have a string attached for retrieval in case they are dropped inside the clutch compartment.

As the clutch wears the finger to throw out bearing is clearance is reduced and so needs to be checked periodically--suggest do not wait until the clutch slips as this is when wear takes place--oil clutches usually do not wear fast unless abused or slipped from lack of adjustment.
Hope this helps.
Cheers,
Eddie B.
Please log in or create an account to join the conversation.
Mon, May 13, 2019 11:03 AM
Jamesgang307
Topic Author
Offline
Send a private message to Jamesgang307
Posts: 5
Thank you received: 0
Reply to edb:
Hi Team,
as said by others adjustment procedure should be same as for other earlier oil clutch units.
Note the lanyard attached to the gauge tool--any tools used in this compartment should have a string attached for retrieval in case they are dropped inside the clutch compartment.

As the clutch wears the finger to throw out bearing is clearance is reduced and so needs to be checked periodically--suggest do not wait until the clutch slips as this is when wear takes place--oil clutches usually do not wear fast unless abused or slipped from lack of adjustment.
Hope this helps.
Cheers,
Eddie B.
Interesting. A common brake spoon to gauge with. I was just about to search for flat iron but I will use the brake spoon and check things twice. I did back off the fingers to reset them. They were pressed up against the plate tight. I fear the the worst as for the clutch condition but I'll hope for the best and hope there is no slippage after adjustment.
Please log in or create an account to join the conversation.
Tue, May 14, 2019 12:14 AM
Jamesgang307
Topic Author
Offline
Send a private message to Jamesgang307
Posts: 5
Thank you received: 0
Reply to Jamesgang307:
Interesting. A common brake spoon to gauge with. I was just about to search for flat iron but I will use the brake spoon and check things twice. I did back off the fingers to reset them. They were pressed up against the plate tight. I fear the the worst as for the clutch condition but I'll hope for the best and hope there is no slippage after adjustment.
I did use the brake spoon to check gaps. Put the 120 back together and took it out for a test run. Made a couple light passes on our road and doesn't seem to slip. Even drove back uphill in 4th gear with no clutch slippage. Tomorrow I'll do some heavier work. Thanks for the tips.
Please log in or create an account to join the conversation.
Thu, May 16, 2019 11:41 AM
edb
Offline
Member
Send a private message to edb
Posts: 4,027
Thank you received: 0
Reply to Jamesgang307:
I did use the brake spoon to check gaps. Put the 120 back together and took it out for a test run. Made a couple light passes on our road and doesn't seem to slip. Even drove back uphill in 4th gear with no clutch slippage. Tomorrow I'll do some heavier work. Thanks for the tips.
Hi Jamesgang307,
thank you for getting back to us with welcome news of your apparent success with the clutch adjustment.
We often do not hear back from people after offering help-we always appreciate feed back so we know what helped and what did not in the troubleshooting process and subsequent adjustments etc. so in future we can give definitive help to others in future cases.

Being an oil clutch they can take some abuse with out much harm but there is a limit to the robustness of these units.
Hope the clutch settles in for the long term.
Regards,
Eddie B.
Please log in or create an account to join the conversation.
Thu, May 16, 2019 1:53 PM
Jamesgang307
Topic Author
Offline
Send a private message to Jamesgang307
Posts: 5
Thank you received: 0
Reply to edb:
Hi Jamesgang307,
thank you for getting back to us with welcome news of your apparent success with the clutch adjustment.
We often do not hear back from people after offering help-we always appreciate feed back so we know what helped and what did not in the troubleshooting process and subsequent adjustments etc. so in future we can give definitive help to others in future cases.

Being an oil clutch they can take some abuse with out much harm but there is a limit to the robustness of these units.
Hope the clutch settles in for the long term.
Regards,
Eddie B.
You're welcome and thanks. I hope this subject helps others too.
My blading is on hold for now. Ground is pretty wet.
Attachment
Please log in or create an account to join the conversation.
Sat, May 18, 2019 11:03 PM
Showing 1 to 10 of 10 results
YouTube Video Placeholder

Follow Us on Social Media

Our channel highlights machines from the earliest Holt and Best track-type tractors, equipment from the start of Caterpillar in 1925, up to units built in the mid-1960s.

Upcoming Events

CAFES 2025 TULARE, CALIFORNIA

Chapter Fifteen

| Tulare, California

Wheatlands Warracknabeal Easter Rally

Chapter Nineteen

| 34 Henty Hwy, Warracknabeal

Veerkamp Open House 2025

Chapter Fifteen

| Placerville, CA

Stradsett Park Vintage Rally

Chapter Two

| Stradsett, Nr Downham Market. Norfolk PE33 9HA UK
View Calendar
ACMOC

Antique Caterpillar
Machinery Owners Club

1115 Madison St NE # 1117
Salem, OR 97301

[email protected]

Terms & Privacy
Website developed by AdCo

Testimonials

"I became a member recently because the wealth of knowledge here is priceless." 
-Chris R

Join Today!