

Hi Jorge,
it's not too hard to remove them, with the right tools. Your chambers "probably" have a six-sided interior that takes a tool 1F0479 which is a hex 1 5/16 across the flats (33.5mm as far as I can tell) which you could make with a nut and bolt welded together with that dimension.
Put a 3/4 drive socket on it and a 5 foot long bar on to turn them out (usual right-handed thread). Caterpillar has the new chambers available, part # 8B4440 for $173 ea - I just bought one last week. You'll also need copper seal 4B5647 and o-ring 1A2298 (my parts man replaced that with 7B6868 which does fit easier so I'll need to confirm that it does hold water).
It's possible that the chamber's threads will gall as you remove them. If they're not too damaged, you can fix them with a 12 threads per inch file but if more than 20% of the threads are gone, you should replace the chamber. That's what I did. Make sure you coat the threads with anti-seize when you reinstall them so they come out easy next time. I also coated the o-ring with 3M #4 silicon lube - you can use dish soap too.
[quote="Neil"]Hi Jorge,
it's not too hard to remove them, with the right tools. Your chambers "probably" have a six-sided interior that takes a tool 1F0479 which is a hex 1 5/16 across the flats (33.5mm as far as I can tell) which you could make with a nut and bolt welded together with that dimension.
Put a 3/4 drive socket on it and a 5 foot long bar on to turn them out (usual right-handed thread). Caterpillar has the new chambers available, part # 8B4440 for $173 ea - I just bought one last week. You'll also need copper seal 4B5647 and o-ring 1A2298 (my parts man replaced that with 7B6868 which does fit easier so I'll need to confirm that it does hold water).
It's possible that the chamber's threads will gall as you remove them. If they're not too damaged, you can fix them with a 12 threads per inch file but if more than 20% of the threads are gone, you should replace the chamber. That's what I did. Make sure you coat the threads with anti-seize when you reinstall them so they come out easy next time. I also coated the o-ring with 3M #4 silicon lube - you can use dish soap too.[/quote]
Thanks for the quick reply Neil!
I have removed the injectors and the glow plugs from the chambers but have not noticed the hex interior, they just seem to have 2 holes (a big one in the center for the injector and a small one for the glow plug).
From what I understood, the entire chamber is then screwed to the head?
Tomorrow I'll try to find the hex inside, but if I don't find it can I try to unscrew it with a big pipe wrench (since they protrude about 2cm out of the head) or could it damage the chamber?
My belief is that the part of the head that screws into the chamber is rusty / rotten and is leaking water in, so I might have to take the head to be repaired if it checks out. Thankfully there's a guy specialized in testing / repairing engine heads just down the street from the CAT dealership.
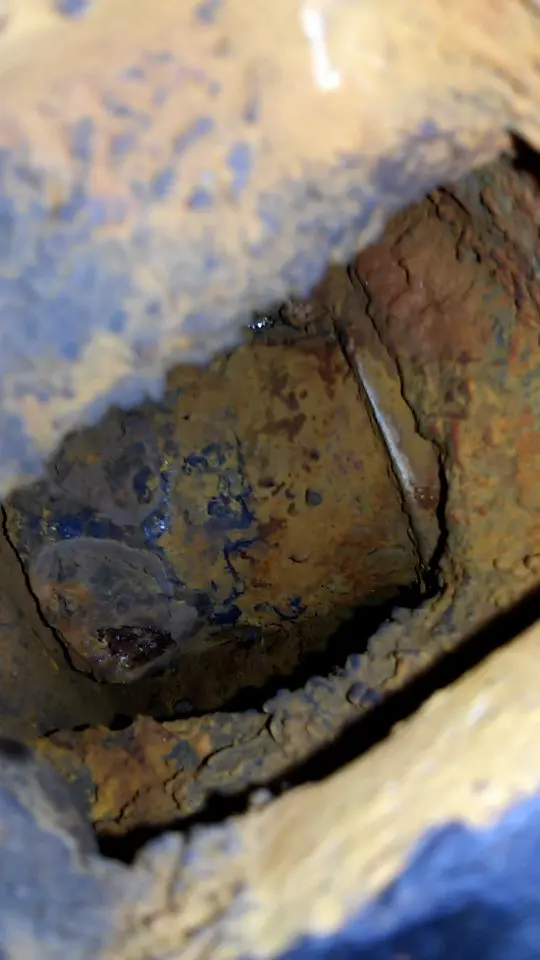
This is what I'm talking about, this is looking from the head water outlet (to the radiator):
[attachment=43913]20668328_894095777407603_860629874_n.jpg[/attachment]
[quote="Neil"]Hi Jorge,
it's not too hard to remove them, with the right tools. Your chambers "probably" have a six-sided interior that takes a tool 1F0479 which is a hex 1 5/16 across the flats (33.5mm as far as I can tell) which you could make with a nut and bolt welded together with that dimension.
Put a 3/4 drive socket on it and a 5 foot long bar on to turn them out (usual right-handed thread). Caterpillar has the new chambers available, part # 8B4440 for $173 ea - I just bought one last week. You'll also need copper seal 4B5647 and o-ring 1A2298 (my parts man replaced that with 7B6868 which does fit easier so I'll need to confirm that it does hold water).
It's possible that the chamber's threads will gall as you remove them. If they're not too damaged, you can fix them with a 12 threads per inch file but if more than 20% of the threads are gone, you should replace the chamber. That's what I did. Make sure you coat the threads with anti-seize when you reinstall them so they come out easy next time. I also coated the o-ring with 3M #4 silicon lube - you can use dish soap too.[/quote]
Thanks for the quick reply Neil!
I have removed the injectors and the glow plugs from the chambers but have not noticed the hex interior, they just seem to have 2 holes (a big one in the center for the injector and a small one for the glow plug).
From what I understood, the entire chamber is then screwed to the head?
Tomorrow I'll try to find the hex inside, but if I don't find it can I try to unscrew it with a big pipe wrench (since they protrude about 2cm out of the head) or could it damage the chamber?
My belief is that the part of the head that screws into the chamber is rusty / rotten and is leaking water in, so I might have to take the head to be repaired if it checks out. Thankfully there's a guy specialized in testing / repairing engine heads just down the street from the CAT dealership.
This is what I'm talking about, this is looking from the head water outlet (to the radiator):
[attachment=43913]20668328_894095777407603_860629874_n.jpg[/attachment]
Not sure a pipe wrench would be a productive plan - I have the tool for my D2 5U non glow plug you can borrow if it interchanges. Bob
if you plan coming to Portugal soon, I'll borrow it 😄 eheh
I just suggested the pipe wrench because I can't find a way to unscrew it. The inside is not hexagonal, but the outside protrudes quite a bit.
By the way, it's counter clockwise, like the injectors, right?
Apologies Jorge, your tractor will have the splined interior as bcwayne correctly stated. You can see a picture of it on eBay at http://www.ebay.com/itm/5F8353-Pre-combustion-Chamber-Wrench-tool-for-Caterpillar-spline-chambers-/182362570125?hash=item2a75a7fd8d:g:HgIAAOSwal5YNFjt You're very unlikely to be able to remove it with a pipe wrench.
The entire chamber screws in with threads at the bottom end adjacent to the cylinder side of the head. The top side, where you removed the injector from, just protrudes through the hole with an o-ring to seal it. Once you have them out, you'll see the seat inside that the chamber screws up against, sealed with a copper washer. That seat needs to be in good shape, so if it's pitted, you might need to have it machined down and use a couple of copper washers so the chamber is correctly located in relation to the head.
[quote="Neil"]Apologies Jorge, your tractor will have the splined interior as bcwayne correctly stated. You can see a picture of it on eBay at http://www.ebay.com/itm/5F8353-Pre-combustion-Chamber-Wrench-tool-for-Caterpillar-spline-chambers-/182362570125?hash=item2a75a7fd8d:g:HgIAAOSwal5YNFjt You're very unlikely to be able to remove it with a pipe wrench.
The entire chamber screws in with threads at the bottom end adjacent to the cylinder side of the head. The top side, where you removed the injector from, just protrudes through the hole with an o-ring to seal it. Once you have them out, you'll see the seat inside that the chamber screws up against, sealed with a copper washer. That seat needs to be in good shape, so if it's pitted, you might need to have it machined down and use a couple of copper washers so the chamber is correctly located in relation to the head.[/quote]
oh, yeah, that makes sense. I've seen those threadings on the inside. Would the CAT dealership have those tools?
I'm pretty sure I could unscrew it with a pipe wrench, since it protrudes about 2cm (1in), I just don't want to damage the chamber.


Our channel highlights machines from the earliest Holt and Best track-type tractors, equipment from the start of Caterpillar in 1925, up to units built in the mid-1960s.
Chapter Twenty Nine
| Hawkesbury Showground, Racecourse Rd, Clarendin, NSW, AustraliaChapter Eighteen
| Geoff Ralph Drive, Taabinga, 4610, Kingaroy, Qld.Chapter Thirty
| 3429 Copper Coast Highway Paskeville, SA 5572
Antique Caterpillar
Machinery Owners Club
1115 Madison St NE # 1117
Salem, OR 97301
Terms & Privacy
Website developed by
AdCo
"I became a member recently because the wealth of knowledge here is priceless."
-Chris R