You have no money and time is free, so try it!
What do you have to lose?👍
One way to find out...please report back results : )
Hi Robyn,
down here a local GM product used very small square section O Rings below the collets, down inside the valve spring cap between the cap and stem but under the collets, to help control stem oil leakage down to the guide/stem area.
On most engines I have run with the valve covers off, I have seen most oil comes from the ends of the rocker arms.
It then runs onto the valve spring cap and down past the collets.
This lends some weight to fitting the small stem seals to helping alleviate some of the stem oil leakage.
Some later Cat engines had an O Ring groove machined into the inner face of the valve spring cap, where it fits to the valve stem, for a small round O ring to fit for this purpose.
If there were enough meat in this area maybe your caps could be machined too.
Just a few thoughts.
The enforced Windows 10 highjack and updates have rendered my steam driven copier useless so I need to save some pension to buy another or I would see if I had something to scan.
Cheers,
Eddie B.
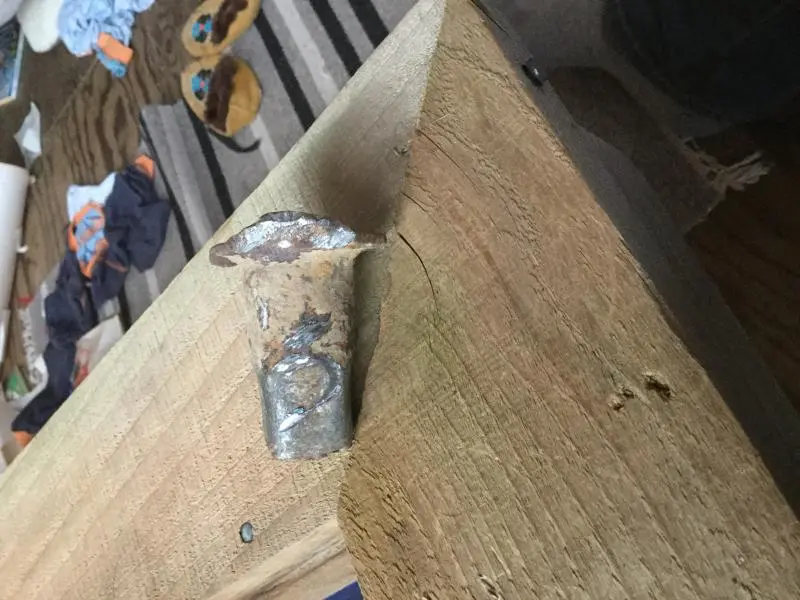
Well, here they are. Not the nicest machining in the world, but I'm hoping it'll do the trick. I took pieces of stainless pipe (it was the closest thing I had to the right diameter) and welded little stainless washers on that I had cut out with a hole saw. Then I got em down to the right size (hopefully!) and now I'm going to hold the leather washers into the cup with a tincey amount of blue gasket compound. I am also going to put a little bit of gasket compound on the top of the valve guide in case these guys expand when they heat up. Once they are in place, I'm going to fill the little lip, between the cup and the leather washer, with oil and let it soak in for a day or two, hoping that the leather will swell and make a tighter fit. Another thing I have done while the valve springs were off, was turn the valves back and forth. I did this with a slow drill on the stem, two at a time, while I had the air compressor hooked up to that particular cylinder. It would turn very easily for about three times back and forth, with a sandy grinding noise. Then all of a sudden it would get very hard to turn and make a metal on metal squealing noise, at which point I would stop right away. My theory is the sandy grinding noise is burnt on ash deposits coming off and then I'm back to valve on seat contact. Do you guys think that might be correct? I am very excited to start her back up and see the results. Robyn
Seems like the long way round for not replacing valve guides and possibly worn valve stems. If the guides are that worn I'd expect the loose fit would knock out those seals in short order. That okie valve seating process doesn't do anything about proper valve seating if valves and seats are pitted/worn. Your just knocking off the crud.


Our channel highlights machines from the earliest Holt and Best track-type tractors, equipment from the start of Caterpillar in 1925, up to units built in the mid-1960s.
Chapter Two
| Highacres Farm, Dewey Lane, Brackenfield, Derbyshire DE55 6DB, UKChapter Nineteen
| 2 Winkleigh Rd, Exeter TAS 7275
Antique Caterpillar
Machinery Owners Club
1115 Madison St NE # 1117
Salem, OR 97301
Terms & Privacy
Website developed by
AdCo
"I became a member recently because the wealth of knowledge here is priceless."
-Chris R